
Here's what we cover:
The Ultimate Guide to being a Lime scooter charger/juicer
How can you get to be a Lime scooter charger/juicer? What does it take, and how much can you make?
Lime scooter charger/juicers service dockless electric scooters that are shared by riders in cities all over the world. We’ve all seen them around, but you might be amazed when you find out just how popular e-scooters have become.
In this post, we’ll take a look at what Lime, the e-scooter company, is all about, and specifically what it’s like working as a Lime charger/juicer.
What is the growth of scooter use?
According to an August 2020 article in Bloomberg CityLab, the National Association of City Transportation Officials (NACTO) reported that scooter ridership increased from 38.5 million in 2018 to 88.5 million in 2019 – a growth rate of 130%.
Scooters have already surpassed bikes when it comes to their share of the micromobility market. This graph, from Appinventiv shows the growth of the e-scooter market. They also state that by the year 2023, this percentage will touch the milestone of 8%. The below display Bird and Lime scooter weekly app installs.
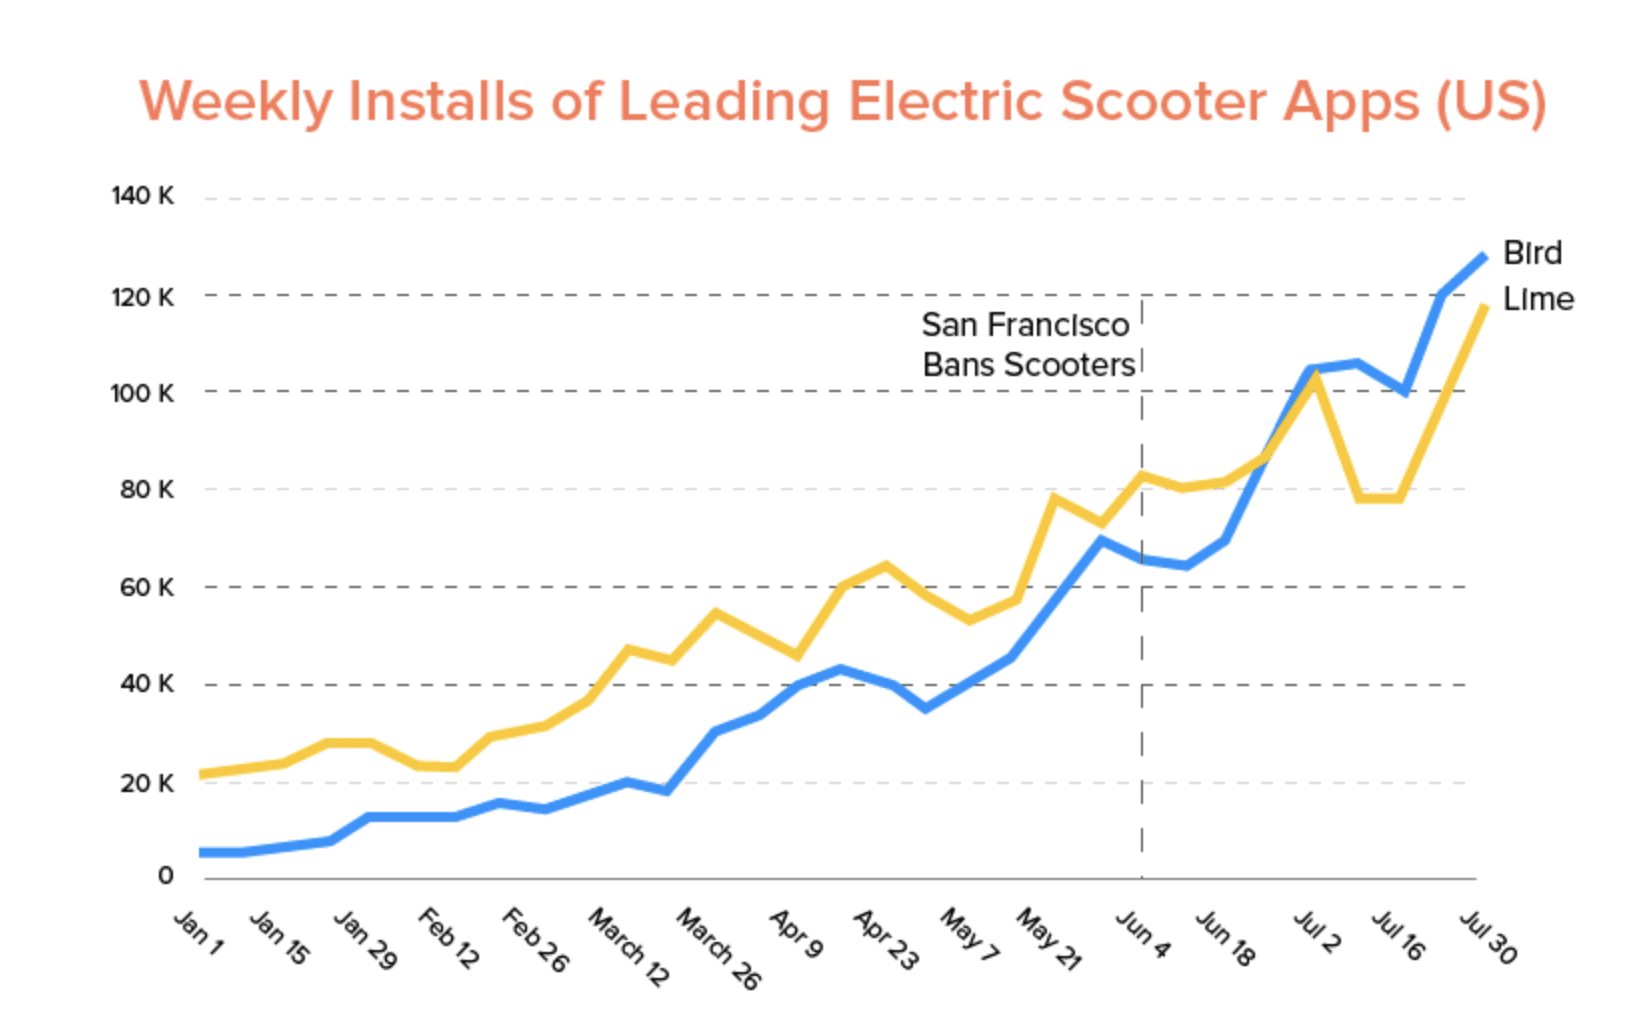
Graph credit: appinventiv.com, November 23, 2023
What is Lime?
Lime is one of the hottest scooter startups transforming the micromobility industry. Just like its competitor, Bird, Lime provides motorized scooters that users can rent via a smartphone app.
The process is simple: When customers want a ride, they access the Lime app, find out the location of the nearest scooter, and electronically unlock the scooter. Then, they’re off … at approximately 15 miles per hour! The scooters cost $1 to unlock and then 15 cents per minute after the initial charge.
Going only 15 miles per hour isn’t much of a problem in most big cities. As traffic comes back to its pre-COVID volumes, more and more cities are opting to give Lime’s eco-friendly, convenient, and socially distanced means of transport a try. Here’s a list of U.S. and international cities where Lime operates.
New York recently ended its ban on e-scooters and is instituting a trial with Lime. Scooters will begin rolling around the Bronx sometime during summer 2021.
Now that you know something about Lime, let’s look at the job of being a juicer.
How does “juicing” work?
Because Lime scooters are electric, they need to be charged regularly – and that’s where you come in. Lime employs contract scooter chargers, whom they call “juicers”, to pick scooters up off the streets and charge them every night after 9:00 p.m.
As a Lime juicer, you will gain access to their Lime juicer map where you can view scooters in real time that are ready to charge, as well as how much Lime will pay you for each charge. Since the scooters are always picked up at night and charged at your home, you can essentially make money while you sleep.
Keep in mind that Lime recruits heavily in cities where it needs contractors to charge scooters. You’ll want to apply as early as possible when Lime comes to your city. That way, you have a stronger chance of getting approved, and you’ll earn more money because there will be less competition.
How to harvest and serve for Lime
There are two steps to charging scooters for Lime: harvesting and serving. “Harvesting” means picking up a scooter from the street that is ready to be charged, juicing it up, and then dropping the scooter off in a designated spot by the time given in the app.
The harvest process looks like this: Find the scooter you’re looking for, scan its QR code, place it in your vehicle, and either take it back to your charging station or continue collecting more scooters.
“Serving” refers to the final step you need to take before completing the charging task. Lime has a list of standards they call “BLT,” which stands for battery, location, and timing. These standards are described as:
- Battery: Scooters must have at least a 95% battery when served in order to receive the full payout.
- Location: In the app, you will be able to see where scooters are, reserve them, and navigate to the locations of scooters in need of some juice.
- Timing: The app specifies the time by which each scooter needs to be served. Again, you’ll find out from the app by what time each scooter you’ve picked up needs to be dropped off.
Once all the scooters you’ve picked up at night are dropped off (the next morning) at their specified location, Lime will credit your account for your juicing job.
How much do Lime juicers make?
When you check the app for scooters that need to be harvested, you’ll be able to see how much each scooter will earn you. Lime juicers report an average of about $8 per scooter, with $5 to $12 per scooter as a reasonable range.
You can probably expect to make around $20 to $30 per hour. For comparison, check out our insights into rideshare driver earnings as well as average earnings for food delivery drivers. You’ll see that the hourly rate for juicing compares favorably.
The only drawback is, your hours as a juicer are limited. You need to do your work at the end of the day and in the morning. You can still pull in a nice chunk of change, though, and your effort will be minimal if you develop a plan and stick to it.
Here’s an inside tip from masters of the juicing game: To make the most money for the least amount of effort, collect multiple scooters that are relatively close together, rather than going out of your way for more profitable scooters that might be harder to retrieve.
Try Gridwise as the perfect gigwork companion:
What are the requirements to be a Lime charger?
Lime has a few requirements that are pretty cut and dried, and make sense for the job. You must:
- Be 18 years old
- Have a vehicle (preferably on the large side)
- Have a valid driver’s license
- Have a helmet for scooter driving
- Have a smartphone to use the app
You can usually be approved to juice for Lime rather quickly. There’s no background check, so you won’t have to wait for that to come through before you can get to work.
How to sign up for Lime
If you meet Lime’s requirements, you can sign up to be a juicer online. Depending on the competition in your city amongst other chargers, you might have to wait for a while for a response back.
Then, you’ll be asked to complete a “How to Juice” course and sign a W-9 form and a standard agreement. Once your application is approved and you’ve completed those tasks, you will receive instructions on how to purchase your chargers. Then, you can order up to four of the chargers (listed at $19 each) from Lime’s online store. Once you receive your chargers, you’re all set to begin juicing.
Note: you can also start out by simply harvesting scooters for juicing. While this won’t pay as much, it’s a good way to get started, see if you like the gig, and then make the investment in chargers if you’re interested in continuing.
How do I contact Lime support?
Lime provides a Help Center for juicers as well as the ability to submit a request via the website. In the Help Center, you can view the pay portal, see your payout summary, and learn more information about harvesting, serving, retrieving, and more.
10 Tips for Maximizing Your Earnings as a Lime Juicer
- Plan efficient routes: Map out a strategic path to collect multiple scooters in close proximity, minimizing travel time and fuel costs.
- Use the Reserve feature: Take advantage of Lime's Reserve feature to claim scooters in advance, reducing competition and wasted trips.
- Invest in quality charging equipment: Purchase reliable chargers to ensure faster and more efficient charging cycles.
- Optimize your charging schedule: Charge scooters overnight to make the most of your time and electricity usage.
- Focus on high-density areas: Target locations with a higher concentration of scooters to maximize your collection efficiency.
- Stay informed about local events: Be aware of concerts, festivals, or other gatherings that might lead to increased scooter usage and potential charging opportunities.
- Maintain a good relationship with Lime: Follow their guidelines closely to avoid penalties and maintain your juicer status.
- Track your expenses: Keep detailed records of your mileage, equipment costs, and other expenses for tax purposes.
- Collaborate with other juicers: Share information and tips with fellow juicers to improve your overall strategy.
- Diversify your gig work: Consider combining Lime juicing with other gig economy jobs like rideshare or food delivery to maximize your overall earnings.
Understanding Local Regulations: A Must for Lime Juicers
When becoming a Lime juicer, it's crucial to be aware of local laws and regulations regarding e-scooters, as these can vary significantly by city and affect how and where scooters can be deployed. Some cities may have specific requirements for where scooters can be parked, operational hours, and safety standards. For instance, certain jurisdictions might restrict scooter usage in specific areas or during particular times of the day. Others may impose stringent safety regulations that juicers must adhere to when charging and deploying scooters. Staying informed about these local regulations ensures compliance and helps avoid potential fines or penalties. Additionally, understanding these rules can optimize your juicing strategy by aligning it with local guidelines, thereby enhancing efficiency and profitability. Always check with local transportation authorities or Lime's guidelines for the most up-to-date information on e-scooter regulations in your area.
Lime vs. Bird
Why would you choose to juice for Lime rather than Bird? Let’s go through a few quick facts, and you’ll see.
Both Lime and Bird have similar payment models, in which they pay you a base rate of $3 to $5 for charging and dropping off each scooter.
But, pay per scooter varies based on when the scooter becomes available for a charge and how long it's been since its last charge. Bird has a range of $3 to $20 per scooter, whereas Lime usually starts out with a base rate of $5 to $12 per scooter.
An upside of charging for Bird is that you’ll be paid at a reduced rate if you release a scooter that isn’t at 100% charge. Lime withholds payment for not meeting charge standards, and may even revoke your juicer status at times. That’s because Lime wants to give the best possible service to its customers by making sure its scooters are charged at at least 95%.
When choosing whether to charge for Lime or Bird, it really comes down to convenience for you and figuring out which hubs you’re closest to. If Lime hubs or Bird hubs are inconvenient spots for you, you’ll make less money if you have to travel too far to get the job done. Depending on the popularity of either company in your city, this is a huge consideration to factor in.
Hoarding
In some cases, juicers can get cutthroat about grabbing up scooters. Lime is bringing order to the chaos by introducing a Reserve feature. This allows juicers to reserve, and lay claim to, a scooter before picking it up at the end of the day for charging.
Now, harvesting for Lime is not a first-come, first-served situation. In the past, harvesting could only be done once the juicer arrived at the scooter’s location and unlocked it with the Lime app.
There have been some scary situations that involved people hoarding scooters in an attempt to defraud the companies, with criminals using scooters to lure juicers into unsafe areas. Since this job takes you to strange places mostly at night, there are serious safety concerns to consider before working as a juicer, and it’s important that you stay vigilant and take common-sense precautions.
Make Lime juicing your next side gig
If you want an easy after-hours gig to add to your rideshare or delivery income, juicing for Lime could be just the ticket. Like all gig driving work, there are some risks to deal with, but for the most part, the benefits outweigh the risks.
And, just like rideshare and delivery, having a strategy is crucial. Once you get the hang of things, figure out where the best scooter hubs are, and lay out your money-making plan from there.
One last consideration about being a juicer: You’ll need a vehicle that’s large enough to hold the scooters. You’ll also need to take measures to protect the inside of the car from upholstery tears and scuff marks, or other damage caused by the scooters.
When you’re ready to roll, all you need to do is start juicing for Lime.
Do you have any tips and tricks for being a Lime juicer? Leave your comment to tell us how to make this gig even sweeter.
More resources you might enjoy
Share article:
Related posts

Uber Driver Sign-Up Bonus (2026): How the Guaranteed Earnings Offer Works
Uber's sign-up bonus for new drivers works differently than most people expect. Instead of a flat cash payout, you get a Guaranteed Earnings offer that promises a minimum income during your first 30 days. Here is exactly how it works, what it is worth, and how to make the most of your first month on the road.
Quick Answer: What Is the Uber Driver Sign-Up Bonus?
Uber does not offer a traditional flat-rate cash bonus for new drivers. Instead, Uber uses a Guaranteed Earnings model. When you sign up to drive, Uber guarantees you'll earn a specific dollar amount within your first 30 days, as long as you complete a set number of rides.
Typical Uber sign-up guarantees range from $500 to $1,650, with ride requirements between 50 and 200 trips in your first 30 days. The exact amount depends on your city, current driver demand, and the time of year you sign up.
This is an important distinction. You're not getting a bonus check on top of your regular earnings. You're getting a safety net, a promise that you'll earn at least a certain amount during your first month. If your normal fares already exceed the guarantee, you won't receive anything extra. If you fall short, Uber pays the difference.
How Uber's Guaranteed Earnings Bonus Works
- Sign up through the Uber Driver app: During the application process, you'll see a guaranteed earnings offer specific to your market.
- Note the terms: The offer will state a dollar amount and a ride count (e.g., "Earn at least $1,000 in your first 200 rides within 30 days").
- Complete your rides: Drive and complete the required number of trips before the 30-day deadline.
- Receive the guarantee: After completing the ride requirement, Uber calculates whether your total earnings met the guarantee. If they didn't, Uber pays you the difference.
Earnings Guarantee vs. Traditional Bonus: Key Difference
A traditional sign-up bonus works like this: Complete X rides, and you receive a flat cash bonus on top of whatever you earned.
Uber's Guaranteed Earnings model works differently: Complete X rides, and Uber guarantees you'll earn at least $Y total. If you already earned $Y or more through your normal fares, tips, and promotions, you get nothing extra. The guarantee only kicks in if you fall short.
Think of it less like a "bonus" and more like an "earnings floor." It protects you from a slow start, but it doesn't reward you for exceeding expectations.
Real Math Examples
Assume Uber offers you a $1,000 guarantee for completing 50 rides in 30 days.
Scenario 1: You earn more than the guarantee
- You complete 50 rides and earn $1,200 in total
- Uber pays you nothing extra. You keep your $1,200
Scenario 2: You earn less than the guarantee
- You complete 50 rides and earn $800 in total
- Uber pays you the $200 difference
- Your total earnings: $1,000 ($800 from driving + $200 guarantee top-up)
Current Uber Sign-Up Bonus Amounts (2026)
- New York City: $800–$1,650 for 100–200 rides
- Los Angeles: $500–$1,200 for 50–150 rides
- Chicago: $600–$1,000 for 75–150 rides
- Dallas: $500–$900 for 50–100 rides
- Miami: $600–$1,100 for 75–150 rides
These are approximate ranges based on recent driver reports. The only way to see your exact guarantee is to start the sign-up process.
Why Amounts Vary by City
- Driver supply and demand: Cities with a driver shortage offer higher guarantees to attract new drivers.
- Seasonal patterns: Sign-up offers tend to increase during busy seasons when Uber needs more drivers.
- Competition from other platforms: If Lyft or DoorDash is running aggressive sign-up campaigns, Uber may raise its offers.
- Local market economics: Cost of living, average ride fares, and trip distances all influence what Uber can profitably guarantee.
How to Claim the Uber Sign-Up Bonus (Step by Step)
Step 1: Download the Uber Driver app. Available for iOS and Android.
Step 2: Create your account and note the guarantee offer. Screenshot it immediately. This is your proof of the terms.
Step 3: Complete the background check and vehicle inspection. Uber runs a background check through Checkr, typically taking 3–10 business days. For a full breakdown, see our guide on Uber driver requirements.
Step 4: Get approved and start driving. Your 30-day countdown begins on the date of your first completed trip, not when you created your account.
Step 5: Complete the required number of rides before the deadline. Every completed trip counts, regardless of distance or fare amount.
Step 6: Receive your payout. If you earned less than the guarantee, the difference is automatically credited to your account within a few days.
Can You Use a Referral Code Too?
The safest approach: before entering any referral code, note the default guarantee offer. Then compare it to what the referral code promises. Go with whichever gives you the better deal, and always screenshot both offers.
Other Uber Driver Promotions: Quests, Streaks, Boost, and Surge
Once your sign-up guarantee ends, Uber driver promotions shift to offers tied to trips: Quests, streak bonuses, Boost, and surge. Which ones you see depends on your market, your account, and the week. Some drivers get several Quest options at once. Others get none.
In the video, a driver who has chased these bonuses himself walks through each promotion type and the math he runs before he lets one change his schedule. The sections below lay out that math so you can run it on your own offers.
Uber Quest
A Quest pays a lump sum after you complete a set number of trips inside a time window. A typical offer is $20 for 50 trips, with another $15 for 20 more. Quests help during your first 30 days because the same trips count toward your sign-up guarantee. Screenshots of big Quests online, like $555 for 100 trips, show one driver's offer in one market. Don't plan around them.
You're not driving alone. Thousands of drivers use Gridwise to track earnings and find the best times to drive. Download for free →
Streak Bonus (Consecutive Trips)
A streak bonus pays a flat amount for completing several trips in a row, such as $6 to $18 for 3 consecutive trips. Declining a request can break the streak, so it can push you to take a trip you'd normally skip.
Boost
Boost raises your base earnings on eligible trips in a set zone or time window. A 1.5x Boost turns a $10 base fare into $15. A Boost in a slow zone can still pay less than a normal busy period, so check how busy the area is before you drive there for it.
Surge Pricing
Surge raises fares in real time when rider demand is higher than the number of drivers nearby. Common surge times are Friday and Saturday nights, holidays, big events, bad weather, and airport rush hours. Surge pays best when it raises the value of a trip you already wanted. Driving across town toward a surge on the map often doesn't pay off, because the surge can end before you get there.
Uber Pro Rewards
Uber's tiered loyalty program. As you complete trips and maintain high ratings, you unlock benefits including gas discounts, free online courses, priority airport pickups, and trip visibility.
How Much Uber Driver Bonuses Add to Your Pay
Gridwise's 2026 Annual Gig Mobility Report, based on real earnings from 500k+ drivers, puts rideshare bonuses at an average of 7.2% of pay per trip. At $23.88 in gross hourly earnings, that's about $1.72 an hour from bonuses.
Rideshare bonus pay averaged $317.65 per driver in Q4 2025, up from $238.97 in Q4 2024. That's about a 33% increase year over year. Over the same period, non-trip incentives such as sign-up and referral payments fell from $83.56 to $65.88 per quarter.
More incentive money now depends on completing trips. So the terms of each promotion matter more than the headline payout. To judge an offer, look at the trips it requires and whether you'd drive them anyway.
How to Tell If an Uber Quest Is Worth It
Divide the bonus by the number of trips it requires. That's the bonus value per trip.
$20 for 50 trips pays 40 cents per trip. Add the second tier, $15 for 20 more trips, and the full $35 over 70 trips works out to 50 cents per trip. An offer of $45 for 30 trips pays $1.50 per trip. That's three times what the 70-trip Quest pays per trip, and 30 trips is more likely to fit a normal weekend.
Next, count how many of those trips you'd complete without the Quest. If you usually finish 40 profitable trips and the Quest requires 50, the bonus has to cover the time, miles, and lost earnings of the last 10. Those trips often come near the deadline, when requests slow down and finishing means a long pickup or a low-fare trip. Take enough trips below your normal standard and you can earn the bonus while lowering your hourly rate.
Pick the Lowest or Middle Quest Tier
The top tier isn't automatically the best. A smaller Quest you finish during normal driving can be worth more than a big one that changes several decisions. Pick the tier you'd hit on your usual schedule. That way the bonus is extra money when you hit it, and you haven't taken worse trips when you don't.
If you don't complete a large share of a Quest on the first day, the top tier gets hard to reach. Some targets take a full day up to Uber's 12-hour driving limit.
The same rule covers streaks and Boost. A streak is worth protecting when the trips in it meet your normal standards. If keeping it alive means one bad trip that costs more than the streak pays, let it go.
5 Questions to Ask Before You Chase Any Uber Promotion
- What is the bonus worth per required trip?
- How many of those trips would I complete without the bonus?
- Will it require me to drive outside my normal profitable hours or areas?
- Could it push me to accept trips I'd normally decline?
- After the extra hours and miles, does it raise my earnings per hour and per mile?
If the numbers work, take the bonus. If they don't, skip it.
After the shift, check what happened. Link your Uber account in Gridwise and your earnings sync in automatically, and Gridwise tracks your miles too. Put a Quest weekend next to a normal weekend and compare your effective hourly and earnings per mile. That shows whether the bonus raised your pay or kept you on the road longer.
Uber Sign-Up Bonus vs. Lyft and DoorDash
- Uber: Guaranteed Earnings (earnings floor). Typical range $500–$1,650 for 50–200 rides in 30 days.
- Lyft: Varies by market. Some use a guarantee model, others offer a flat bonus. Typical range $200–$1,000.
- DoorDash: Guaranteed Earnings. Typical range $200–$900 for a set number of deliveries.
The smartest play for most new gig drivers is to sign up for all three platforms and stack the incentives simultaneously. Gridwise tracks all your gig earnings in one dashboard, Uber, Lyft, DoorDash, and more.
Tips to Maximize Your Uber Sign-Up Bonus
- Drive during peak hours: Friday and Saturday nights (8 PM–2 AM), weekday morning commute (6–9 AM), weekday evening commute (4–7 PM), Sunday mornings, major local events.
- Use Gridwise's When to Drive and Where to Drive: See which hours are busiest and where demand is in your city, so you spend your 30 days in the busiest windows.
- Keep your ride count moving without taking every request: Every completed ride counts toward the guarantee, so volume matters. Driving during busy hours brings more good requests, so you can still skip long pickups that eat your time.
- Track your ride count daily: Know your daily target and check your progress every evening.
- Combine Uber rides with Uber Eats deliveries: Check whether Eats deliveries count toward your sign-up guarantee. In most markets, they do.
- Drive in high-density areas: Near airports, downtown cores, university campuses, shopping districts, and entertainment venues.
Uber Driver Requirements (Quick Overview)
- Age: At least 21 years old (25 in some markets for certain vehicle types)
- Driver's license: Valid U.S. driver's license with at least one year of licensed driving experience
- Vehicle: A qualifying four-door vehicle meeting Uber's year and model requirements, typically no older than 15 years
- Insurance: Valid auto insurance with your name on the policy
- Background check: Clean background check through Checkr
What to Do If Your Bonus Doesn't Pay Out
Step 1: Verify your eligibility. Confirm your trip count, check the deadline, verify whether your earnings already exceeded the guarantee, and check for any account issues.
Step 2: Contact Uber support through the app. Go to Help > Account and Payment > Incentives and Promotions. Include screenshots of the original offer.
Step 3: Visit a Greenlight Hub. Uber's physical support locations where you can speak with a representative face to face.
The single best protection: screenshot the guarantee offer the moment you see it during sign-up.
FAQ
How much is the Uber sign-up bonus right now?
Typically $500 to $1,650, depending on your city and current driver demand. The only way to see your exact offer is to start the sign-up process in the Uber Driver app. Amounts change frequently.
Is an Uber Quest worth it?
It depends on the value per trip and how many of the trips you'd drive anyway. Divide the bonus by the required trips. $20 for 50 trips is 40 cents a trip. $45 for 30 trips is $1.50 a trip. A Quest is worth it when you can finish it without taking trips you'd normally decline.
How much do bonuses add to Uber driver pay?
Rideshare bonuses average 7.2% of pay per trip, according to Gridwise's 2026 Annual Gig Mobility Report. At $23.88 gross per hour, that's about $1.72 an hour.
Is the Uber sign-up bonus real?
Yes, but it's not a traditional bonus. It's a guaranteed earnings floor. If your total earnings fall below the guaranteed amount after completing the required rides, Uber pays the difference. If you earn more on your own, you won't receive additional money.
How long do I have to complete the required rides?
Most guarantees give you 30 days from your first completed trip. The countdown starts when you complete your first ride, not when you create your account.
Do Uber sign-up bonuses count as taxable income?
Yes. Any guarantee top-up payment is considered taxable income and will be included in your 1099 form. Consider setting aside 20–30% of your gig income for taxes throughout the year.
Make Your First 30 Days Count
The Uber driver sign-up guarantee is a safety net, not a windfall. The drivers who do best in their first 30 days treat it like a business from day one: driving at peak times, tracking their numbers, and using tools like Gridwise to make data-driven decisions about when and where to drive.
Keep Reading
- How Much Do Uber Drivers Make in 2026?
- How to Make $1,000 a Week With Uber in 2026
- UberX vs Uber Comfort vs Uber Black: Earnings, Requirements, and Which Tier Is Worth It
Ready to start driving? Download Gridwise for free to track your earnings, mileage, and ride count across every gig platform, and make sure your first 30 days are as profitable as possible.

Uber vs Lyft Driver Pay: Real Earnings in 2026
Two drivers can work the same roads on the same Saturday night, one on Uber and one on Lyft, and go home with paychecks that look nothing alike. Ask which app pays more in any driver forum and you will get a hundred confident answers, most of them based on one good night or one bad week.
Drivers ask whether Uber or Lyft pays more expecting a big number. Nationally, the difference per active hour is $1.43. On a four hour shift that works out to about $5.70.
The weekly numbers look nothing like that. Uber drivers average $522 a week. Lyft drivers average $325. That is a $197 difference, and a $1.43 hourly rate cannot produce it.
The reason for that difference is also the reason the answer changes from city to city.
In this post:
- What Uber and Lyft pay per active hour
- Where the weekly difference comes from
- Why the answer changes depending on your market
- How ride type controls affect which trips you see
- How tips, bonuses, and per mile pay compare
- How to test both apps on your own numbers
An active Uber Black and XL driver working Jacksonville, with driving history in Miami and Atlanta, walks through his own receipts against the Gridwise platform data.
Uber vs Lyft Driver Pay Is Nearly Identical Per Active Hour
Gridwise earnings data from a network of more than 500,000 drivers and couriers puts Lyft at $22.45 gross per active work hour and Uber at $23.88 in 2026. Active time means the clock is running on a trip. Passenger in the car, or on the way to pick one up.
Measured that way, both platforms pay in the same range. If Uber and Lyft each hand you a 30 minute ride, the two receipts will look similar. That is why a single screenshot proves almost nothing about which app pays better.
The word doing the work in that number is active. It excludes everything that happens between trips. Whether the next request came in 30 seconds after drop off or 45 minutes later, the active hour rate reads the same.
Active hour pay measures the trips you got. It says nothing about how many you got.
Where Uber or Lyft Pays More Comes Down to Trip Volume
The weekly averages fill in what the hourly rate leaves out. Lyft drivers log 14.7 active work hours a week. Uber drivers log 21.2.
Uber drivers get 6.5 more hours of paid trip time a week, likely from a similar number of hours online. At roughly $23 an hour, those extra hours account for about $150 of the $197 weekly difference. The hourly rate itself explains far less of it.
So the weekly difference is mostly about how many trips you get. More requests mean less time parked waiting for one, and waiting time is unpaid on both apps.
Rider pricing is part of why the volume differs. The average Uber trip costs a rider $24.32. On Lyft it is $21.02, about 14% cheaper. Cheaper fares do not automatically produce more ride requests, though. Some riders compare both apps and pick the lower price. Plenty of others open Uber because Uber is the app they have.
What is each app paying you? Link both your Uber and Lyft accounts in Gridwise and it syncs the earnings from each while tracking your miles automatically, so you can compare both apps over a full week instead of one shift. Track it free
Whether Uber or Lyft Pays More Depends on Your Market
National averages describe the country. They do not describe your city, and the difference between the two can be larger than $1.43 an hour.
In Jacksonville, one driver running both apps gets more requests through Uber. Lyft sends offers, but a large share of them are Extra Comfort fares that do not clear his cost of operating a premium vehicle. The Black and XL trips that do clear it come through Uber, and Uber reservations show up in his feed throughout the day while Lyft reservations are uncommon.
In Atlanta and Miami, the same driver saw the reverse. Lyft was busier. It paid comparably to Uber and sometimes better, because more riders in those markets were opening Lyft first. More Lyft riders mean more Lyft requests, more surge windows, and a better chance that a good trip appears when he needs one.
Neither app performs the same way in every city, and the stronger one in your market this year may not be next year. If you are weighing Lyft specifically, our breakdown of how much Lyft drivers make in 2026 goes deeper on the Lyft side of these numbers.
Ride Type Controls Decide Which Trips You See
Which trips reach you depends partly on a setting most pay comparisons ignore.
In Jacksonville, Lyft offers three ride type choices for a premium vehicle: all ride types, Black only, or premium only. Premium only groups Lyft XL, Extra Comfort, and Black together. A driver who wants XL requests sees Extra Comfort offers in the same feed and declines the ones that do not pay enough.
Uber in the same market splits those controls apart. Black and XL can be switched on while Uber X and Comfort stay off.
In a standard sedan, that difference barely registers. It matters in a premium vehicle, where fuel, tires, and maintenance cost more per mile. Declining offers is free, but it costs time, and time spent sorting offers is time not spent on a paid trip.
These controls are also market dependent. In Atlanta, the same driver had more individual control over ride types on Lyft than he does in Jacksonville. Uber's controls vary by city too. Your market also decides how precisely you can filter for the work you want.
Tips Favor Uber and Per Mile Pay Favors Lyft
Across the rest of the numbers, neither app sweeps.
Tips run higher on Uber: about $2.97 per work hour against $2.12 on Lyft, roughly 40% more. On premium rides specifically, tipping behavior is similar on either app. What differs is how many premium rides you get offered, which loops back to demand in your market.
Bonuses are structured differently on each app. Lyft leans on percentage based bonuses that stay available for a set window. Uber uses fixed dollar surge that moves faster with demand, which means it can appear and disappear before you reach it. A longer window on a small percentage may add less to a fare than a short lived fixed dollar surge on a short trip. Neither structure wins every time, and a promotion on the map pays nothing until a request comes through.
Per work mile, Lyft edges ahead at $1.01 against Uber's $0.94. On longer trips that adds up. It also does not help if the requests are too thin to fill the shift, which is how Uber ends up paying more per week despite the lower per mile rate.
Pick Your Primary App on Your Own Numbers
There is no national winner. What matters is how much work each app can send you where you drive.
The way to find out is to run several comparable shifts on each app and track six things: total online time, active time, gross earnings, work miles, tips and bonuses, and time spent waiting between requests. Waiting time is the one most drivers skip, and in most markets it is where the weekly difference shows up. Tracking all six by hand across two apps is where most drivers give up, which is the part Gridwise automates. Link both platforms in Gridwise and your earnings sync from each while it logs the miles automatically, so you get active hours, gross pay, and per mile pay broken out by app across a full week. That is what tells you which of the two is actually paying you better in your market right now.
Once you know, run the stronger app as your primary and keep the other one on as a backup for slow stretches. Then test again when demand shifts.
Keep Reading
- UberX vs Uber Comfort vs Uber Black: Earnings, Requirements, and Which Tier Is Worth It
- How Much Do Uber Drivers Make in 2026? (Data from 500k+ Drivers)
- How Much Do Lyft Drivers Make in 2026? (Real Data from 500k+ Drivers)
See which app is paying you more this week. Download Gridwise free and track your earnings, miles, and waiting time across Uber and Lyft in one place.

How Much Do Uber Eats Drivers Make in 2026? (Data from 500k+ Drivers)
How much do Uber Eats drivers make? Forums and recycled blog posts say "$10 to $25 an hour." This guide uses actual 2025 earnings from 101,709 Uber Eats drivers tracked through Gridwise, part of a network of more than 500,000 gig workers, plus the platform-by-platform numbers from our Annual Gig Mobility Report.
The median Uber Eats driver makes $14.07 per hour in total trip pay, including tips. Tips are $6.26 of that. On averages instead of medians, Uber Eats drivers grossed $18.06 per hour in 2025, up from $17.87 in 2024.
Uber Eats also has a low barrier to entry. You can deliver with a car, bike, or scooter, and on foot in some markets. Uber rideshare requires a qualifying vehicle.
This guide covers hourly pay, per-delivery earnings, tip income, the best times to deliver, and how Uber Eats compares to DoorDash, Grubhub, and Uber rideshare.
Quick answer: how much do Uber Eats drivers make per hour?
Uber Eats drivers earn a median of $14.07 per hour in total trip pay, based on 2025 data from 101,709 drivers tracked through Gridwise. Median means half of drivers earn more than $14.07 and half earn less. Add promotions and bonuses and the median gross pay is $15.03 per hour.
The top 25% of drivers earn $17.02 or more per hour. The top 10% earn $20.83 or more. All of these numbers are before gas, insurance, and vehicle costs.
Per delivery, the median driver earns $8.16 and completes 1.70 deliveries per hour. DoorDash drivers complete 1.51 per hour. More deliveries per hour is one reason Uber Eats drivers earn more per hour than DoorDash drivers.
Tips are a large part of Uber Eats pay. The median tip is $3.73 per delivery, which is 46% of the $8.16 median per-delivery total. Details below.
Uber Eats earnings breakdown
Here are the 2025 Gridwise numbers.
Hourly earnings
Total trip pay per work hour (base fare, surge, and tips combined):
- Median driver: $14.07/hr
- Top 25%: $17.02/hr
- Top 10%: $20.83/hr
Gross pay per work hour adds promotions and quest bonuses. The median is $15.03 per hour. That extra $0.96 per hour is $29 more over a 30-hour week, and it comes from drivers who hit quest targets and consecutive-delivery bonuses.
Per-delivery earnings
The median Uber Eats delivery pays $8.16 in total trip pay. The top 10% of drivers average $12.00 per delivery.
The range between a median delivery and a top-10% delivery is under $4. Rideshare trips vary far more: a single trip can pay $4 or $30. Uber Eats pay per delivery is more consistent, so you rarely get a big payout and you rarely get stuck with a very low one.
Deliveries per hour
Uber Eats drivers complete a median of 1.70 deliveries per hour. DoorDash drivers complete 1.51. That is 13% more deliveries per hour on Uber Eats, and more deliveries per hour means more pay per hour. The top 10% of Uber Eats drivers complete 2.28 deliveries per hour.
Want to know exactly what you make per hour, per delivery, and in tips? Download Gridwise free and track your real Uber Eats earnings automatically.
How Uber Eats pay works
Delivery pay has several parts, and it works differently from rideshare pay. Knowing the parts helps you decide which orders to take and when to log on.
Base pay
Every delivery includes a base pay amount. Uber sets it using estimated time, distance to the restaurant and then to the customer, and how desirable the order is. Uber does not publish the formula. Rideshare fares are mostly distance and time.
Base pay for a typical delivery is $2 to $8 before tips, depending on distance and complexity. Stacked orders (two restaurants or two customers on one trip) pay more per batch but less per individual delivery.
Trip supplement
Uber adds a trip supplement when nearby drivers are not accepting an order. If an order has been declined several times or involves a long drive, Uber raises the payout. If you decline a low offer, the same order may come back later at a higher price.
Surge and boost zones
During high-demand periods, Uber turns on surge pricing or boost zones for deliveries. Surge adds a multiplier or flat bonus to base pay. Boost zones are scheduled promotions shown in the app, for example "1.3x pay downtown between 6pm and 9pm." They are announced in advance, so you can plan shifts around them.
Promotions and quest bonuses
Uber offers these bonus incentives to delivery drivers:
- Quests: complete a set number of deliveries in a window (for example, 30 deliveries Friday through Sunday) for a flat bonus
- Consecutive delivery bonuses: extra pay for completing a streak of deliveries without declining
- Boost zones: scheduled multipliers in specific areas and time windows
- Sign-up and referral bonuses for new drivers
These promotions are the difference between total trip pay ($14.07/hr median) and gross pay ($15.03/hr median) in our data.
Uber's service fee
Uber takes a service fee on every delivery. It varies by market and order type, typically 15% to 30% of the delivery fee before tips. Uber does not take a cut of tips. 100% of customer tips go to you. Every earnings figure in this article is what drivers receive after Uber's fee.
How much do Uber Eats drivers make in tips?
Tips are a bigger share of pay on Uber Eats than on rideshare or most other gig platforms.
Tip earnings per delivery
- Median driver: $3.73 per delivery
- Top 10%: $6.20 per delivery
Tip earnings per hour
- Median driver: $6.26/hr
- Top 10%: $11.09/hr
The median Uber Eats driver earns $6.26 per hour in tips. The median Uber rideshare driver earns $2.08 per hour in tips. The top 10% of Uber Eats drivers earn over $11 per hour in tips.
Why tips are so high on Uber Eats
The median tip of $3.73 is 46% of the $8.16 median per-delivery pay. On Uber rideshare, tips are 6% to 7% of trip pay. Four reasons for the difference:
Customers tip at checkout, before the food arrives, and the app suggests preset amounts. Restaurant delivery has a long-standing tipping norm that rideshare never fully picked up. Order totals are often higher than a short rideshare fare, so percentage-based tip suggestions are higher too. And the customer usually sees you at their door, which keeps the tip personal.
How to maximize your Uber Eats tips
Tips are nearly half of per-delivery pay, so small changes add up. Deliver during dinner and weekend windows, when order values and tips are both higher. Skip low upfront offers from far-away pickups; the tip is usually included in the offer, so a low offer means a low tip. Keep food upright and sealed, follow the customer's drop-off notes, and send a short message when you pick up and when you arrive. Customers can change tips after delivery, and drivers who communicate are the ones who see tips go up.
Best times to deliver Uber Eats (earnings by day and time)
Gridwise tracks delivery earnings across all major platforms by day of week and time block. Here is what average gross earnings per hour look like for delivery drivers.
Dinner rush dominates (6pm to 8pm)
The highest-earning window is 6pm to 8pm. That holds every day of the week and is strongest on weekends.
Sunday 6pm to 8pm is the single best block at $18.28 per hour on average, 29% higher than the lowest weekday blocks. If you can only deliver during one window, make it Sunday evening.
Afternoon rush (3pm to 5pm)
3pm to 5pm is the second-best block on most days. Early dinner orders and snack deliveries pick up, and fewer drivers are online than at 6pm, so wait times between offers are shorter.
Late night pays well (12am to 5am)
Late-night and early-morning hours pay above average. The 3am to 5am window averages $16 to $17 per hour on most days, and midnight to 2am beats midday hours.
Fewer drivers are online late, so base pay runs higher, and late-night customers tip well. Most drivers skip this window.
Avoid midweek midday
The lowest-earning times are Tuesday through Thursday from 9am to 2pm, at $14 to $14.50 per hour.
The best block pays over $4 per hour more than the worst. Over a 20-hour week, that is $365 versus $285: $80 more per week, or more than $4,000 a year, from picking the right shifts. For more on timing, see the best times to drive for Uber Eats.
Want to find the highest-paying hours in your own market? Download Gridwise free and see the best times to deliver based on real earnings data.
How to earn more on Uber Eats
The median Uber Eats driver earns $14.07 per hour. The top 10% earn $20.83. That is a $6.76 per hour difference, and it comes down to which orders you take, where you wait, and when you work.
The video below profiles how a handful of experienced Uber Eats drivers approach the job, from which orders they skip to when they log on.
The sections below walk through each of those habits, starting with how top earners decide which orders to take.
Benchmark against the best
If you are at the median ($14.07 per hour, 1.70 deliveries per hour), the next target is the top 25% at $17.02 per hour. The top 10% earn $20.83 per hour, complete 2.28 deliveries per hour, and make $11.09 per hour in tips. Track your own numbers for two weeks and see which of those three you are furthest from. That tells you whether to work on order selection, positioning, or timing.
Multi-app to fill dead time
The fastest way to raise your hourly rate is to run multiple delivery apps at once. When Uber Eats is slow, DoorDash or Grubhub may have orders waiting. The key rules for multi-apping:
- Only accept one active order at a time unless the pickups and drop-offs are on the same route
- Pause the other apps as soon as you accept an order, so you are not declining offers and hurting your standing on the other platform
- Compare offers on pay per mile and pay per minute, not the headline dollar amount
- Keep completion rates high on every app; a cancellation costs more than a declined offer
- Track earnings across apps in one place so you know which one pays best in your market and hours
Position near restaurant clusters
Wait near dense restaurant areas such as shopping centers, downtown strips, and food courts, not residential neighborhoods. Closer to restaurants means faster pickups and more offers per hour. The top 10% of drivers complete 2.28 deliveries per hour versus the median 1.70, and much of that comes from positioning.
Be strategic about order acceptance
Not every Uber Eats order is worth taking. Experienced drivers judge each offer on dollars per mile (many use $1.50 to $2.00 per mile as a floor), total time including the restaurant wait, whether the drop-off keeps them in a busy zone, and whether the tip is already included in the upfront amount.
You can decline any order. Your acceptance rate does not affect your standing on Uber Eats the way it can on other platforms. Take the orders that pay, skip the ones that don't. Also track your deductible expenses; our guide to tax deductions for gig workers covers what counts.
Running Uber Eats alongside DoorDash or Grubhub? Download Gridwise free and track earnings across every app in one place, so you know which one pays best and when.
Uber Eats vs Uber rideshare vs DoorDash
Here is how Uber Eats compares to DoorDash and Uber rideshare using Gridwise data.
Uber Eats vs DoorDash
Uber Eats pays more per hour than DoorDash on every measure we track.
On medians, Uber Eats drivers earn $14.07 per hour in trip pay versus $11.26 on DoorDash, 25% more. Uber Eats drivers also complete more deliveries per hour (1.70 vs 1.51).
The 2025 averages from our Annual Gig Mobility Report show the same pattern:
- Average earnings per hour: Uber Eats $18.06, DoorDash $12.43
- Average earnings per mile: Uber Eats $1.27, DoorDash $0.94
- Average weekly gross: Uber Eats $198, DoorDash $247
- Average weekly hours: Uber Eats 11.5, DoorDash 18.8
DoorDash drivers gross more per week because they work about seven more hours. Per hour and per mile, Uber Eats pays more. For the full comparison, see Uber Eats vs DoorDash pay in 2026. Grubhub is the closest competitor on hourly pay at $18.67 average; see Grubhub vs Uber Eats pay.
Uber Eats vs Uber rideshare
Rideshare pays more per hour. The median Uber rideshare driver earns $21.18 per hour in trip pay versus $14.07 for Uber Eats. On 2025 averages, Uber rideshare drivers grossed $23.88 per hour and $522 per week over 21.2 hours. Uber Eats drivers grossed $18.06 per hour and $198 per week over 11.5 hours.
Per mile, Uber Eats pays more: $1.27 versus $0.94 on rideshare. Delivery trips are shorter, so you put fewer miles on your car for each dollar earned. Rideshare also requires a newer qualifying vehicle, passengers in your car, and usually higher insurance costs. For the rideshare numbers, see how much Uber drivers make.
When each platform makes sense
Uber Eats fits drivers who want part-time work, use a bike, scooter, or older car, and do not want passengers. The average Uber Eats driver works 11.5 hours a week. Most people use it as a supplement, not a full-time job.
Uber rideshare fits drivers with a qualifying vehicle who want the highest hourly rate and will work longer shifts at peak times.
DoorDash fits markets where Uber Eats demand is thin, and it works as the second app in a multi-app setup. Many drivers run both delivery apps and take whichever offer pays more.
Is Uber Eats worth it in 2026?
Yes, for the right driver. Uber Eats pays more per hour than DoorDash, about the same as Grubhub, and is one of the easiest gig platforms to start on.
The case for Uber Eats: average hourly earnings rose to $18.06 in 2025, average weekly gross rose 12.8% to $198, and you can start with almost any vehicle. Tips are a large, steady share of income. Your acceptance rate does not put your account at risk, so you can be selective.
The downsides: the median driver earns $14.07 per hour before gas and vehicle costs, and per-mile pay fell 2.6% year over year to $1.27. Uber does not publish the base pay formula. Nearly half of per-delivery income is tips, so a bad tipping night is a bad night. Weekly earnings are modest because most Uber Eats drivers work short weeks. If you need $500 or more a week, you will need to combine Uber Eats with another app or work the peak windows hard.
Uber Eats is best for part-time earners who want a flexible schedule, drivers without a rideshare-eligible vehicle, night owls who can work 12am to 5am, and multi-appers who want a second delivery platform with strong hourly pay.
Uber Eats driver pay FAQ
Can you make $1,000 a week doing Uber Eats?
At the median $14.07 per hour, you need about 71 hours a week to hit $1,000. At the top 25% level ($17.02/hr) it drops to about 59 hours, and at the top 10% ($20.83/hr) to about 48 hours. It is possible but takes long weeks and peak-hour focus. A realistic target for a full-time driver working 40 hours is $560 to $830 a week, depending on skill and market. See how to make $1,000 a week with Uber Eats for the strategy.
Does Uber Eats pay more than DoorDash?
Yes. The median Uber Eats driver earns $14.07 per hour versus $11.26 on DoorDash, 25% more. On 2025 averages it is $18.06 versus $12.43. Uber Eats drivers also complete more deliveries per hour (1.70 vs 1.51). See how much DoorDash drivers make for the DoorDash breakdown.
How much do Uber Eats drivers make in tips?
The median Uber Eats driver earns $3.73 per delivery in tips, or $6.26 per hour. The top 10% earn $6.20 per delivery and $11.09 per hour. Tips are 46% of per-delivery pay on Uber Eats, compared with 6% to 7% on Uber rideshare. See how much Uber Eats drivers make before tips.
Is Uber Eats better than driving Uber?
Uber rideshare pays more per hour ($21.18 median vs $14.07) but requires a newer qualifying vehicle and passengers. Uber Eats has lower vehicle requirements, lower vehicle costs, better pay per mile ($1.27 vs $0.94), and no passengers. Many drivers do both and take whichever offer pays more.
What is the best time to deliver Uber Eats?
6pm to 8pm, especially on weekends. Sunday 6pm to 8pm pays the most at $18.28 per hour on average. Late night (12am to 5am) pays $15 to $17 per hour. The lowest-paying times are Tuesday through Thursday from 9am to 2pm at $14 to $14.50 per hour. Peak hours pay over $4 per hour more than slow times.
How much do Uber Eats drivers make per week?
The average Uber Eats driver grossed $198 per week in 2025, up 12.8% from $175 in 2024, working an average of 11.5 hours. At the median hourly rate, 30 hours a week is roughly $420 to $450 before expenses.
Start tracking your Uber Eats earnings today
Uber Eats pays a median $14.07 per hour in trip pay and an average $18.06 per hour in 2025, well ahead of DoorDash. Tips are $3.73 per delivery, nearly half of per-delivery income, and $6.26 per hour. The top 10% of drivers earn $20.83 per hour by working peak windows, waiting near restaurant clusters, and declining low offers.
The way to move from the median to the top 25% is to know your own numbers: what you earn per hour, per delivery, and in tips, by day and time. Then change the one that is furthest behind.
Want to see how your Uber Eats earnings compare to 101,709 other drivers? Download Gridwise free and track your earnings, find the best times to deliver in your market, and see where you stand.
Work smarter. Earn more.
Whether you drive, deliver, or pick up shifts — Gridwise helps you track earnings, mileage, and performance so you stay in control of your work. Download the app and take charge today.
