Gridwise blog
Tips, insights, and advice to help you earn more and work smarter, whether you do gig work, hourly, or shift work.
How to Make $1,000 a Week With Uber Eats in 2026 (Tips + Hourly Data)
In this blog, we'll explore the strategies and techniques that can show you how to earn $1000 per week as an Uber Eats delivery driver. We'll cover everything from optimizing your delivery zones and schedules to maximizing your tips and customer satisfaction. Whether you're a seasoned Uber Eats driver or just starting out, this guide will provide you with the insights and actionable steps to take your Uber Eats driver earnings to the next level.
Becoming an Uber Eats delivery partner can be a lucrative opportunity, especially if you're able to consistently earn $1000 a week. By understanding the platform, optimizing your delivery strategies, and focusing on customer satisfaction, you can maximize your earnings and turn Uber Eats into a reliable source of income.
We’ll cover the following topics to provide coaching and ideas to help you push your earnings up to that $1000 per week level:
[elementor-template id="20891"]
What do Uber Eats drivers do?
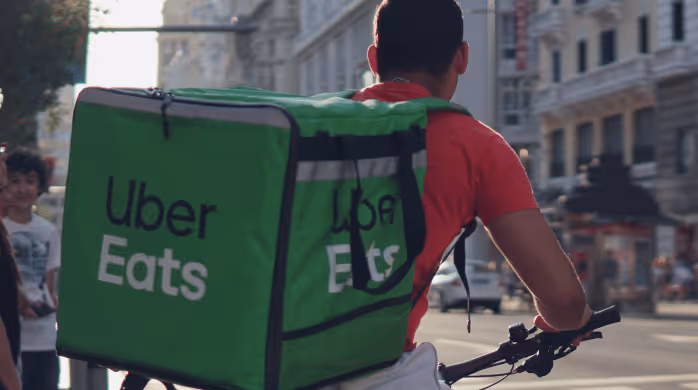
Uber Eats drivers deliver prepared food most of the time, but they also might shop for and deliver goods from convenience outlets and grocery stores. The job is pretty simple. You get a request for an order, you drive to the restaurant or store to pick it up, and then you deliver it to the customer. If you already drive for Uber, you can choose to take orders for Uber Eats delivery any time.
If you’re not an Uber Eats driver yet, it’s pretty easy to become one. This Gridwise post tells you what you need to do if you want to sign up and start making money Uber Eats style. Many rideshare drivers welcome the chance to deliver food rather than people. This article from Nerdwallet covers the Uber Eats gig from that angle.
There are some sweet advantages to working with Uber Eats. In lots of cities you don’t even need to have a car. You can use a bike or a scooter, or even walk, to make your rounds. If you do use a car, Uber Eats’ requirements are a lot easier to meet than they are for Uber rideshare driving.
You also have a lot of flexibility. You can shop and deliver convenience items and groceries, but you don’t have to. And, like most driving gigs, you can choose your own hours, and map out the locations where you want to work.
Use Gridwise features When to Drive and Where to Drive to help you figure out what work hours and which specific areas will be the most profitable for you. Real data from real delivery people will show you earning patterns for drivers in your town.
[elementor-template id="20949"]
How much can you earn doing Uber Eats?
The honest answer to this question is: basically, as much as you want! It all depends on how many hours you put in and how strategic you are about your gig. Earnings vary from one area to another, as this article from Entrepreneur points out. To give you a baseline, let’s look at the earnings of Uber Eats drivers who tracked their earnings with Gridwise.
Remember that these numbers show us only average earnings. To make $1,000 a week with Uber Eats, you’re going to have to be better than average, and we’ll show you how. For now, though, it’s good to have these figures so you get a ballpark number of where to start.
How much do Uber Eats drivers make?
Gridwise data tell us the following:
- Monthly earnings average around $444.00 per month.
- Gross earnings per trip are between $9.00 and $10.00.
- Tips make up about 50% of most Uber Eats drivers’ income, which amounts to about $225.00 per month.
Is Uber Eats good money? It can be. While there are other gigs that pay more per trip, if you drive for Uber Eats, you’ll always be pretty busy.
https://datawrapper.dwcdn.net/HPAz8/3
You can also see that, unlike many other gigs, tips play a huge role in Uber Eats earnings.

With these numbers as a baseline, what can we say about how to earn $1,000 a week with Uber Eats? As we said in the introduction, it’s going to be a hustle, but it’s really possible. To figure out how to make the most money with Uber Eats, let’s start by looking at how many trips these “average” drivers made each month.
We know that average gross earnings were $444.00 per month, and drivers got around $10.00 per trip. That means they took 44 or 45 trips per month, which breaks down to 11 trips per week. That’s not a lot of Uber Eats delivery, is it?
The fact that Uber Eats drivers averaged so few trips shows us that many drivers use more than one app at the same time. This is called multi-apping, and you can learn more about it in this Gridwise post. If you want to answer the question of how much you can make with Uber Eats, then you need to stick with the app and keep plugging away at those orders. You also need solid strategies, as well as some inside tips and tricks.
How to make the most money on Uber Eats: Delivery driving tactics
Getting to that $1,000 a week with Uber Eats isn’t so hard when you remember that the drivers we saw making about $111 a week were only taking around 11 trips in the same time period. That’s not much at all! If you work the Uber Eats app like a boss, you’ll soon have many more trips than that, easily reaching the number needed to get you to $1,000 a week. Now, let’s get to some tactics you’ll need to make that kind of bank.
- Stay with the Uber Eats app, and track your earnings. Gridwise can easily do that for you. Simply sync your Uber Eats app with Gridwise, and you’ll be able to see how much you’ve earned with Uber Eats, what times were most profitable, and your average hourly pay. Racking up trips with Uber Eats has other benefits, including perks and bonuses that are awarded to top drivers.
- Leverage surge pricing and promotions. Surge pricing is applied when there is a lot of demand. When surge pricing is in effect, many of the trips you make will pay more than usual. Promotions are offered to drivers who complete a given number of trips in a certain time period. High traffic volume days, nights, and times give you these chances to get extra earnings. Challenging yourself to complete the right number of trips for promotions will add to the number of trips you can count on for big bucks, too. Learn more about Uber Eats surge pay, boosts, and promotions in this Gridwise blog post.
- Say yes to doubling up on orders. With Uber Eats, you can get back-to-back orders or receive batched orders. Back-to-back orders happen when you receive a new request while you’re on the way to deliver an original order. The Uber Eats app routes these trips automatically, so you won’t be sent out of your way.
Batched orders are Uber Eats’ way of bundling together orders from either the same restaurant, or two nearby eating establishments. You get money—and trip count credit—for all the orders you complete, plus customer tips, without having to make a bunch of separate trips.
- Turn on the charm and get bigger tips. Being nice really is part of the Uber Eats driver’s job, and getting tips is one way people who drive for Uber Eats make money beyond their basic pay.. Bring along those extra napkins and condiments, use equipment that keeps food and drinks at the right temperatures and prevents spilling, and consider your customers’ needs. If you deliver groceries, be extra careful with delicate items such as bread and eggs.
And, most important, follow your customers’ directions, and stay in communication with them if you are going to be delayed, or if you have questions about their order. This Gridwise post will tell how to get bigger tips as a delivery driver.
- Use even more charm to keep your ratings high. As an Uber Eats driver, you will be rated by the restaurant or store where you pick up the orders as well as the customers who are waiting for the deliveries. This two-way rating system is designed to keep you on your toes, so Uber can keep people satisfied with your service. Don’t worry—you get to rate them, too.
There’s another reason why your rating as a driver is important. It not only keeps you in good standing with Uber; it helps you to qualify for the Uber Eats Pro incentive program. To learn more about Uber Eats Pro, and what it takes to earn perks such as preferred services, discounts, and deals, check out this Gridwise blog post.
Smart business moves that seal the deal
Now that you know how to gobble up the deliveries you need to make $1,000 a week with Uber Eats, it’s going to be a breeze to get there. Let’s make it even easier, with business moves that boost your earnings and shrink your expenses. If you use these, it will also be easy to say yes when people ask, “Can you make good money with Uber Eats?”
Minimize expenses. Avoid racking up big fast-food bills by bringing your own food and beverages. You might not think you’re hungry when you first start your Uber Eats run, but once the aroma of pepperoni pizza, premium cheeseburgers, and piping hot fries start wafting through your car, that might change. Bring a sandwich or other healthy food from home, and buy bottled water in bulk to save tons of cash compared to what it costs to buy single servings.
Maximize tax deductions. Another way to minimize your expenses is to maximize your tax deductions. Start by tracking mileage with Gridwise.
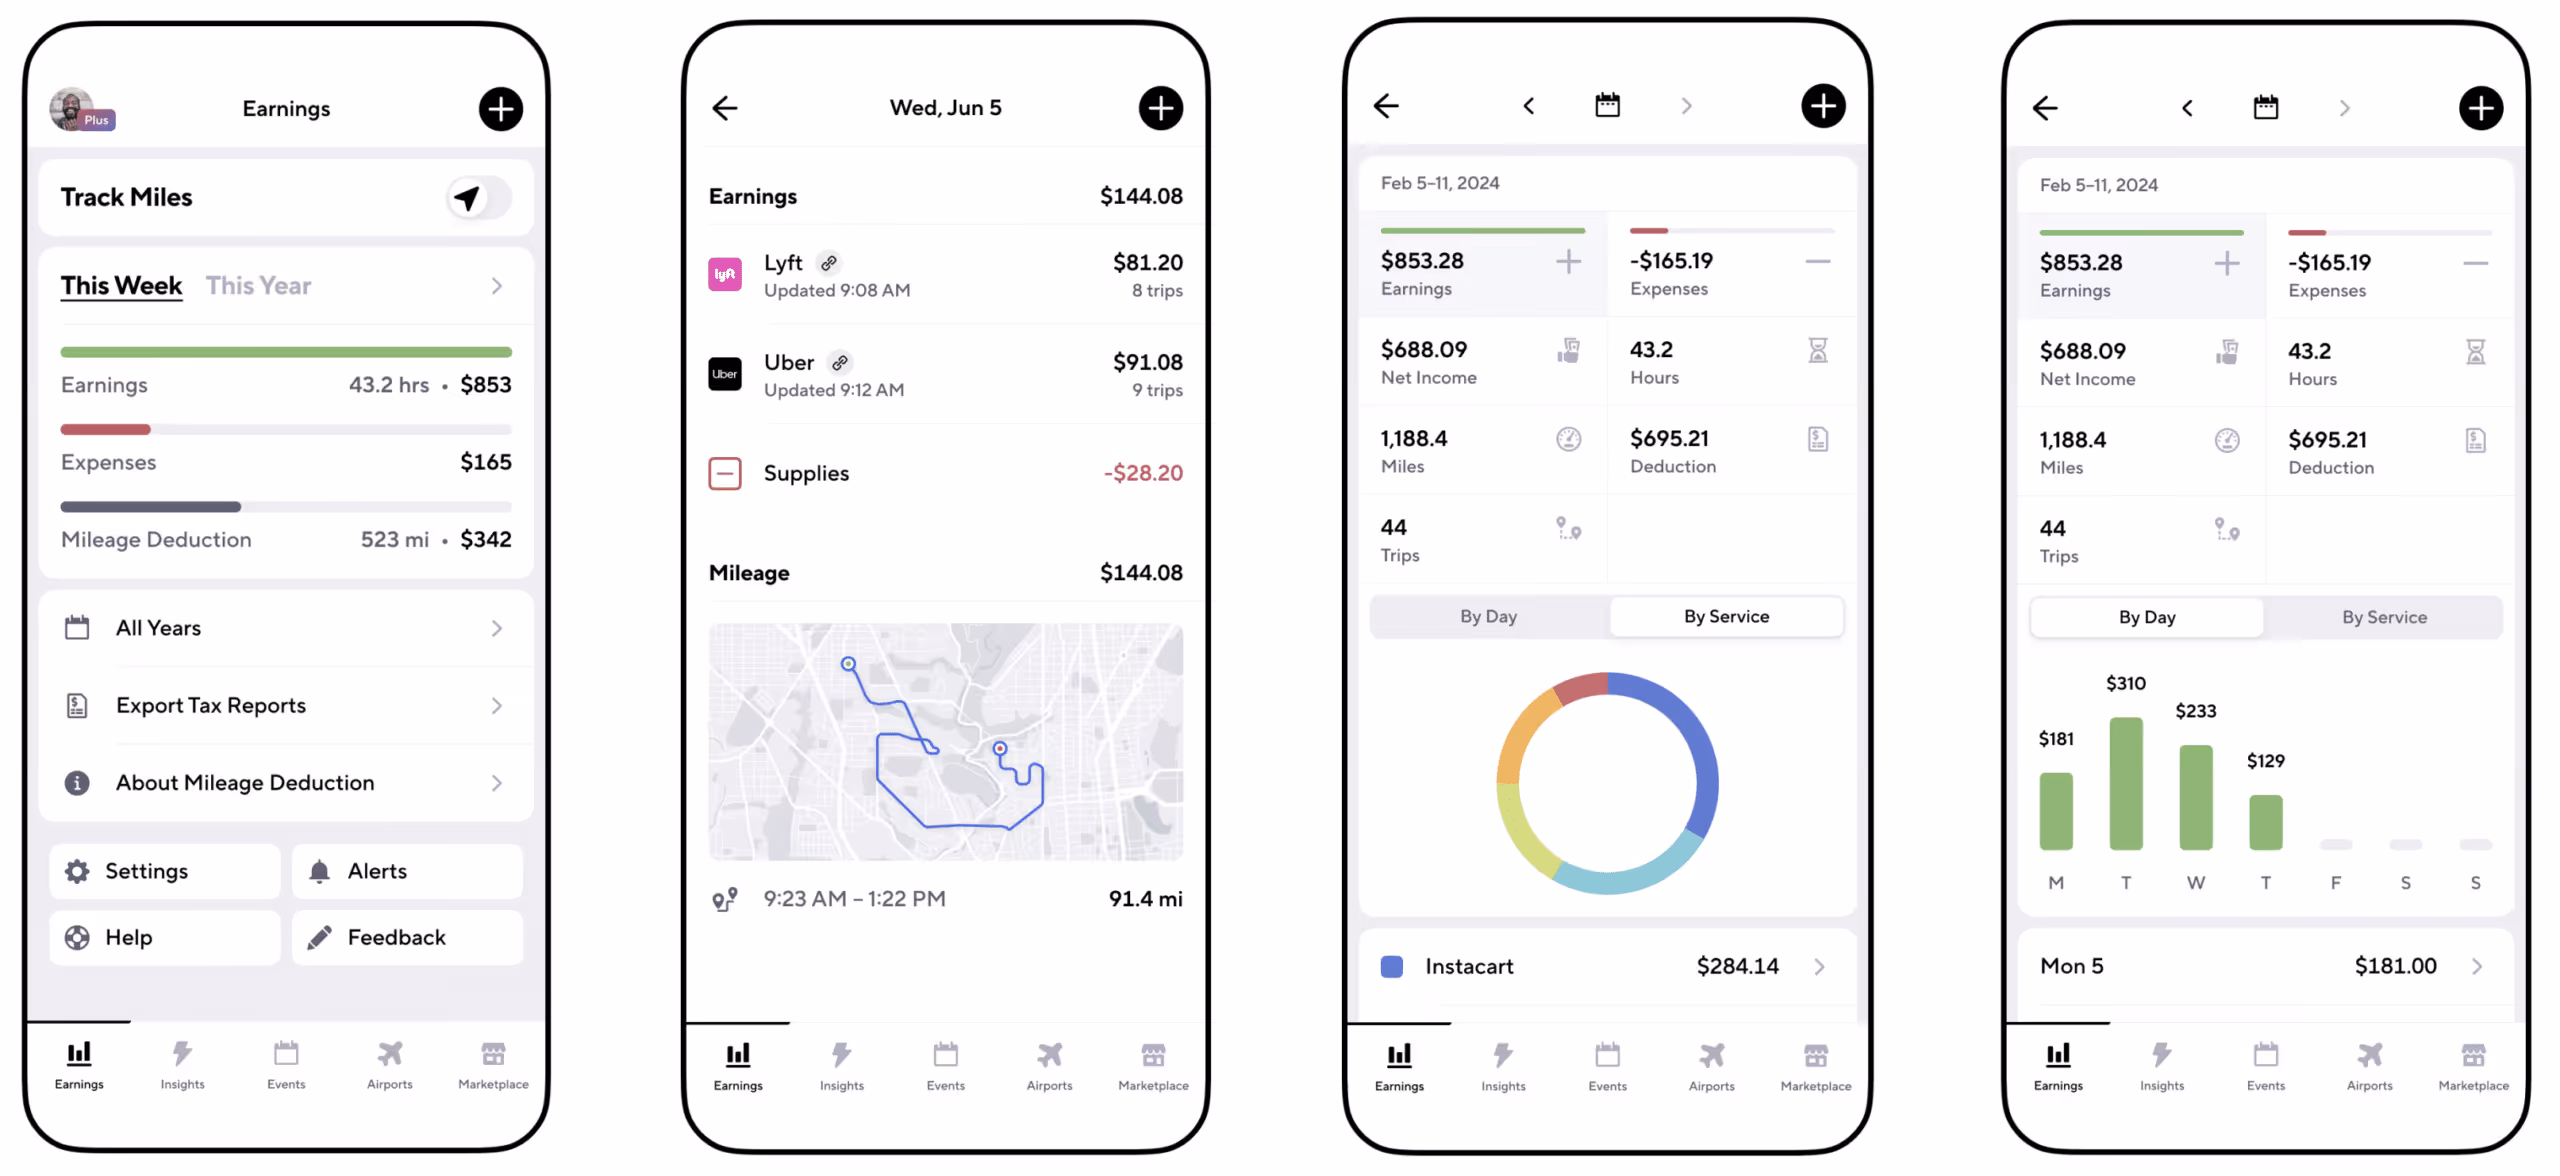
Gridwise App
Gridwise captures every deductible mile you drive, including the distance you cover between the trips your driving app records. Know what expenses you can deduct, and put them to work for you when tax time comes. Learn more about tax deduction strategies in the Gridwise Tax Guide for drivers.
Boost earnings with referrals
As an independent contractor, you’re probably looking for ways to make even more money than you can with Uber Eats. And most gig workers like you enjoy getting passive income. With Uber Eats, there’s a really easy way to do that—referrals!
All you need to do is find friends and encourage them to deliver for Uber Eats. If they make a certain number of deliveries within a specified time, you will get paid for doing nothing more than having them sign up under your referral code! Rates of pay vary by city, so check your Uber Eats app to find out what the current deal might be, and learn more about the referral program on the Uber Eats website.
Also remember: “friends” don’t have to be your best buds. Many delivery people carry cards with a QR code linking to their referral information, so just about anyone you encounter can join Uber Eats and boost your earnings. You could meet a source of passive income at the gas station, on social media, or at your high school reunion. The more you hustle, the more there is to gain, right?
Master the art of self-employment
As an Uber Eats driver, you’re an independent contractor. That means the company isn’t going to withhold your taxes, provide insurance, keep track of your earnings, or tell you about tax deductions. You’ll have to do all these things for yourself.
If you want to maximize your tax advantages, open an official business entity. You can incorporate (create a corporation) or you can work as a limited liability corporation (LLC). You can also work with a DBA (Doing Business As) arrangement, but the corporation or LLC will do a better job of protecting you from liability.
Establishing a corporation or LLC offers better tax advantages than being a sole proprietor. For instance, if you simply collect your earnings into your private account, you’ll be charged self-employment taxes in most states. And paying extra taxes is something we all want to avoid, within legal limits, as much as possible.
Every Uber Eats driver needs to learn about self-employment, and there are some great resources you can review. Check out the CareerOneStop website about self employment which will help explain the basics. You can also check with a professional tax accountant, or look other websites to learn more about actually creating a business.
Scope out your market
Look at the area around you to see where you’re likely to get the most deliveries. Where are all the restaurants? Where might people be more inclined to order deliveries? What hours do you want to drive? What activities might be going on around those times? Think about late-night and after-school times as well as breakfast, lunch, and dinner times.
Be realistic about the potential for your area and aware of new services opening up. For example, in New York, there is already a tab on the Uber Eats app that allows customers to order groceries. In our article about the best food delivery service to work for you’ll see that Uber Eats stacks up well against other delivery companies, mainly because of its potential for expanded opportunities for drivers to earn.
So, is Uber Eats good money? As we said, it isn’t an automatic guarantee that everyone will make $1,000 a week with Uber Eats. Trying out the suggestions we give you here, though, should put you on the right track! Go out there and start stacking up those orders and raking in some impressive earnings!
[elementor-template id="20936"]
Get more inside information on Uber Eats in these posts from the Gridwise blog:
- The delivery driver guide: Using the Uber Eats app
- Everything you need to know about driving for Uber Eats
- Uber Eats Pro: What drivers need to know
- Looking for a different gig, part-time or full time job? Check out the Gridwise Job board.
Uber Eats FAQ
How does the Uber Eats platform work for drivers?
Uber Eats is a food delivery service that connects customers with local restaurants and independent delivery partners. As an Uber Eats driver, you'll receive notifications of nearby delivery requests, which you can accept and complete. The platform provides flexibility, allowing you to work on your own schedule and earn money based on the number of deliveries you complete.
What are the requirements to become an Uber Eats delivery partner?
To become an Uber Eats delivery partner, you'll need to meet certain requirements, such as having a valid driver's license, a registered vehicle, and passing a background check.
How can I choose the right delivery zone to maximize my earnings?
Selecting the right delivery zone can significantly impact your earnings, as some areas may have higher demand and better-paying orders. It's important to research and identify the zones in your area that tend to have the most consistent and lucrative delivery opportunities.
How can I take advantage of peak delivery hours and surge pricing?
Understanding peak delivery hours, such as mealtimes and weekends, and taking advantage of surge pricing can boost your earnings. Be aware of when demand is highest in your area and adjust your schedule accordingly to capitalize on these peak periods.
What are some tips for maximizing tips and customer satisfaction?
Providing excellent customer service and going the extra mile to ensure a positive experience can lead to more tips and repeat business. Prioritize communication, timeliness, and attention to detail to keep your customers happy and satisfied.
How can I set realistic weekly goals to reach my $1000 target?
To make $1000 a week with Uber Eats, it's essential to set realistic weekly goals and track your earnings and expenses. Start by determining your target earnings and breaking it down into achievable daily or weekly goals. This will help you stay on track and make adjustments as needed.
What are some strategies for efficient route planning and navigation?
Effective route planning and navigation can save you time and fuel, allowing you to complete more deliveries. Utilize mapping apps and take advantage of features like real-time traffic updates and turn-by-turn directions to find the quickest routes.
How can I balance my Uber Eats deliveries with other commitments?
Develop a schedule that allows you to capitalize on peak delivery hours while still maintaining a healthy work-life balance. Consider using tools like calendar apps to plan your availability and track your hours to ensure you're maximizing your earning potential without sacrificing your personal life.
What are the key considerations for maintaining my vehicle as an Uber Eats driver?
Keeping your car clean and well-maintained is crucial for maximizing your Uber Eats earnings. Regularly scheduled oil changes, tire rotations, and other preventive maintenance can help extend the life of your vehicle and minimize downtime. Additionally, budgeting for vehicle-related expenses, such as fuel, insurance, and repairs, will ensure you're accounting for these costs and maximizing your net earnings.
What are the tax obligations and legal considerations for Uber Eats drivers?
As an Uber Eats delivery driver, it's essential to understand the tax obligations and legal considerations that come with being an independent contractor. This includes properly reporting your earnings, deducting eligible business expenses, and making quarterly estimated tax payments. Additionally, you'll need to ensure you have the appropriate insurance coverage, such as personal auto insurance and possibly commercial auto insurance, to protect yourself and your vehicle while on the road making deliveries.

The Gridwise Job Board: Find Your Ideal Job or Gig Work
Gridwise is an essential assistant app created by gig workers for gig workers. Our mission is to support those engaged in gig work in every way possible. We understand how challenging it can be to deal with income instability, a lack of benefits, and job insecurity that often comes with gig work. The Gridwise app tracks and organizes earnings and expenses, and offers a wide array of discounts, deals, and services that make the lives of independent contractors easier and more rewarding.
We firmly believe it’s possible to make a viable living and create a gig experience that offers flexible hours, variety, and excitement. With issues such as consistent earnings and job security in mind, Gridwise is proud to offer a centralized platform that shows you how to find gig work and secure reliable opportunities. We’re proud to introduce the Gridwise Job Board.
[elementor-template id="20891"]
The Gridwise Job Board: Key features
Because Gridwise is dedicated to serving the gig worker community, we’ve filled the Gridwise Job Board with useful features that won’t waste your precious time.
- Comprehensive listings. Find part-time, full-time, temporary, and per-task work. Drive or deliver with your vehicle, utilize an employer’s vehicle, or even find non-driving gig work.
- User-friendly interface. Find the jobs that are right for you with a tap of your screen.
- Verified opportunities. We vet the jobs before they are listed to ensure you’re getting high-quality job postings.
How to get more gig work, seasonal, part-time or full-time jobs with the Gridwise Job Board
Looking specifically for “gig work apps” or “gig jobs near me?” You’re in luck. Our filters and search functions send you directly to the listings you seek.
Here’s how it works.
- Access the Job Board via the Gridwise website.
- Search for jobs by type, location, and more.
- Select the job that interests you, and read all about it.
- Scroll through the description, and if it appeals to you, click “Apply for job.”
Many types of jobs are available. Adjust the search filter to see the full variety of opportunities that will let you cash in. Deliver food, set up catering, do rideshare driving, get paid for doing package delivery, and much more. You’ll find short-term gigs, long-term contracts, and part-time positions.
Perks of the Gridwise Job Board for gig workers
Gig workers who know how to make extra money will appreciate how the Gridwise Job Board lets you multiply your chances of bringing in big earnings. Here’s how:
- Increased stability. Use the Gridwise Job Board to find part-time or permanent jobs in addition to the part-time gigs you already have. Always keep a steady stream of earning opportunities flowing toward you.
- Flexibility and autonomy. Choose jobs that fit your schedule, work around other jobs and family duties, and still leave room for some fun in your life. Discover side hustles to supplement your full-time job, permanently or just for the season.
- Skill development. Find part-time work that lets you use a skill you already have, or try your hand at something new. It’s a smart way to develop a portfolio to showcase what you can do, or even to find permanent employment.
Get Gridwise and stay up to date on the Gridwise Job Board
Gig workers need plenty of information and assistance, and Gridwise is here to give it to you. Download the app and get essential features such as
- seamless earnings tracking
- mileage tracking
- expense recording, including notes
- low-cost and no-cost insurance benefits
- access to affordable medical, dental, vision, mental health, and alternative care
- professional services including legal and financial help
- deals and discounts
- weather, events, and traffic reports
- inside information on where and when to drive
[elementor-template id="20936"]
More to know about gig work:

5 Best Mileage Trackers For Gig Drivers
Many drivers ask, “Do I really need a mileage tracking app?” The answer is simple: only if you want to have an accurate count of all the miles you can legally deduct from your taxable income! You might think your rideshare or delivery driving app has got you covered. After all, they do quite a good job of logging the miles you drive while you’re on a trip or delivery. But, if you want to have the best app to track mileage for Uber, Lyft, Doordash, Instacart, or the other apps you may use, you need more. Why is that?
Without a separate tracker, you’re missing the miles you drive in between pings. Did you realize that all the miles you drive, from the moment you begin your shift until it’s over (as long as you don’t drive several miles on a break to hang with your friends), are tax deductible! That means you need something besides your driving app to keep an accurate count of your travels. Read this Gridwise post to see how important it is to keep track of every deductible mile.
You won’t be surprised to hear that there’s an app for tracking miles. In fact, there are several of them. Here, we’re going to tell you about five top mileage tracking apps, and help you figure out which one is best for you.
Before we get to the list and identify the best mileage tracker app, let’s clarify what exactly a mileage tracking app is. According to G2.com’s technology glossary, mileage tracking is done for the purpose of keeping a log of mileage that is either reimbursable or tax deductible.
And yes, of course you can track your miles simply by taking readings on your odometer. But are you really prepared to account for how many miles you drove for personal reasons and subtract them from the total to get your business mileage? Even if you can remember all that and do the arithmetic, if you want an accurate reading of the miles you drive for business, and can therefore deduct, a mileage tracking app will save you a lot of trouble and prevent you from making costly errors.
Plus, as a gig driver, you have specific needs when it comes to a mileage tracker. Ideally, you’d be able to handle mileage tracking and several other functions all in one app. It can be maddening enough to deal with driving apps, particularly if you’re an avid multi-apper. You would want your mileage tracker app to help you keep account of other aspects of your business, including income, expenses, and inside information about the art of gig driving.
Not all mileage apps are equal, to be sure! Let’s look at five of the best apps to track mileage and figure out which is the best app to track mileage with Uber and Lyft, or what mileage tracker app is best for DoorDash.
[elementor-template id="20891"]
1. Zoho Expense
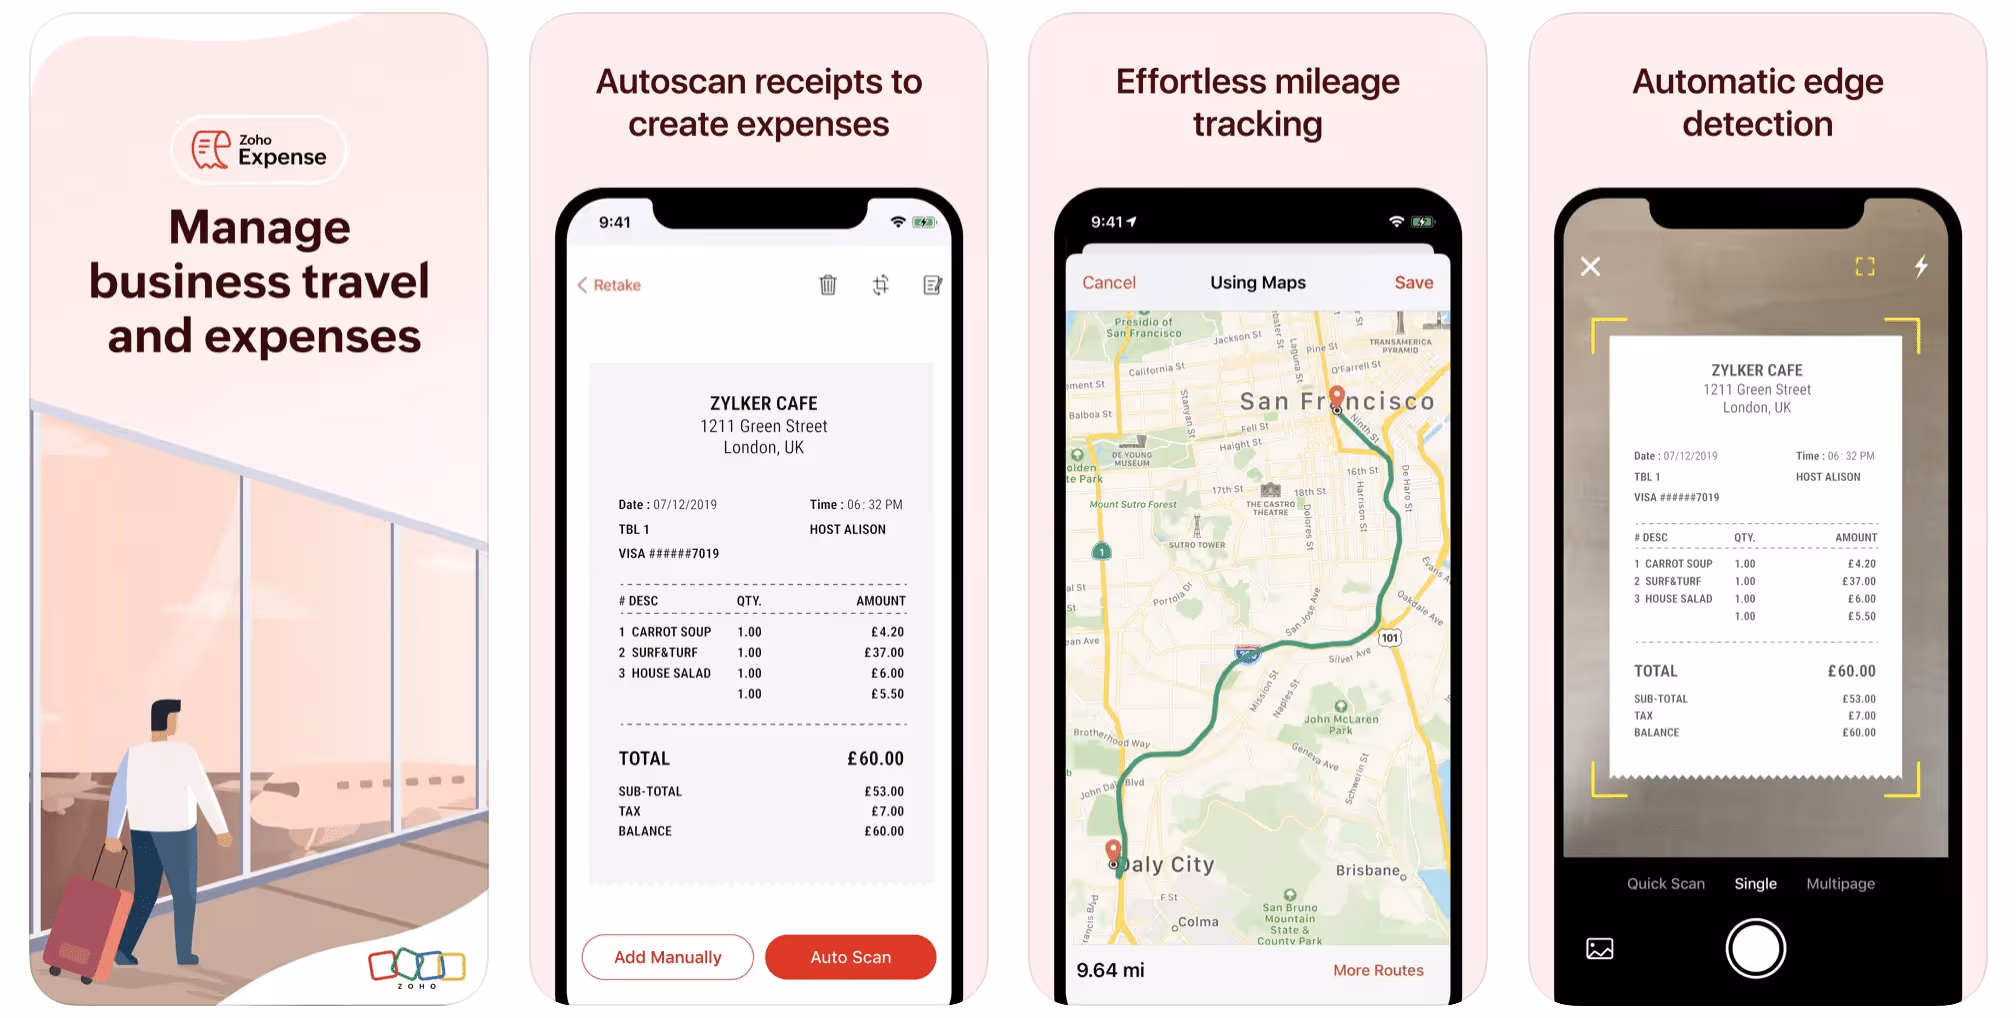
First up is Zoho Expense, which does exactly what its name says. This app is designed to allow companies to give employees a uniform way to create and submit expense reports. It can be used by individuals, including gig drivers, as well.
It includes a mileage tracker, as well as features that let you track other deductible expenses, including the ability to scan and record receipts.
Available on Android and Apple: Yes
Ratings: 4.8 stars on App Store, 4.7 stars on Google Play
Free Version: Yes
Subscription price: $3 per month, billed annually
Created specifically for gig drivers: No
2. Quickbooks Online
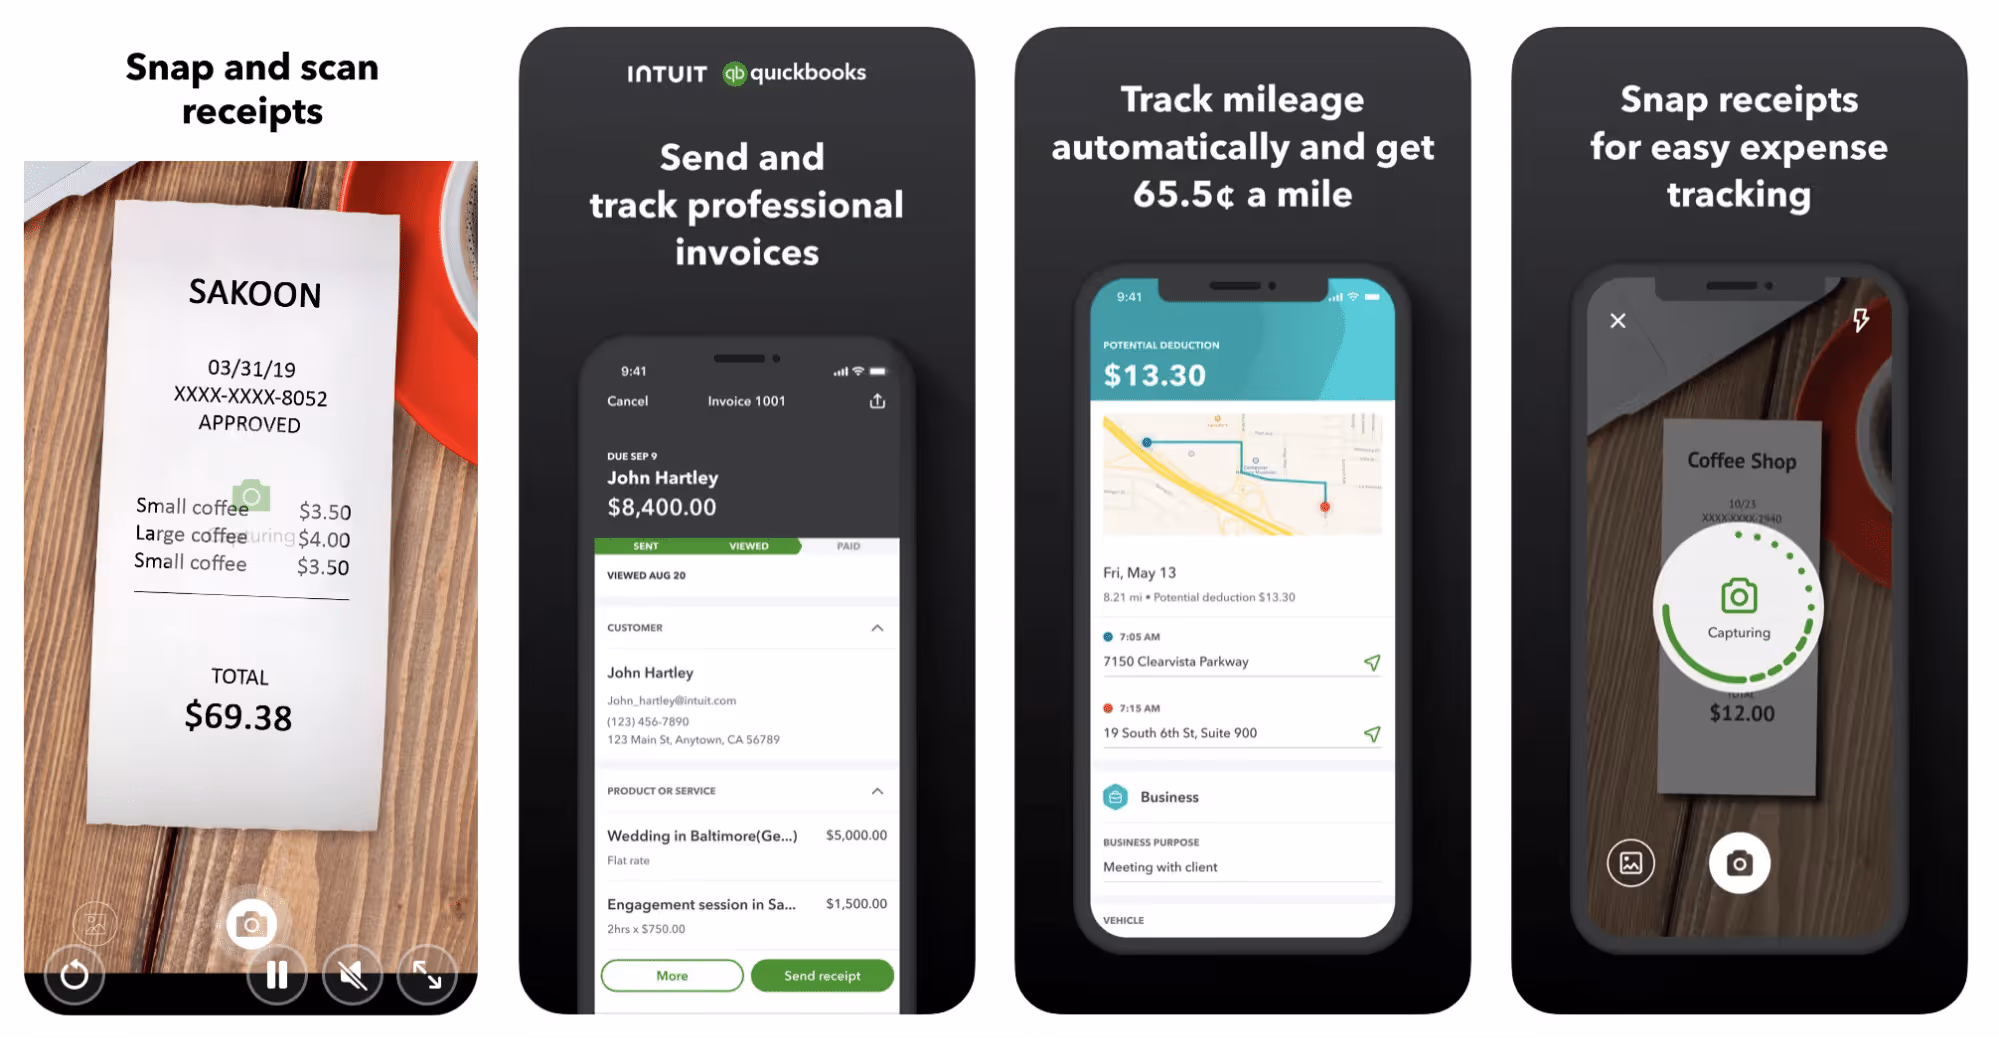
Quickbooks Online is a cloud-based app that allows you to track your mileage, earnings, and expenses. The information you enter can then be used to generate various reports that prepare you for tax time. It also allows you to create graphs that illustrate your cash flow, and includes a receipt scanner so you can instantly record deductible expenses. Quickbooks is popular, highly reliable, and designed mainly to help people keep track of their small businesses.
Available on Android and Apple: Yes
Ratings: 4.7 stars on App Store, 4.4 stars on Google Play
Free version: 30-day free trial
Subscription price: $15 per month for basic version if purchased for 3 months or more
Created specifically for gig drivers: No
Source: quickbooks.intuit.com
3. Shoeboxed
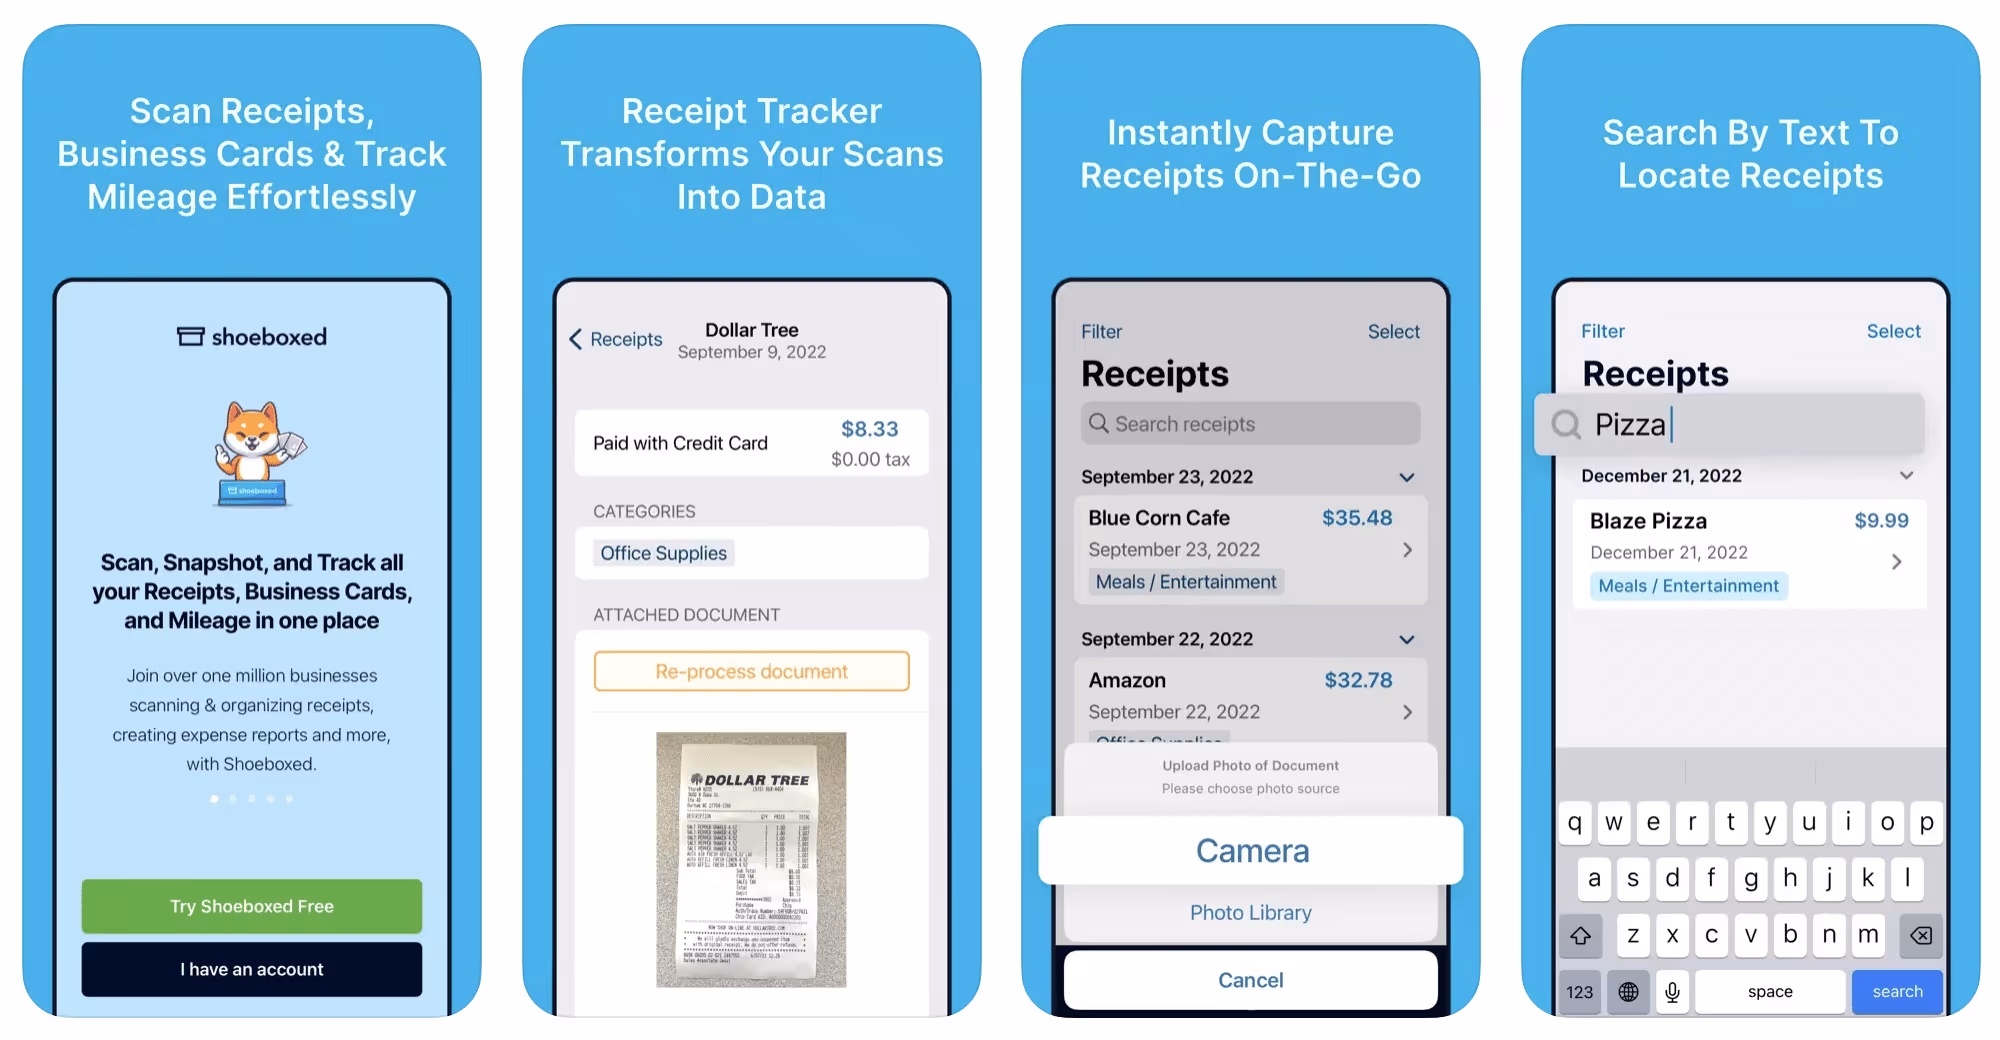
Shoeboxed started in 2007 as a service for scanning paper receipts into digital form. Now the app offers a free mileage tracker and has enabled users to scan receipts directly. It touts itself as the best mileage tracking app for DoorDash, but there are some elements missing that Dashers might like to have. While it provides features that record your expenses and prepare you for tax season, it doesn’t automatically track your earnings. The mileage tracker has a system where you can drop pins along your routes to make the tracking more precise, identifying those legs of a trip that you make for business purposes. The mileage tracker is “free” once you sign up for the basic version.
Available on Android and Apple: Yes
Ratings: 4.5 stars on App Store, 2.3 stars on Google Play
Free version: No
Subscription price: $18 per month for basic version
Created specifically for gig drivers: No
Source: blog.shoeboxed.com
4. Stride
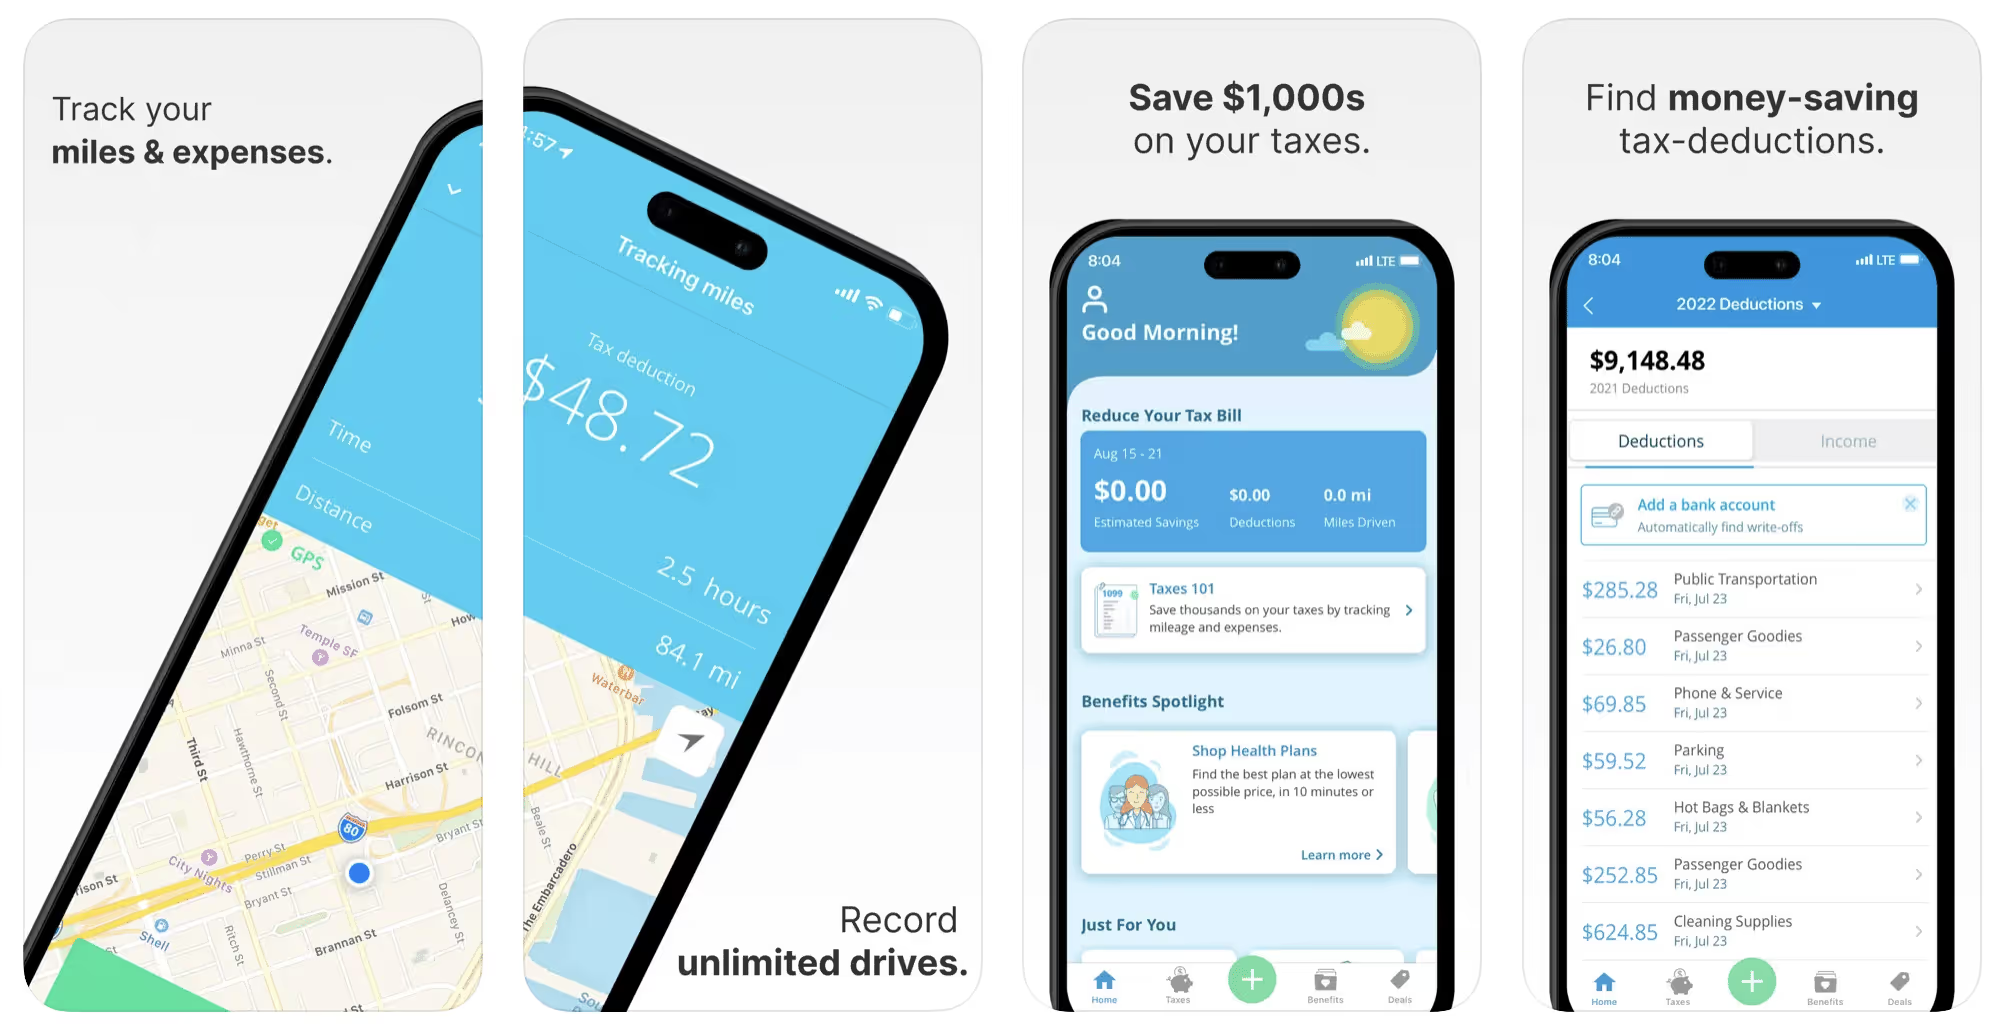
This free mileage tracker does a fair job of keeping track of the distances you rack up while gig driving, but it doesn’t automatically track earnings. It can be a big help, though, in tracking your expenses. You can link Stride to your bank account, and it will automatically scan your expenses to identify items you can potentially deduct. The app is totally free. This could make it the best free mileage tracker app, but there is a small price to pay. The app will persistently push you to consider various insurance plans that they are affiliated with. If you don’t mind that, this is a solid mileage tracker, even if it doesn’t track your earnings.
Available on Android and Apple: Yes
Ratings: 4.8 stars on App Store, 4.6 stars on Google Play
Free version: Yes
Subscription price: None. The app is free.
Created specifically for gig drivers: No
5. Gridwise
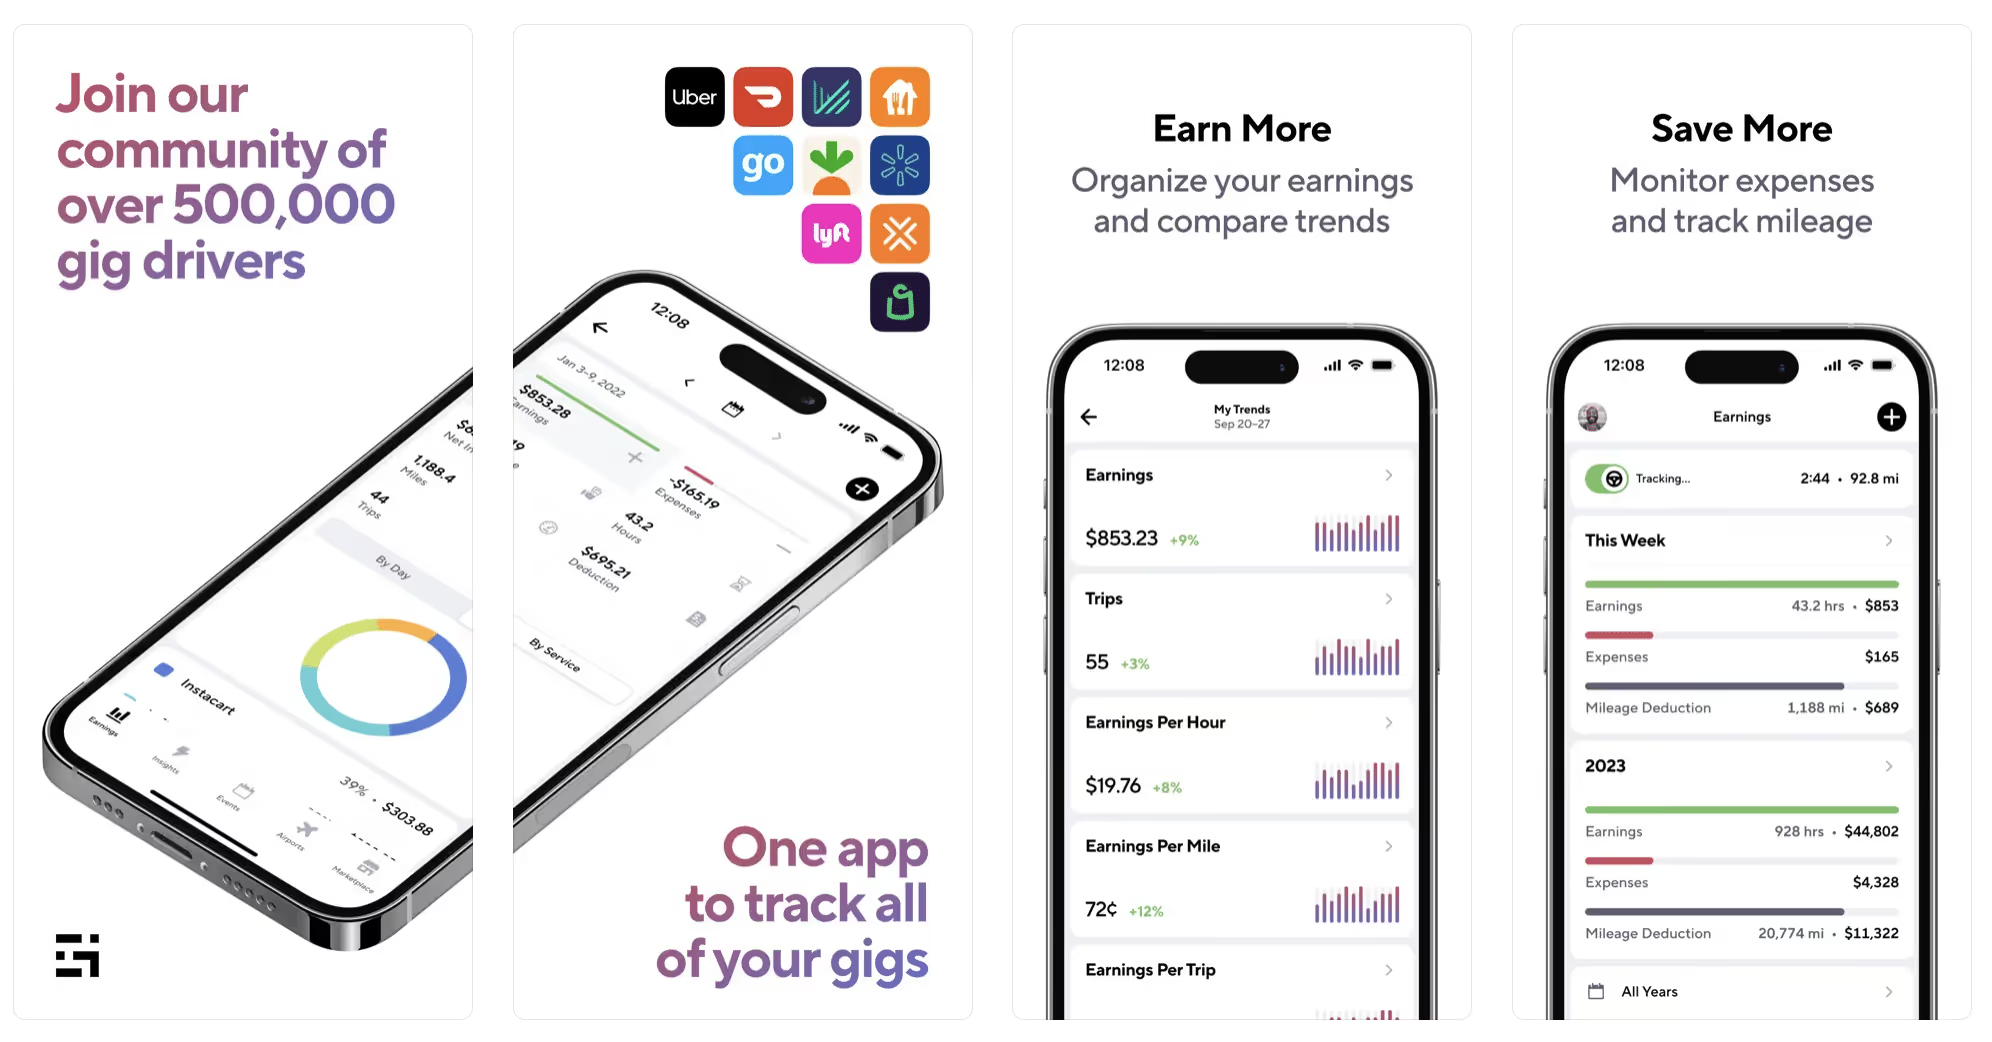
Gridwise has a free mileage tracker and free features that record your income and expenses. It gives you access to insurance and benefits, as well as insights about the best times and places to make the most money while gig driving. The Gridwise mileage tracker captures all the miles you drive while you’re on your driving shift, and it can be used if you have other trips you need to make which qualify as business travel.
Drivers love it because it is geared toward the needs of rideshare and delivery workers, providing free information about airport departures and arrivals, event start and let out times, weather, traffic, and more. The Gridwise Plus subscription adds value by providing additional insights and reports, discounts on benefits, the ability to export data in .csv format,, and more.
Available on Android and Apple: Yes
Ratings: 4.9 stars on App Store, 4.6 stars on Google Play
Free version: Yes
Subscription price: $9.95 per month for Gridwise Plus, or $95.99 per year (a $23.41 savings)
Created specifically for gig drivers: Yes!
What is the best mileage tracking app?
Now that we’ve checked them all out, we’re positive about the answer to that. Hands down, it’s Gridwise. Are we biased? You bet we are! But drivers love it too. Gridwise is the best mileage tracker app—and so much more. So many of the features are free, and the subscription to Gridwise Plus will pay for itself with additional insights to boost your earnings and deeper discounts on products and services.
Most important, Gridwise is designed specifically for gig drivers by experts who were once gig drivers themselves! Knowing what gig drivers need is a crucial step in creating an app that rideshare and delivery drivers can really use! Here are a few of the features, besides mileage tracking:
- seamless earnings tracking
- automatic, on/off toggle and manual mileage tracking
- mileage categorization
- airport, traffic, weather, and events information
- insights into where to drive and when to drive
- reports showing earnings across the platforms you use
- discounts on countless products and services for drivers
- additional resources for finding side gigs
- an informative and comprehensive blog
- affordable benefits, including insurance, medical, dental, and alternative practitioner discounts
- a community of drivers just like you
Don’t settle for just any app. Get the best mileage tracker, and so much more, from Gridwise!
[elementor-template id="21599"]

Lyft Driver Requirements 2026: Age, Car, Background Check, and How to Apply
Thinking about driving for Lyft? Before you download the app and start accepting ride requests, you need to make sure you actually qualify. Lyft has specific requirements for your age, vehicle, driving record, insurance, and background -- and some of these vary depending on where you live.
This guide breaks down every Lyft driver requirement for 2026 so you know exactly what to expect before you apply. We cover the age minimums that trip people up, vehicle standards for every service tier, the background check process, insurance rules, and the full sign-up timeline. If you are also considering Uber, we include a side-by-side comparison so you can see how the two platforms stack up.
Quick Answer -- Do You Qualify to Drive for Lyft?
Here is the short version. To drive for Lyft in 2026, you need:
- Age: At least 21 in most markets (25 in some, 19 in NYC with a TLC license)
- Driver's license: A valid U.S. driver's license with at least one year of licensed driving history (three years if you are under 23)
- Vehicle: A 4-door car that is 2009 or newer in most markets, with no salvage or rebuilt title
- Insurance: Personal auto insurance that meets your state's minimum requirements
- Background check: A clean criminal history and driving record that passes Lyft's screening through Checkr
- Smartphone: An iPhone or Android device capable of running the Lyft Driver app
If you check every box above, you are likely eligible. But the details matter -- especially around age and vehicle year, which vary by city. Keep reading for the full breakdown.
Lyft Driver Age Requirements
The minimum age to drive for Lyft is not the same everywhere, and this is one of the most confusing parts of the application process. Depending on your market, Lyft requires drivers to be anywhere from 19 to 25 years old.
Here is how age requirements break down by major market:
- Age 19 — New York City (with an active TLC license)
- Age 21 — Most U.S. markets including Los Angeles, Chicago, Houston, Phoenix, San Antonio, Dallas, San Diego, and the majority of cities nationwide
- Age 23 — Select markets with stricter local regulations
- Age 25 — New York City (without a TLC license), certain jurisdictions with commercial licensing requirements
In most of the country, you need to be at least 21 years old to drive for Lyft. This is higher than the 18-year-old minimum some people expect, and it catches a lot of applicants off guard.
There is also a driving experience requirement tied to age. If you are between 21 and 22, Lyft requires at least three years of licensed driving experience. If you are 23 or older, you need at least one year of experience. This means that even if you meet the age minimum, you could still be ineligible if you got your license recently.
Why Does Lyft's Age Requirement Vary So Much?
Lyft does not set these age limits arbitrarily. In most cases, the variation comes down to local and state regulations. Cities and states that require a commercial or for-hire license (like New York City's TLC license) set their own age thresholds, and Lyft must comply.
In markets without specific rideshare regulations, Lyft defaults to a 21-year minimum. This is partly an insurance consideration -- commercial auto insurance policies and Lyft's own liability coverage are structured around the assumption that drivers are at least 21.
If you are under 21 and want to start earning with gig work, rideshare is not your only option. Delivery platforms like DoorDash and Instacart have lower age requirements (18 in most markets), and you can track earnings from those platforms with Gridwise just like you would with Lyft.
Lyft Vehicle Requirements
Your car needs to meet specific standards before Lyft will approve it for the platform. These are the baseline vehicle requirements that apply in most U.S. markets:
- Doors: Must be a 4-door vehicle
- Seatbelts: Minimum of 5 passenger seatbelts, maximum of 8
- Vehicle year: 2009 or newer in most markets (some cities require newer)
- Title status: No salvage titles, no rebuilt titles, no lemon titles
- Cosmetic condition: No significant exterior damage, no missing bumpers, no excessive rust
- Branding: No commercial branding, taxi markings, or government plates
- Safety features: Working air conditioning, power windows (all four), functioning headlights, taillights, brake lights, turn signals, horn, and mirrors
- Tires: All four tires must have adequate tread depth and match in size
Lyft is strict about the cosmetic and safety standards. Even if your vehicle is mechanically sound, visible damage like large dents, cracked windshields, or torn upholstery can result in a failed inspection.
Lyft Car Requirements by Service Tier
Lyft operates multiple service tiers, and each one has its own vehicle requirements. Here is what qualifies for each level:
Lyft Standard (Basic Rideshare)
- 4-door sedan, SUV, or minivan
- 2009 or newer (varies by market)
- 5-8 passenger seatbelts
- No special vehicle requirements beyond the baseline
Lyft XL
- Must seat at least 7 passengers (including the driver)
- Typically requires a full-size SUV or minivan
- 2009 or newer
- All standard requirements apply
Lyft Extra Comfort (formerly Lyft Lux)
- Vehicle must be 2017 or newer
- Must have leather or leatherette interior
- Must score 4.85 or higher driver rating
- Vehicle must be from Lyft's approved Extra Comfort vehicle list
Lyft Black
- Commercial registration or livery plates required
- Must be a luxury sedan from Lyft's approved Black vehicle list (examples: BMW 5 Series, Mercedes E-Class, Audi A6, Tesla Model S, Cadillac CT5)
- 2017 or newer
- Black exterior required
- Leather interior required
- Driver must maintain a 4.85 or higher rating
Lyft Black SUV
- All Lyft Black requirements plus minimum 6 passenger seats
- Must be a luxury SUV from the approved list (examples: Cadillac Escalade, Lincoln Navigator, Chevrolet Suburban, GMC Yukon XL, Mercedes GLS)
- Commercial registration or livery plates required
- Black exterior and leather interior required
If your vehicle qualifies for a higher service tier, you can accept rides at that tier and earn more per trip. You will still receive standard Lyft ride requests as well.
2026 Vehicle Age Updates
Lyft periodically adjusts its vehicle age requirements, and 2026 brought changes in several markets. Here are the key updates:
- California: Vehicles must now be 2011 or newer (previously 2009) in Los Angeles, San Francisco, and San Diego
- New York City: Vehicles must be 2012 or newer for standard Lyft service
- Chicago: Moved from 2009 to 2010 as the cutoff year
- Seattle: Now requires vehicles to be 2010 or newer
- National default: Most other markets remain at 2009 or newer, but Lyft has indicated that the national cutoff will move to 2010 by late 2026
These cutoffs typically shift by one year annually, so if your vehicle is right on the edge, plan ahead. A car that qualifies today may not qualify when your annual vehicle review comes up.
Does My Car Qualify for Lyft? How to Check
The fastest way to confirm whether your specific vehicle qualifies is to use Lyft's online vehicle eligibility tool. Visit the Lyft driver application page at lyft.com/driver, enter your city, and the tool will show you which vehicles are accepted in your market.
You can also check Lyft's premium vehicle list at lyft.com/driver/eligible-premium-vehicles if you think your car qualifies for Extra Comfort, Black, or Black SUV service.
Driver's License and Documentation Requirements
Beyond your vehicle, Lyft requires several personal documents before you can be approved:
- Valid U.S. driver's license: Must be issued by the state where you plan to drive. Lyft does not accept temporary paper licenses, international driving permits, or out-of-state licenses in most cases.
- Driving experience: At least one year of licensed driving history (three years if under 23)
- Vehicle registration: Current and up-to-date registration in the driver's name or with the driver listed as an authorized operator
- Proof of insurance: Personal auto insurance that meets your state's minimum liability coverage requirements
- Profile photo: A clear, front-facing photo of your face taken through the Lyft Driver app. No sunglasses, hats, or filters. Lyft uses this photo for identity verification and passenger safety.
All documents are uploaded directly through the Lyft Driver app during the application process. Lyft's system will tell you immediately if a document is illegible or does not meet requirements, so you can re-upload before it causes a delay.
Do You Need a Special License or Permit?
In most U.S. cities, a standard driver's license is all you need. However, certain markets require additional licensing:
- New York City: You must hold an active Taxi and Limousine Commission (TLC) license. This is a separate application process through the NYC TLC that includes its own background check, drug test, and defensive driving course. The TLC license process can take several weeks and costs approximately $250 in fees.
- Philadelphia: Requires a Certificate of Public Convenience (CPC) from the Philadelphia Parking Authority
- Massachusetts: Requires drivers to pass a state-administered background check in addition to Lyft's Checkr screening
- Other markets: Some cities require a business license, vehicle-for-hire permit, or specific rideshare registration. Check your local government's transportation authority website for requirements in your area.
Lyft also requires all new drivers to complete a Community Safety Education course. This is a short online module that covers topics like preventing discrimination, recognizing signs of human trafficking, and interacting safely with passengers. It takes about 30 minutes and is completed within the Lyft Driver app.
Background Check and Driving Record
Lyft uses Checkr, the same third-party screening company used by Uber, to conduct background checks on all driver applicants. The background check examines two main areas: your criminal history and your driving record.
What Lyft's background check screens:
- County, state, and federal criminal records (typically using a 7-year lookback period)
- National Sex Offender Registry
- SSN trace to verify identity and associated addresses
- Motor vehicle report (driving record) from your state's DMV
- Terrorism watchlist and sanctions databases
The background check begins automatically once you submit your application and consent to screening through the Lyft Driver app.
What Disqualifies You from Driving for Lyft?
Lyft's disqualification criteria are similar to Uber's, and they fall into two categories: criminal history disqualifiers and driving record disqualifiers.
Criminal history disqualifiers (permanent):
- Convictions for violent felonies including murder, assault with a deadly weapon, and kidnapping
- Sexual offenses of any kind
- Registration on the National Sex Offender Registry
- Terrorism-related offenses
Criminal history disqualifiers (7-year lookback):
- Felony convictions (including drug offenses, theft, fraud, and property crimes)
- Violent misdemeanors
- Drug-related convictions
- DUI or DWI (also flagged on driving record)
Driving record disqualifiers:
- Four or more moving violations within the past three years
- Any major moving violation within the past three years (reckless driving, hit-and-run, fleeing the scene, racing)
- DUI or DWI within the past seven years
- Driving on a suspended or revoked license within the past three years
- Any serious driving conviction within the past seven years
A single speeding ticket or minor moving violation will not disqualify you. Lyft is looking for patterns of unsafe driving or serious individual offenses that indicate elevated risk.
How Long Does the Lyft Background Check Take?
The Lyft background check typically takes 3 to 7 business days. Most applicants receive results within five business days.
Here is what affects the timeline:
- Faster processing (2-3 days): You have lived in one or two states, have a clean record, and all courts in your area use electronic records
- Standard processing (3-7 days): You have lived in multiple states or counties, which requires more searches
- Delayed processing (7-14+ days): You have a common name that generates false matches, you have lived in jurisdictions that rely on manual courthouse searches, or there are records that require additional verification
You can check your background check status at any time through the Checkr candidate portal at candidate.checkr.com. Lyft will also notify you through the app once results are in.
How to Appeal a Background Check Rejection
If your background check comes back with a result that Lyft considers disqualifying, you have options:
- Review the report: Checkr is required by law (under the Fair Credit Reporting Act) to send you a copy of the report that led to the adverse decision. Review it carefully for errors.
- Dispute inaccuracies: If the report contains incorrect information -- wrong conviction, mistaken identity, records that should have been expunged -- you can file a dispute directly with Checkr through their candidate portal. Checkr must investigate and respond within 30 days.
- Provide documentation: Gather court documents, expungement orders, or certificates of rehabilitation that support your dispute.
- Reapply after resolution: If the dispute results in corrected information, you can ask Lyft to reconsider your application with the updated report.
Be aware that if the information in the report is accurate and falls within Lyft's disqualification criteria, the dispute process will not change the outcome. Lyft's policies are firm on the offenses listed above.
Insurance Requirements for Lyft Drivers
Insurance is one of the most misunderstood parts of driving for Lyft. Here is how it actually works.
What you need before you start: Lyft requires you to carry personal auto insurance that meets your state's minimum liability coverage. You must upload proof of this insurance during the application process. Lyft will not approve you without it.
What Lyft provides while you are driving: Lyft maintains a commercial insurance policy that provides coverage during active rideshare trips. However, this coverage only activates in specific phases:
- App off: Lyft provides no coverage. Your personal insurance is your only protection.
- App on, waiting for a ride request: Lyft provides limited liability coverage ($50,000 per person for bodily injury, $100,000 per accident for bodily injury, $25,000 for property damage). This does not cover damage to your own vehicle.
- En route to pick up a passenger or during a trip: Lyft provides up to $1,000,000 in third-party liability coverage, plus contingent comprehensive and collision coverage (subject to a $2,500 deductible) if you already carry comp and collision on your personal policy.
The coverage gap: The problem is that most personal auto insurance policies exclude rideshare activity. If you get into an accident while the Lyft app is on but you are not on an active trip, your personal insurer could deny the claim -- and Lyft's limited Phase 1 coverage may not be enough.
The solution -- rideshare endorsement: Most major insurers now offer a rideshare endorsement (sometimes called a TNC endorsement) that you can add to your personal policy. This fills the gap between your personal coverage and Lyft's commercial policy. The typical cost is $15 to $30 per month, and it is well worth it for the peace of mind.
Some states (California, Colorado, and others) actually require rideshare drivers to carry a rideshare endorsement or commercial policy. Check with your insurance provider to understand what is required and available in your state.
Vehicle Inspection Requirements
Most markets require your vehicle to pass a physical inspection before you can start driving for Lyft. Here is what you need to know.
What inspectors check:
- Brakes (pedal feel, stopping power, parking brake)
- Tires (tread depth, condition, matching size)
- Headlights, taillights, brake lights, and turn signals
- Horn functionality
- Windshield condition (no major cracks in the driver's line of sight)
- Seatbelts (all must be present and functional)
- Steering and suspension
- Exhaust system (no leaks)
- Mirrors (interior and both exterior)
- Doors (all four must open, close, and lock properly)
- Air conditioning functionality
Where to get inspected:
- Lyft-approved inspection stations (search within the Lyft Driver app for locations near you)
- Participating auto repair shops (Lyft partners with national chains like Jiffy Lube, Meineke, and Pep Boys in many markets)
- Certified mechanics on Lyft's approved list
Cost:
- Free at some Lyft-partnered locations
- $0 to $50 at independent shops, depending on your market
- California: Inspections are conducted through the Bureau of Automotive Repair and are typically free
How often you need to re-inspect:
- Most markets require annual re-inspection
- Some states (like California) require inspection only at initial signup
- Lyft may request a new inspection if your vehicle information changes or if a passenger reports a safety concern
If your vehicle fails inspection, you will receive a list of items that need to be addressed. Fix the issues and schedule a re-inspection -- there is no penalty for failing the first time, and Lyft does not limit the number of attempts.
How Lyft Requirements Compare to Uber
If you are deciding between Lyft and Uber -- or planning to drive for both -- here is how their requirements compare side by side:
- Minimum age — Lyft: 21 in most markets / Uber: 21 in most markets (25 for UberX in NYC without TLC)
- Minimum driving experience — Lyft: 1 year (3 years if under 23) / Uber: 1 year (3 years if under 23)
- Vehicle year — Lyft: 2009+ (varies by city) / Uber: 2009+ (varies by city)
- Vehicle doors — Lyft: 4-door required / Uber: 4-door required
- Salvage or rebuilt title — Lyft: Not allowed / Uber: Not allowed
- Background check provider — Lyft: Checkr / Uber: Checkr
- DUI lookback period — Lyft: 7 years / Uber: 7 years
- Moving violations limit — Lyft: 4+ in 3 years disqualifies / Uber: 3+ in 3 years disqualifies
- Vehicle inspection — Lyft: Required in most markets / Uber: Required in most markets
- Insurance requirement — Lyft: State minimum personal auto / Uber: State minimum personal auto
- Application timeline — Lyft: 7-14 days typical / Uber: 7-14 days typical
The requirements are nearly identical across both platforms. The most notable difference is in the moving violation threshold -- Uber disqualifies at three violations in three years, while Lyft allows up to three before disqualifying at four. This means a driver with exactly three recent moving violations could be approved by Lyft but denied by Uber.
Since the requirements are so similar, most drivers who qualify for one platform qualify for the other. Many gig drivers drive for both Lyft and Uber simultaneously to maximize their earnings.
Driving for both Lyft and Uber? Gridwise tracks earnings from both platforms in one dashboard so you can see which one pays better in your market.
For a deeper comparison of pay, features, and driver experience, check out our full Uber vs Lyft guide.
How to Sign Up for Lyft -- Step by Step
Once you have confirmed that you meet all the requirements, here is the sign-up process from start to finish.
Step 1: Start your application
Visit lyft.com/driver or download the Lyft Driver app from the App Store or Google Play. Tap "Apply to drive" and enter your phone number to get started.
Step 2: Enter your personal information and upload documents
You will provide your full legal name, date of birth, Social Security number, and driver's license number. Upload photos of your driver's license (front and back), vehicle registration, and proof of insurance. Take a profile photo through the app.
Step 3: Complete the background check
After you submit your information, Lyft automatically initiates the background check through Checkr. You will receive an email from Checkr confirming the process has started. This stage typically takes 3 to 7 business days.
Step 4: Add your vehicle and pass inspection
Enter your vehicle's year, make, model, and license plate number. Upload exterior photos of your car. Schedule and pass a vehicle inspection at an approved location if required in your market.
Step 5: Complete the Community Safety Education course
This short online course takes about 30 minutes and covers passenger safety, anti-discrimination policies, and recognizing signs of human trafficking. You complete it directly in the Lyft Driver app.
Step 6: Receive approval and start driving
Once your background check clears, your documents are verified, and your vehicle passes inspection, Lyft will activate your driver account. You will receive a notification in the app, and you can start accepting rides immediately.
Total timeline: Most applicants are approved and ready to drive within 7 to 14 days. The background check is usually the longest step. If your documents are clean and your market does not require a lengthy inspection process, some drivers are approved in as little as five days.
Once approved, download Gridwise to track your Lyft earnings and find the best hours to drive in your city. Gridwise shows you real-time demand data so you can make more per hour from day one.
FAQ
Can I drive for Lyft at 18?
No. Lyft's minimum age is 21 in most markets. The only exception is New York City, where drivers as young as 19 can qualify if they hold an active TLC license. There is no market where Lyft accepts 18-year-old drivers.
What is the oldest car Lyft accepts?
In most markets, the oldest vehicle Lyft accepts is a 2009 model year. However, this varies by city -- some markets like Los Angeles and New York City require newer vehicles (2011 or 2012, respectively, as of 2026). The national cutoff is expected to shift to 2010 later in 2026. Check the Lyft driver application page for your specific city's requirement.
Can I drive for Lyft and Uber at the same time?
Yes. There is no exclusivity requirement for either platform. Many drivers run both apps simultaneously and accept whichever ride request comes first or pays better. This is one of the most effective ways to reduce downtime and increase hourly earnings. You can use Gridwise to track and compare earnings across both platforms.
Does Lyft require a vehicle inspection every year?
In most markets, yes. Lyft requires an annual vehicle re-inspection to ensure your car continues to meet safety standards. Some states only require an inspection at initial sign-up. If you are unsure about your market, check the Lyft Driver app or contact Lyft support for your local inspection schedule.
Can I drive for Lyft in a different state than my license?
Generally, no. Lyft requires your driver's license to be issued by the state where you plan to drive. If you move to a new state, you will need to update your license to that state and update your information in the Lyft Driver app. There are limited exceptions in some border-area markets, but the standard policy is same-state licensing.
Do I need commercial insurance for Lyft?
In most states, you do not need a full commercial insurance policy. You do need personal auto insurance that meets your state's minimum requirements, and Lyft's commercial policy provides additional coverage during active trips. However, adding a rideshare endorsement to your personal policy (typically $15 to $30 per month) is strongly recommended to cover the gap between personal and commercial coverage. A few states require rideshare-specific insurance by law.
How much does it cost to start driving for Lyft?
There is no application fee to become a Lyft driver. Your main costs are the vehicle inspection ($0 to $50 depending on your market), any vehicle repairs needed to pass inspection, and the optional but recommended rideshare insurance endorsement ($15 to $30 per month). If you are in a market like NYC that requires a TLC license, factor in approximately $250 in licensing fees plus the cost of a defensive driving course.
What happens if my Lyft background check is taking too long?
If your background check has been pending for more than 10 business days, check your status at candidate.checkr.com first. Common causes of delays include living in multiple states (which requires more county searches), having a common name that generates potential matches requiring manual review, and jurisdictions that use manual courthouse records rather than electronic databases. If the status shows "complete" on Checkr but Lyft has not updated your app status, contact Lyft support directly.
Can I drive for Lyft with a DUI on my record?
It depends on when the DUI occurred. Lyft applies a 7-year lookback period for DUI and DWI convictions. If your DUI conviction was more than seven years ago and you have no other disqualifying offenses, you may be eligible. If the DUI occurred within the past seven years, it will likely disqualify you. State laws may also affect how DUI records are reported and considered.

DoorDash Driver Requirements 2026: Age, Car, Background Check, and How to Sign Up
So you want to start delivering for DoorDash, but you are not sure if you actually qualify. Maybe you are 18 and wondering if that is old enough in your state, or you are not sure if your car meets the requirements, or you have something on your record and want to know if it will be a problem. This guide covers every DoorDash driver requirement in 2026 -- age minimums by state, vehicle rules, documents you need, the background check process, and everything else standing between you and your first delivery.
The good news is that DoorDash has some of the most accessible requirements in the gig economy. Most people who apply get approved. But there are specific criteria you need to meet, and a few gotchas that catch people off guard. Here is the full breakdown.
Quick Answer -- DoorDash Driver Requirements at a Glance
If you just want the short version, here is what you need to become a DoorDash Dasher in 2026:
- Age: At least 18 years old (19 in some states)
- Valid driver's license (or government-issued ID if delivering by bike or on foot)
- Clean background check through Checkr (no major criminal or driving offenses)
- A vehicle -- car, bike, scooter, or even on foot in select markets
- Auto insurance, registration, and a clean driving record (car dashers only)
- A smartphone running iOS 15 or later, or Android 7.0 or later
- A Social Security number and legal authorization to work in the U.S.
If you meet all of these, you can apply at dasher.doordash.com and potentially be dashing within a week. Keep reading for the full breakdown by category, including state-specific age rules and what exactly will get you disqualified.
DoorDash Age Requirements by State
The standard minimum age to deliver for DoorDash is 18 years old. However, several states have a higher minimum of 19 due to local labor laws and regulations around independent contractor work. This catches a lot of people off guard, so check your state before applying.
Here is the state-by-state breakdown for 2026:
States where you must be at least 19 to DoorDash:
- Arizona
- Arkansas
- Florida
- Idaho
- Indiana
- Kentucky
- Mississippi
- Montana
- Nebraska
- New Mexico
- South Dakota
- Texas
- Utah
- Wyoming
All other states (and Washington, D.C.): The minimum age is 18.
If you live in one of the 19-minimum states and you are currently 18, you have a couple of options. You can wait until your 19th birthday, or you can check whether platforms like Uber Eats or Instacart accept 18-year-olds in your area in the meantime.
Not sure if DoorDash is the best platform for you? Use Gridwise to compare earnings across DoorDash, Uber Eats, and more -- download Gridwise free.
How Old Do You Have to Be to DoorDash?
You have to be at least 18 years old to DoorDash in most of the United States. In 14 states -- including Texas, Florida, and Arizona -- the minimum age is 19 instead. There is no maximum age limit. As long as you meet the minimum and can pass the background check, you can deliver.
The age difference exists because DoorDash classifies Dashers as independent contractors, and some states have stricter rules about the minimum age for independent contractor agreements. This is not a DoorDash-specific rule -- it applies to most gig platforms operating in those states.
One important note: DoorDash verifies your age through your driver's license or government-issued ID during the application process. There is no way to bypass this requirement, and using a fake or borrowed ID will result in permanent deactivation.
Vehicle and Transportation Requirements
DoorDash is flexible when it comes to how you deliver. Depending on your market, you can use a car, bike, electric scooter, or even deliver on foot. Each option has different requirements.
DoorDash Car Requirements
If you plan to deliver by car -- which is the most common option and gives you access to every delivery type -- here is what you need:
- Valid driver's license -- Must be a U.S.-issued license that is current and not suspended, expired, or restricted in a way that prevents delivery driving
- Vehicle registration -- Your car must be registered in your name or you must be listed on the registration
- Auto insurance -- Active auto insurance on the vehicle you use for deliveries. DoorDash does not specify minimum coverage amounts, but you need at least your state's minimum liability coverage
- Vehicle condition -- Your car must be in safe, working condition. DoorDash does not have specific make, model, or year restrictions. There is no vehicle inspection required. However, if your car has significant visible damage, missing lights, or safety issues, it could be a problem if a customer reports it
- Two-door or four-door -- Both are acceptable. DoorDash does not require a four-door vehicle like some rideshare platforms do
Unlike Uber and Lyft, DoorDash does not set a maximum vehicle age. You can deliver in a 2005 Honda Civic or a 2026 Tesla -- it does not matter as long as the car runs safely and is legally registered and insured.
Can You DoorDash with a Bike, Scooter, or on Foot?
Yes, but availability depends on your market. Here is how each option works:
Bike deliveries:
- Available in most major metro areas (New York City, Chicago, San Francisco, Los Angeles, and others)
- You need a valid government-issued ID (driver's license not required)
- No insurance or registration needed
- You will only receive short-distance orders, typically within a 2-3 mile radius
- Pros: No fuel costs, no car insurance to maintain, good exercise
- Cons: Smaller delivery radius means fewer orders, weather exposure, physically demanding
Electric scooter / moped deliveries:
- Available in select urban markets
- Requirements vary by city -- some require a driver's license and registration for mopeds, others do not for low-speed electric scooters
- Check your local regulations, as some cities require specific permits for motorized scooter delivery
- Pros: Faster than biking, lower operating costs than a car
- Cons: Limited availability, range limitations, weather exposure
On-foot deliveries:
- Available in dense urban cores where restaurants and customers are within walking distance
- You need a valid government-issued ID
- Delivery radius is very small -- typically under 1 mile
- Pros: Zero vehicle costs
- Cons: Very limited order volume, only viable in the densest neighborhoods
When you sign up, you select your delivery method in the Dasher app. You can change it later if you switch from biking to driving, for example, but you will need to upload the appropriate documents (license, insurance, registration) for car deliveries.
Required Documents and How to Submit Them
DoorDash needs to verify your identity and, if you are driving, confirm that you are legally authorized to operate a vehicle. Here is everything you need to have ready before you start the application:
For all Dashers (car, bike, scooter, or on foot):
- Social Security number -- Entered during sign-up for tax purposes and to run your background check
- Government-issued photo ID -- Driver's license, state ID, or passport. Must be unexpired
- Selfie verification -- A photo of your face taken in real time through the Dasher app. This is matched against your ID photo to confirm your identity
Additional documents for car deliveries:
- Valid driver's license -- If you are delivering by car, a state ID alone is not enough. You need a full driver's license
- Proof of auto insurance -- A photo or digital copy of your insurance card showing active coverage
- Vehicle registration -- Not always required at sign-up, but DoorDash may request it
All documents are uploaded directly through the Dasher app or the dasher.doordash.com sign-up portal. The process is straightforward -- you take a photo of each document with your phone's camera, and DoorDash's system reads and verifies the information automatically.
A few tips to avoid delays:
- Make sure your photos are clear, well-lit, and not blurry
- Ensure all four corners of the document are visible in the frame
- Your name must match exactly across all documents (driver's license, insurance, and application)
- If your insurance card is digital, take a screenshot and upload that
DoorDash Background Check -- What to Expect
Every DoorDash applicant must pass a background check before they can start delivering. DoorDash uses Checkr, the same third-party screening company used by Uber, Lyft, Instacart, and most major gig platforms.
Here is what the background check covers:
- Criminal history -- County, state, and federal records going back seven years
- National sex offender registry -- A permanent check with no time limitation
- Motor vehicle records (MVR) -- Your driving history from the DMV, including violations, accidents, DUIs, and license status (car dashers only)
- SSN verification -- Confirms your identity and that the records pulled belong to you
The background check does not include credit checks, employment verification, drug testing, education history, or social media screening.
Timeline: Most background checks take 3 to 7 business days. Some applicants are cleared in under 24 hours. If your check takes more than 10 business days, you can check your status through the Checkr Candidate Portal at candidate.checkr.com.
For a complete deep dive on the background check process, including exactly how to read your results and what each status means, see our full guide: DoorDash Background Check: What to Expect and How Long It Takes.
What Disqualifies You from DoorDash?
DoorDash does not publish a complete list of disqualifying offenses, but based on their policies and the experiences of thousands of applicants, here is what will prevent you from being approved:
Permanent disqualifiers (no time limit):
- Convictions requiring sex offender registry listing
- Violent felonies such as murder, attempted murder, or kidnapping
- Terrorism-related convictions
7-year lookback disqualifiers:
- Felony convictions of any kind
- DUI or DWI convictions
- Drug-related offenses (possession, distribution, manufacturing)
- Theft, fraud, robbery, or burglary convictions
- Assault and battery
- Weapons offenses
Driving record issues (typically 3-year lookback):
- Reckless driving or hit-and-run
- More than three moving violations in three years
- Suspended, revoked, or expired driver's license
- At-fault accidents involving injury
If your offense falls outside the lookback window -- for example, a felony conviction from nine years ago -- it generally will not appear on your Checkr report and should not affect your application. However, some states allow longer lookback periods, so this is not a guarantee.
What If Your Background Check Fails?
If your background check comes back with issues, you are not necessarily out of options. Here is what you can do:
Step 1: Check your Checkr report. You will receive an email from Checkr with a link to view your full report. Review it carefully for errors -- incorrect records, mistaken identity, outdated information, or charges that were dismissed or expunged.
Step 2: File a dispute with Checkr. If you find errors, you can dispute them directly through the Checkr Candidate Portal. You will need to provide documentation such as court records, expungement orders, or proof of identity. Checkr is required by the Fair Credit Reporting Act (FCRA) to investigate disputes within 30 days.
Step 3: Provide supporting documentation. Gather any relevant paperwork -- dismissal letters, certificates of rehabilitation, proof that charges were dropped. The more documentation you provide, the stronger your dispute.
Step 4: Wait for re-adjudication. After Checkr updates your report, DoorDash will re-review your application. This process can take an additional 2 to 4 weeks.
For step-by-step instructions on the dispute process, read our complete guide: DoorDash Background Check: What to Expect and How Long It Takes.
Equipment You Will Need to Get Started
Beyond the basic requirements, there are a few items you will want to have ready before your first delivery. Some are required, and some are strongly recommended.
Required:
- Smartphone -- iPhone running iOS 15+ or Android running 7.0+. The Dasher app is your entire business -- you receive orders, navigate, and communicate with customers through it
- Insulated delivery bag -- DoorDash may ship you a free activation kit that includes a basic insulated bag. If yours does not arrive before you start, or if you want a higher-quality option, buy one yourself. A good insulated bag costs $10 to $25 on Amazon
Strongly recommended:
- Phone mount -- You will be using GPS navigation constantly. A dashboard or vent mount keeps your phone visible and your hands free. Cost: $10 to $20
- Car charger or portable battery pack -- Running the Dasher app, Google Maps, and your screen at full brightness drains your battery fast. A car charger is essential. Cost: $10 to $15
- Extra insulated bags -- A second bag helps when you have stacked orders (two deliveries at once). Some dashers carry a large pizza bag and a smaller bag for regular orders
Optional but useful:
- Dashcam -- Protects you in case of accidents or false customer complaints. Cost: $30 to $100
- Portable hot bag -- A bag with heating elements to keep food warmer on longer deliveries. Cost: $20 to $40
- Weather gear -- If you deliver in rain or snow, waterproof phone cases and seat covers can save you headaches
Estimated total startup cost: $20 to $75, depending on what you already have. If DoorDash sends you the free activation kit, your out-of-pocket cost is even lower. Compared to the startup costs for rideshare driving (vehicle inspections, commercial insurance), food delivery has a very low barrier to entry.
How to Sign Up for DoorDash -- Step by Step
The DoorDash sign-up process is straightforward and mostly happens through your phone. Here is exactly what to do:
Step 1: Go to dasher.doordash.com or download the Dasher app. The Dasher app is separate from the regular DoorDash customer app. Search for "DoorDash Dasher" in the App Store or Google Play.
Step 2: Enter your personal information. You will provide your name, email, phone number, address, and Social Security number. You will also consent to the background check at this stage.
Step 3: Upload your documents and complete identity verification. Take photos of your driver's license (or government-issued ID for bike couriers), proof of insurance (car dashers), and a live selfie for identity matching.
Step 4: Wait for your background check to clear. This typically takes 3 to 7 business days. You will receive email updates from both DoorDash and Checkr as your check progresses. There is no way to speed up the process.
Step 5: Complete orientation (if required in your market). Some markets require you to watch a short online orientation video before you can start. Others skip this step entirely. If required, it takes about 10 to 15 minutes.
Step 6: Activate your account and start dashing. Once approved, you will see a "Dash Now" or "Schedule" button in the Dasher app. Pick a time slot, head to a busy area, and you are officially a Dasher.
Once you are approved, download Gridwise to track every DoorDash delivery and find the highest-paying hours in your market -- get Gridwise free.
How Long Does DoorDash Approval Take?
For most applicants, the entire process from application to first delivery takes 5 to 10 days. Here is the typical breakdown:
- Application itself: 10 to 15 minutes
- Background check: 3 to 7 business days (sometimes as fast as 24 hours)
- Orientation (if required): 10 to 15 minutes
- Activation kit delivery (optional): 5 to 7 business days, but you do not need to wait for it to start
Some applicants report being approved and dashing on the same day they applied, though this is not the norm. If you are in a hurry, the biggest variable is the background check. Applicants with common names, clean records, and addresses in states with fast court systems tend to get cleared fastest.
If you have not heard anything after 10 business days, check your email (including spam) for messages from Checkr, and log into the Checkr Candidate Portal to view your status.
Ongoing Requirements to Stay Active
Getting approved is only the first step. DoorDash has ongoing performance and compliance requirements that every Dasher must maintain to keep their account in good standing.
Customer rating: DoorDash tracks your average customer rating on a scale of 1 to 5. If your rating drops below 4.2, you are at risk of deactivation. This rating is based on your last 100 rated deliveries, so a few bad ratings early on can have an outsized impact. Focus on communication, handling food carefully, and following delivery instructions.
Completion rate: Once you accept an order, you are expected to complete it. DoorDash requires a completion rate above 80%. Dropping below this threshold can trigger deactivation. Unassigning orders after accepting them counts against this metric, so be selective about which orders you accept in the first place.
Periodic selfie verification: DoorDash periodically requires Dashers to take a real-time selfie before starting a dash. This is to confirm that the person dashing is the person who was approved. Failing to complete the selfie check, or having a mismatch, can result in account suspension.
Keep your documents current: If your driver's license, auto insurance, or vehicle registration expires, DoorDash will pause your account until you upload updated documents. Set reminders for yourself so expiring documents do not catch you off guard.
What gets you deactivated:
- Customer rating below 4.2
- Completion rate below 80%
- Fraud or abuse (falsifying deliveries, using someone else's account)
- Safety violations reported by customers or merchants
- Failed periodic selfie verification
- Criminal activity while dashing
If you are deactivated, DoorDash does offer an appeal process. You will receive an email with instructions on how to submit your appeal. The process involves explaining your side and providing any relevant documentation. Appeals are reviewed on a case-by-case basis and typically take 1 to 2 weeks. For more details on the deactivation and appeal process, check out our guide: Deactivation Appeal Guide.
DoorDash Insurance -- What Is Covered?
Understanding insurance as a DoorDash driver is important, because there are gaps that many new Dashers do not realize exist.
Your personal auto insurance: DoorDash requires you to have active auto insurance, but your standard personal auto policy may not cover you while you are making deliveries. Most personal insurance policies exclude commercial or delivery driving. If you get into an accident while on a delivery and your insurer finds out, they could deny your claim.
DoorDash's occupational accident policy: DoorDash provides an occupational accident policy for active Dashers that includes:
- Up to $1,000,000 in third-party liability coverage while you are on an active delivery (from the time you accept an order until you complete the drop-off)
- Occupational accident insurance covering medical expenses if you are injured while dashing
- Disability payments and death benefits in certain situations
The gap: DoorDash's coverage only applies while you are on an active delivery. It does not cover you while you are driving to a restaurant to pick up an order, waiting for orders in a parking lot, or driving between deliveries. During those times, only your personal insurance applies -- and if your personal policy excludes delivery work, you could be uninsured.
What you should do: Consider adding a rideshare or delivery endorsement to your personal auto insurance policy. This typically costs $15 to $30 per month and ensures you are covered during all phases of delivery driving, not just while you are carrying food. Major insurers like State Farm, Progressive, Geico, and Allstate offer these endorsements. It is a small price to pay for peace of mind and real protection.
FAQ
Can you DoorDash at 16 or 17?
No. DoorDash requires all Dashers to be at least 18 years old, and 19 in some states. There are no exceptions, and there is no parental consent workaround. If you are under the minimum age, you will need to wait until your birthday. In the meantime, look into other ways to earn money that do not have age restrictions tied to independent contractor agreements.
Do you need your own car to DoorDash?
No. You can deliver by bike, electric scooter, or on foot in many urban markets. If you do use a car, it does not have to be in your name specifically, but you need to be listed on the insurance and registration -- or at minimum, have the vehicle owner's permission and valid insurance covering your use of the vehicle.
Can you DoorDash with a suspended license?
No. If your driver's license is suspended, revoked, or expired, you cannot deliver by car. DoorDash verifies your license status during the application process and periodically afterward. If your license is suspended after you are approved, your account will be paused or deactivated until the issue is resolved. You may still be able to deliver by bike or on foot if your market allows it, since those options require only a government-issued ID, not a driver's license.
Does DoorDash check your driving record every year?
DoorDash does not publicly confirm how often they re-run background checks, but Checkr offers continuous monitoring services and DoorDash has the ability to run periodic checks. Many Dashers report receiving re-check notifications after 12 to 24 months. If a serious violation (like a DUI) appears on your record after you are already approved, it could lead to deactivation.
Can someone ride with you while you DoorDash?
DoorDash's official policy states that only the registered Dasher should be in the vehicle during deliveries. In practice, this is difficult to enforce and many Dashers do have passengers. However, if a customer or merchant reports that someone else is handling their food or entering their property, it could trigger a review of your account. The safest approach is to dash alone.
Is there a DoorDash sign-up bonus right now?
DoorDash frequently offers sign-up bonuses (also called guaranteed earnings offers) for new Dashers, but they vary by market and change frequently. Common offers include a guaranteed minimum amount for completing a set number of deliveries within your first few weeks -- for example, "earn at least $500 for your first 50 deliveries." To find the current offer in your area, check our regularly updated guide: DoorDash Sign-Up Bonus. You can also visit dasher.doordash.com to see what is currently available when you start the application.
Start Tracking Your DoorDash Earnings from Day One
Meeting the DoorDash driver requirements is the easy part. The real challenge is making the most of every hour you spend on the road. That is where Gridwise comes in.
Gridwise automatically tracks your DoorDash deliveries, mileage, and earnings so you always know exactly how much you are making per hour, per mile, and per delivery. You can see which hours and areas are most profitable in your market, track your expenses for tax time, and compare your DoorDash earnings against other platforms like Uber Eats and Instacart.
Thousands of gig drivers use Gridwise to earn more and stress less. Whether DoorDash is your full-time gig or a side hustle, having real data about your earnings changes the game. For more on what you can expect to earn, check out our guide on DoorDash earnings.
Download Gridwise free and start tracking from your very first delivery.
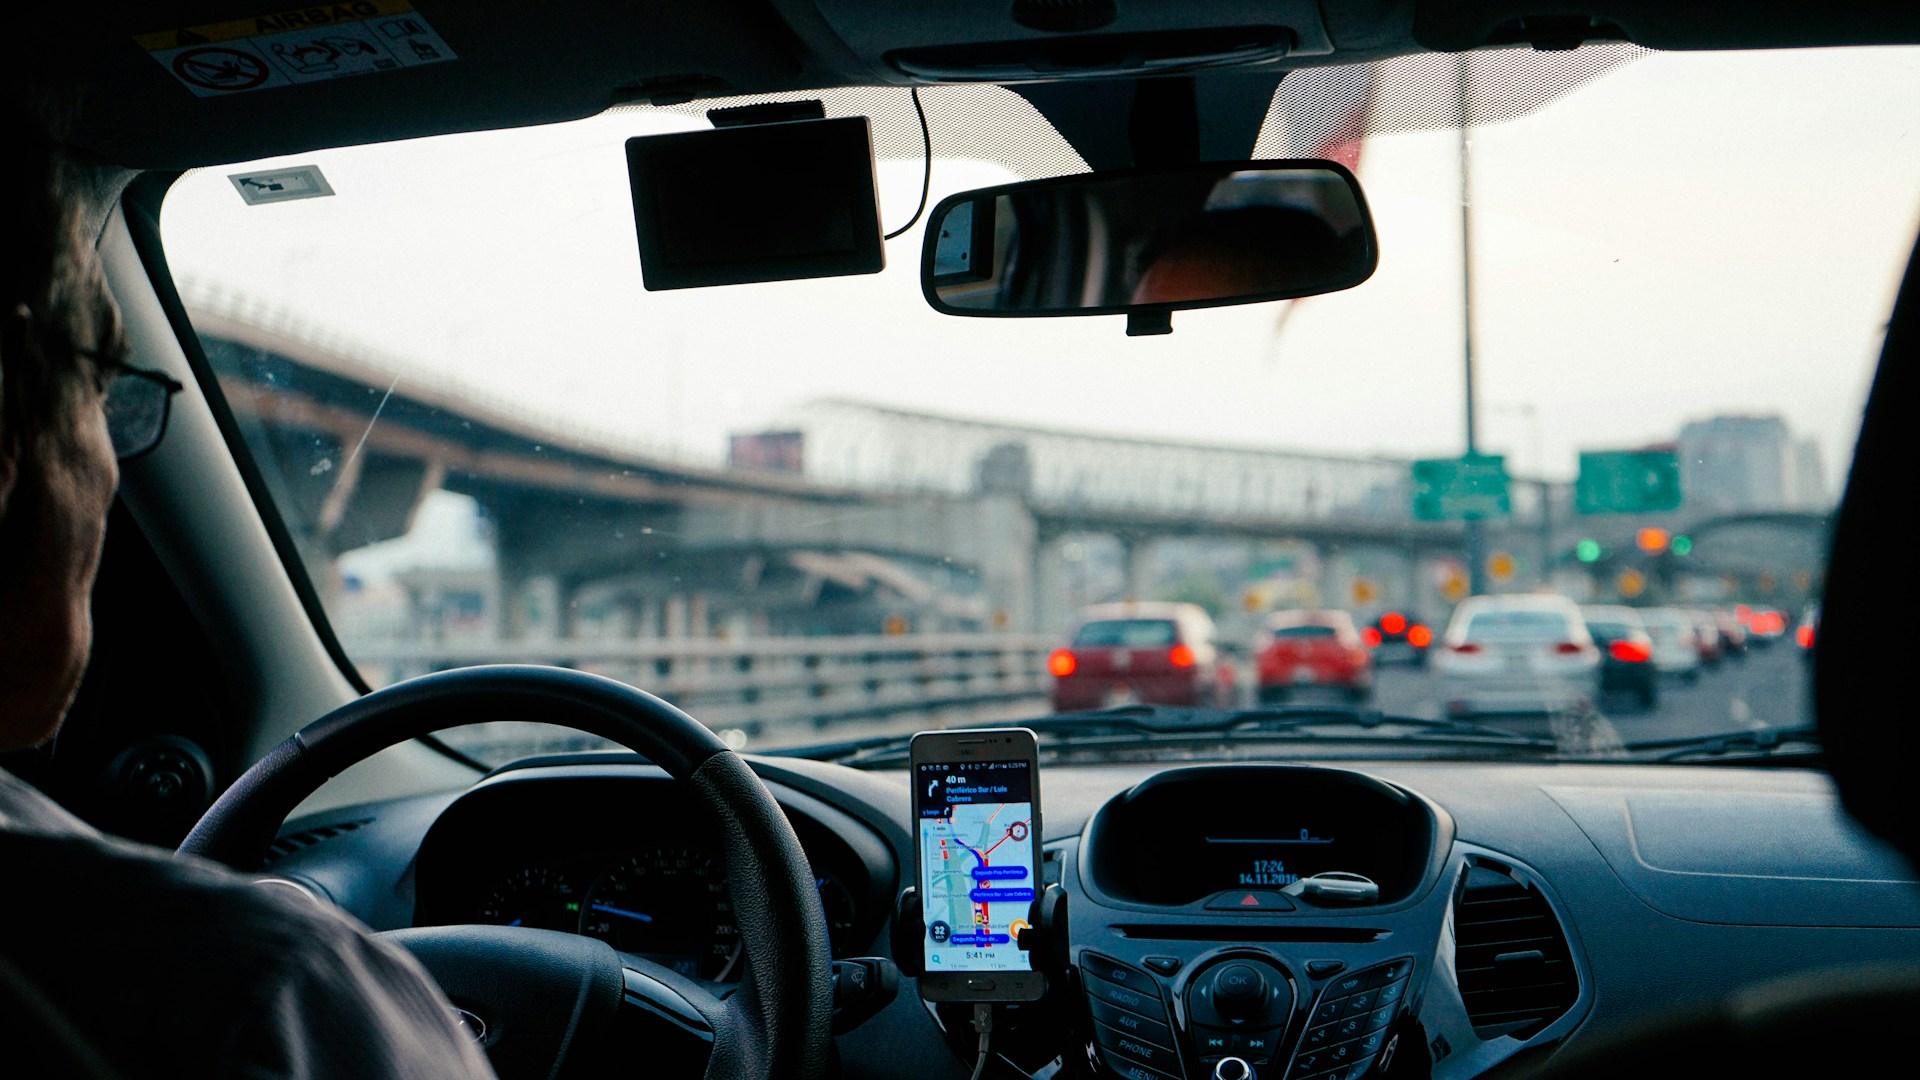
How to Become an Uber Driver in 2026: Requirements, Sign-Up, and What to Expect
Signing up to drive for Uber or deliver with Uber Eats is one of the fastest ways to start earning money on your own schedule. Whether you want to give rides, deliver food, or do both, the application process is straightforward — but there are specific requirements and steps you need to know about before you begin.
This guide walks you through the entire process from start to finish, covering both Uber rideshare and Uber Eats. We will explain what you need to qualify, how to submit your application, how long approval takes, what it costs to get started, and what to expect during your first week on the road. If you are looking for a detailed breakdown of vehicle and driver requirements specifically, check out our complete guide on Uber driver requirements before you apply.
Quick Answer — How to Sign Up for Uber in 5 Steps
Here is the short version of how to become an Uber driver or Uber Eats driver in 2026:
- Download the Uber Driver app from the App Store or Google Play
- Enter your personal information including your name, email, phone number, and Social Security number
- Upload your required documents — driver's license, vehicle registration, insurance, and a profile photo
- Consent to a background check run by Checkr (takes 3-10 business days)
- Complete a vehicle inspection (rideshare drivers only, $20-$50 depending on your market)
Estimated total time from application to first trip: 7 to 14 days.
Most of that waiting period is the background check. The actual application itself takes about 15 to 20 minutes to complete. The rest of this guide breaks down each step in detail and covers everything else you need to know, including how Uber Eats sign-up differs from rideshare.
Uber Driver vs. Uber Eats Driver — What's the Difference?
Before you sign up, it helps to understand the difference between driving for Uber (rideshare) and delivering for Uber Eats. They use the same app and the same sign-up process, but the requirements, earning potential, and day-to-day experience are different.
Uber Rideshare (UberX, Comfort, XL, etc.):
- You transport passengers from point A to point B
- Stricter vehicle requirements (4-door, must be 16 years old or newer, no cosmetic damage)
- Must be 21 or older in most markets (25 in some)
- Higher earning potential per trip
- Requires a vehicle inspection before you can start
Uber Eats (Delivery):
- You pick up food orders from restaurants and deliver them to customers
- More flexible vehicle options — you can deliver by car, bike, scooter, or even on foot in some markets
- Lower age requirement (18+ in most markets)
- No vehicle age requirement for delivery-only drivers
- No vehicle inspection required
- Lower barrier to entry overall, but tips make up a larger portion of your income
Can you do both? Yes. When you sign up through the Uber Driver app, you can choose to enable both rideshare and delivery. Once approved, you can toggle between them at any time depending on what is available and what you feel like doing. Many drivers stack Uber Eats deliveries during slow rideshare periods to keep their earnings consistent.
Which Should You Choose?
If your main goal is to maximize earnings per hour, rideshare generally pays more on a per-trip basis, especially during surge pricing. However, it requires more investment upfront (a qualifying vehicle, inspection, and insurance) and means having strangers in your car.
If you want the lowest barrier to entry and maximum flexibility, Uber Eats is the way to go. You can start with almost any vehicle — or no vehicle at all in some cities — and work at your own pace without interacting with passengers. Many drivers start with Uber Eats while they figure out whether they want to commit to rideshare.
If you are on the fence, sign up for both. There is no downside to having both options available, and you can always adjust later based on what works best in your market.
Requirements to Drive for Uber (Rideshare)
To drive for Uber's rideshare service, you need to meet requirements for both yourself and your vehicle. Here is a summary of the key qualifications — for a full deep dive, see our complete Uber driver requirements guide.
Driver requirements:
- Be at least 21 years old (some markets require 25)
- Hold a valid U.S. driver's license — you must have had it for at least one year (three years if you are under 25)
- Have a clean driving record with no major violations in the past seven years
- Pass a background check through Checkr
- Have a valid Social Security number
Vehicle requirements:
- Four-door vehicle
- Must be model year 2010 or newer (varies by city — some markets require 2012 or newer)
- No salvage or rebuilt title
- No significant cosmetic damage
- Must pass a vehicle inspection
- Must be registered and insured in your name (or you must be listed on the policy)
Insurance requirements:
- Must carry at least your state's minimum auto insurance coverage
- A rideshare endorsement or commercial policy is strongly recommended, though not always required by Uber
- Uber provides supplemental liability coverage while you are online and on trips, but it does not cover your vehicle's damage — that gap is where a rideshare endorsement matters
The specific requirements can vary by city and state, so always check Uber's website for your local market. Some cities have additional requirements like a TLC license (New York City) or specific permits.
Requirements to Deliver for Uber Eats
The requirements for Uber Eats delivery are notably less strict than rideshare:
- Age: 18 or older (compared to 21 for rideshare)
- License: Valid driver's license if delivering by car. If delivering by bike, scooter, or on foot, no driver's license is needed — just a government-issued ID
- Vehicle: Car, bike, electric bike, scooter, or on foot (availability varies by market)
- No vehicle age requirement for delivery-only sign-ups
- No vehicle inspection required for delivery drivers
- Background check: Still required, same process as rideshare
- Insurance: Required if delivering by car (same as rideshare), not required for bike or foot delivery
This lower barrier to entry is a big reason why "how to become an Uber Eats driver" is one of the most searched gig economy phrases. If you meet the basic age and background check requirements, you can likely start delivering within a week or two.
Step-by-Step Sign-Up Process
Now let's walk through the actual application process. Whether you are signing up for Uber rideshare, Uber Eats, or both, the process starts the same way.
Step 1 — Download the Uber Driver App
Search for "Uber Driver" in the Apple App Store or Google Play Store. Make sure you download the Uber Driver app, not the regular Uber rider app — they are two separate applications. The Uber Driver app has a green icon, while the rider app has a black icon.
You can also start your application online at uber.com/drive, but you will eventually need the app to complete the process and to actually accept trips once you are approved.
Step 2 — Enter Your Personal Information
Once you open the app, you will be prompted to create a driver account. You will need to provide:
- Your full legal name (must match your driver's license exactly)
- Email address
- Phone number (Uber will send a verification code)
- Social Security number (for the background check)
- Your city or market area
If you already have an Uber rider account, you can use the same email to sign up as a driver. The system will link both accounts.
At this stage, you will also choose whether you want to drive (rideshare), deliver (Uber Eats), or both. You can change this later, so if you are unsure, select both to keep your options open.
Step 3 — Upload Required Documents
This is where the process takes the most hands-on effort. You will need to upload clear photos of:
- Driver's license (front and back)
- Vehicle registration (if driving a car)
- Proof of insurance (if driving a car)
- Profile photo — a clear, front-facing photo of your face with no sunglasses or hats
Tips for getting your documents accepted on the first try:
- Take photos in good lighting with no glare or shadows
- Make sure all four corners of each document are visible in the frame
- Ensure text is legible and not blurry — hold your phone steady
- Your profile photo should be taken against a plain background with your face clearly visible
- Make sure your name matches across all documents exactly (middle name, suffixes, etc.)
- Do not crop or edit the photos before uploading
Document review typically takes one to three business days. If something is rejected, Uber will notify you in the app with a specific reason, and you can re-upload immediately. The most common rejection reasons are blurry photos, glare obscuring text, and name mismatches between documents.
Step 4 — Consent to Background Check
After your documents are submitted, Uber will prompt you to consent to a background check through Checkr, their third-party screening provider. This is a required step for both rideshare drivers and Uber Eats delivery partners.
What Uber checks:
- Criminal history (county, state, and federal records going back seven years)
- Sex offender registry
- Motor vehicle records (driving violations, suspensions, DUIs)
- SSN verification and identity confirmation
Typical timeline: 3 to 10 business days, with most applicants cleared within five business days.
You do not need to do anything during this waiting period — it runs automatically after you provide consent. You can check your status at any time in the Uber Driver app under the "Account" section.
For a complete breakdown of what the background check covers, what disqualifies you, and what to do if there is a problem, read our detailed guide on the Uber background check.
Step 5 — Complete Vehicle Inspection (Rideshare Only)
If you are signing up to drive rideshare passengers, your vehicle must pass an inspection before you can go online. Uber Eats delivery drivers can skip this step entirely.
Where to get your inspection:
- Uber-authorized inspection stations (search in the Uber Driver app for locations near you)
- Some mechanics and auto shops that are Uber-approved
- Certain Uber Greenlight Hub locations (available in larger markets)
What they check:
- Working headlights, taillights, and turn signals
- Tire condition and tread depth
- Brakes
- Seatbelts for all passenger seats
- Working horn and windshield wipers
- No significant body damage or mechanical issues
- Interior cleanliness and condition
Cost: Typically $20 to $50, depending on your market and where you go. Some markets offer free inspections at Greenlight Hubs. You pay out of pocket — Uber does not reimburse this cost.
The inspection form must be uploaded to the Uber Driver app. Once it is reviewed and approved (usually within one to two business days), you are cleared to start accepting rides.
Download Gridwise alongside the Uber Driver app to track your earnings, find peak hours, and maximize your income from day one.
How Long Does It Take to Get Approved?
From the moment you submit your application to the moment you can accept your first trip, expect the process to take 5 to 14 days in most cases.
Here is how that breaks down:
- Application and document upload: 15-20 minutes
- Document review: 1-3 business days
- Background check: 3-10 business days (runs in parallel with document review in many cases)
- Vehicle inspection review: 1-2 business days (rideshare only)
For Uber Eats delivery drivers who are not using a car, the timeline is often shorter since there is no vehicle inspection or insurance verification step. Some Uber Eats applicants are approved in as little as three to five days.
What can delay your approval:
- Blurry or rejected documents (adds 2-4 days while you re-upload)
- Background check holds — if Checkr needs to verify records across multiple counties, it can take longer
- Name mismatches between your license, registration, and insurance
- Expired documents (insurance or registration)
- High application volume in your market during peak sign-up periods
What to do while you wait:
- Use the time to set up your car (phone mount, charger, dashcam)
- Research your local market to understand peak hours and busy areas
- Read through Uber's driver policies and community guidelines
- Download Gridwise and start exploring earnings data and peak hours in your area so you are ready to hit the ground running
What If You're Denied or Waitlisted?
Not every application gets approved. Here is what you need to know if you run into issues.
Common denial reasons:
- Felony conviction within the past seven years
- DUI or major driving offense on your record
- Too many moving violations
- Suspended or revoked license
- Vehicle does not meet requirements
- Failed vehicle inspection
How to appeal through Checkr:
If your denial is based on your background check, you have the right to dispute the results directly with Checkr. Checkr will send you a copy of the report, and you can file a dispute if you believe any information is inaccurate. The dispute process typically takes 30 days.
You can start a dispute at Checkr's candidate portal (candidate.checkr.com). You will need the report ID from the email Checkr sent you.
Waitlisted — what it means:
In some markets, Uber places new applicants on a waitlist when they have enough drivers in the area. This does not mean you were denied — it means your market is temporarily saturated. Waitlists can last anywhere from a few weeks to several months. There is no way to speed up the process, but you will be notified by email and in the app when a spot opens.
If you are waitlisted for rideshare, you may still be able to start with Uber Eats in the meantime, since delivery has separate capacity limits.
How Much Does It Cost to Become an Uber Driver?
Signing up for Uber is free — there is no application fee. However, there are real costs associated with getting started, and it helps to know what you are getting into financially.
Startup cost breakdown:
- Vehicle inspection fee: $20-$50 (rideshare only; free at some Greenlight Hubs)
- Insurance upgrade (rideshare endorsement): $0-$50/month extra depending on your provider and state
- Phone mount: $10-$25
- Car phone charger: $10-$20
- Dashcam (optional but recommended): $50-$150
- First tank of gas: $40-$70
- Car wash and interior cleaning: $10-$30
Estimated total to get started: $50 to $300, depending on your market and what you already own.
If you are signing up for Uber Eats delivery only (especially by bike or on foot), your startup costs are essentially zero beyond what you already have.
What Uber provides vs. what you need:
- Uber provides the app, navigation, payment processing, and supplemental insurance while you are on a trip
- Uber does not provide a vehicle, phone, phone mount, dashcam, or personal auto insurance
- Uber does not reimburse gas, maintenance, or any startup costs
One thing to keep in mind: all of these expenses, plus your gas and car maintenance costs, are tax-deductible as business expenses since you are an independent contractor. Keep your receipts from day one.
What to Expect Your First Week
Getting approved is just the beginning. Your first week driving for Uber or delivering for Uber Eats will involve a learning curve, and knowing what to expect will help you avoid common mistakes and start earning faster.
Navigating the app for the first time:
The Uber Driver app can feel overwhelming at first. Before you go online, spend 10 to 15 minutes exploring the interface. Familiarize yourself with how to go online and offline, how to view and accept trip requests, where to find your earnings summary, and how to contact rider or customer support.
Choosing your first rides or deliveries:
For your first few trips, stick to areas you know well so you are not relying entirely on GPS navigation. This reduces stress and lets you focus on the pickup and drop-off process. If you are doing rideshare, shorter trips close to home are a good way to get comfortable before tackling airport runs or long highway trips.
Understanding surge pricing and promotions:
Uber uses dynamic pricing (called "surge") that increases fares when demand is high — think Friday and Saturday nights, morning rush hour, or during bad weather. The app shows you a heat map of surge areas in real time.
As a new driver, you may also qualify for sign-up bonuses or guaranteed earnings promotions. These vary by market and change frequently, but they can be worth hundreds of dollars if you hit the required trip count within the specified timeframe. Check the "Promotions" tab in the Uber Driver app to see what is available in your area.
Setting realistic earnings expectations:
Your first week will probably not be your highest-earning week. You are still learning the best times to drive, the most profitable areas, and how the app works. Most new Uber drivers earn between $15 and $30 per hour before expenses during their first week, depending on their market. For a detailed look at what you can expect to make, check out our guide on how much Uber drivers make.
Do not compare your earnings to what full-time veteran drivers post online. They have optimized their strategy over months or years. Focus on learning the patterns in your market during week one.
First-Week Tips from Experienced Drivers
Here are tips that experienced Uber drivers wish they had known during their first week:
- Drive during peak hours first. Friday and Saturday evenings (7 PM to 2 AM) and weekday morning rush (6 AM to 9 AM) are consistently the busiest and highest-paying times in most markets. Start there.
- Keep your car clean and stocked. For rideshare, a clean car with a phone charger available for riders goes a long way toward better ratings and tips.
- Do not chase surge. By the time you drive to a surge area, it often disappears. Instead, position yourself near bars, restaurants, or event venues where you know demand will spike.
- Accept most trips your first week. Your acceptance rate matters less than you think long-term, but early on, every trip is a learning opportunity. Get your first 20 to 30 trips under your belt before you start being selective.
- Track everything from day one. Your mileage, gas receipts, car washes, and any other driving-related expenses are all tax-deductible. Start a tracking system now so you are not scrambling at tax time.
- Download Gridwise alongside the Uber Driver app. Gridwise shows you real-time earnings data, peak demand times, and airport queue information for your specific market. Having that data from your first day gives you an advantage most new drivers do not have.
How to Maximize Your Earnings from Day One
Use Gridwise to find peak hours in your market. Gridwise aggregates earnings data from thousands of drivers in your area and shows you exactly when and where demand is highest. Instead of guessing, you can plan your shifts around proven peak windows. This alone can increase your hourly earnings by 20% or more compared to driving at random times.
Stack Uber Eats with rideshare during slow periods. If you are approved for both, toggle on Uber Eats delivery during times when rideshare requests slow down (typically mid-afternoon on weekdays). This keeps you earning instead of sitting idle.
Take advantage of new driver promotions and bonuses. Uber frequently offers sign-up bonuses, guaranteed earnings, and quest promotions for new drivers. These can range from $100 to $1,000+ depending on your market. Check the Promotions tab in the Uber Driver app and make sure you understand the requirements (usually a specific number of trips within a set timeframe). For a full breakdown of current promotions, see our guide on Uber driver bonuses.
Learn your market's patterns. Every city is different. In some markets, airport rides are the money maker. In others, it is bar close on weekends. Pay attention to where your best fares come from during your first two weeks, and build your schedule around those patterns.
Download Gridwise alongside the Uber Driver app to track your earnings, find peak hours, and maximize your income from day one.
FAQ
Can I drive for Uber and Lyft at the same time?
Yes. There is nothing preventing you from being active on both platforms simultaneously. Many drivers toggle between Uber and Lyft (and even Uber Eats and DoorDash) to maximize their trip volume and reduce downtime. Just make sure you only accept one trip at a time and that you are not double-booking rides.
Do I need a special license to drive for Uber?
In most U.S. cities, no. A standard driver's license is all you need. However, some cities have additional licensing requirements. New York City, for example, requires a TLC (Taxi and Limousine Commission) license. Check Uber's requirements page for your specific city.
Can I drive Uber with a rental car?
Yes, but only through Uber's approved rental partners. You cannot use a personal rental from Enterprise or Hertz. Uber partners with companies like Avis and Hertz through specific programs designed for rideshare drivers. These rentals typically cost $200 to $350 per week and include insurance.
How old do you have to be to drive for Uber Eats?
You must be at least 18 years old to deliver for Uber Eats. This is lower than the 21-year minimum for Uber rideshare. If you are between 18 and 20, Uber Eats delivery is your only option on the Uber platform.
Do I need my own car to deliver for Uber Eats?
No. Depending on your market, you can deliver using a bicycle, electric bike, scooter, or even on foot. Car delivery is available everywhere, but alternative modes of transportation are only available in select cities — usually larger urban markets. Check the Uber Eats section of the Uber Driver app during sign-up to see which options are available in your area.
Can I sign up for both Uber and Uber Eats at the same time?
Yes, and this is actually what Uber recommends. During the sign-up process in the Uber Driver app, you can select both rideshare and delivery. You will go through one application and one background check. Once approved, you can switch between driving passengers and delivering food at any time from within the app. There is no extra fee or separate application for adding Uber Eats to your driver account.
Curious how much you will actually make? Download Gridwise to see real-time demand in your market so you can plan your first week strategically.
What Is Uber Pet? How It Works, How Much You Earn, and Is It Worth It for Drivers
If you drive for Uber and you have seen "Uber Pet" pop up in the app, you are probably wondering what it means for your earnings, your car, and your sanity. Whether you are a dog lover who would welcome a golden retriever in your back seat or you are worried about fur and scratches on your leather interior, this guide covers everything you need to know: what Uber Pet actually is, how much extra you earn, whether it is worth the hassle, how to protect your vehicle, and what you legally must know about service animals.
Quick Answer -- What Is Uber Pet?
Uber Pet is a ride option that lets riders bring their pets along on trips for an additional fee. When a rider selects Uber Pet in the app, they are matched exclusively with drivers who have opted in to accept pet rides.
Here is what you need to know at a glance:
- Riders pay an extra $3-5 per Uber Pet ride. Drivers receive a portion of that surcharge.
- You opt in voluntarily. You choose whether to accept pet rides -- it is not mandatory.
- You can toggle Uber Pet on or off at any time with no penalty or impact on your account.
- Available in 30+ US cities including New York, Los Angeles, Chicago, Houston, Atlanta, Miami, and more.
- Service animals are completely separate from Uber Pet. Drivers must always accept service animals regardless of Uber Pet opt-in status -- that is federal law, not an Uber policy.
Uber Pet is a nice add-on for drivers who are comfortable with animals, but it is not a game-changer for earnings. The real value depends on your personal tolerance for fur, the occasional muddy paw, and whether you have a plan to keep your car clean between rides.
How Uber Pet Works for Drivers
The process is straightforward. When a rider books an Uber Pet trip, the app matches them only with drivers who have opted in to the Uber Pet program. You will see a Pet label on the ride request before you accept, so there are no surprises. The ride itself works like a standard UberX trip -- same routing, same fare structure -- except there is a pet in the car.
The rider is responsible for controlling their pet during the ride. Uber's guidelines state that the pet should be kept on the back seat (not the front seat, not the floor) and the rider should have a leash or carrier if appropriate. In practice, compliance varies, and that is something you will want to manage politely when the rider gets in.
How to Opt In (or Out) of Uber Pet
Opting in takes about 30 seconds:
- Open the Uber Driver app
- Go to Work Hub
- Tap Account
- Select Uber Pets
- Toggle it on
That is it. You can toggle it off anytime you want -- after a messy ride, during allergy season, or just because you are not feeling it that day. There is no penalty for opting out, and it has no impact on your acceptance rate, your rating, or your standing on the platform.
What Types of Pets Are Allowed?
Uber Pet covers any legal domestic pet that can reasonably fit in the vehicle:
- Dogs of any breed or size (as long as they fit)
- Cats
- Rabbits, guinea pigs, and other small animals
- Typically one pet per rider, though Uber does not strictly enforce a number limit
What is not covered: exotic animals, illegal pets, farm animals, or anything that would pose a safety risk. If a rider shows up with a snake draped around their neck or a parrot on their shoulder, that is outside the scope of Uber Pet and you are within your rights to decline.
How Much Extra Do Uber Pet Drivers Earn?
Uber charges riders an extra $3-5 for selecting Uber Pet. Drivers receive a portion of this surcharge, which varies by market. The premium is added automatically to your fare -- you do not need to do anything special to collect it.
The Real Earnings Picture
Here is the honest take that most articles skip over: the Uber Pet earnings premium is real, but it is modest.
- The $3-5 surcharge is what the rider pays. After Uber takes its cut, drivers typically see $2-4 extra per Pet ride.
- Some drivers report the premium is inconsistent. In certain markets, the extra pay on Pet rides is minimal or does not always appear as expected. This is a known frustration in driver forums.
- Pet rides do not surge differently than regular UberX. The Pet premium is a flat add-on, not a multiplier. During surge pricing, you earn the surge rate plus the Pet premium, but the Pet fee itself does not surge.
- Tips may be slightly higher. Pet owners who use Uber Pet tend to be grateful that you are willing to take their animal. Many drivers report better tips on Pet rides compared to standard UberX.
If you complete 5 Uber Pet rides in a day and earn an extra $3 per ride, that is $15 in additional income. Over a 5-day week, that is $75. It adds up, but it is not going to transform your earnings.
Is the Uber Pet Premium Worth the Risk?
This depends entirely on your situation:
- If you love animals and already keep your car clean: Easy yes. You are getting paid a small premium for something you do not mind doing. Pet rides also tend to fill gaps during slower periods, so you may be earning rather than sitting idle.
- If you have a newer or expensive vehicle: Weigh the damage risk carefully. Scratches on leather seats, muddy paw prints, and pet hair embedded in fabric are real possibilities. A $3 premium does not cover a professional interior detail.
- If you have allergies: Probably not worth it. Even with quick cleanups between rides, pet dander lingers. If you are sensitive to pet allergens, the discomfort and health impact outweigh the modest extra pay.
- The real question: Would you rather have Pet rides filling your idle time or sit and wait for the next standard UberX request? In slower markets or during off-peak hours, Uber Pet can be the difference between earning and waiting.
Curious whether Uber Pet rides are actually earning you more? Track your earnings by ride type in Gridwise and see the data for yourself.
Service Animals vs. Uber Pet -- What Drivers Must Know
This is the most legally important section of this article. The distinction between service animals, emotional support animals, and Uber Pet requests is something every rideshare driver must understand. Getting this wrong can result in deactivation from the platform and legal liability.
Service Animals (You MUST Accept)
Under the Americans with Disabilities Act (ADA), all Uber drivers are required to accept service animals -- period. This applies regardless of whether you have opted in to Uber Pet. It applies even if you have allergies. It applies even if you just had your car detailed.
Here are the legal requirements you need to know:
- Service animals are dogs (and in some cases, miniature horses) that are individually trained to perform specific tasks for a person with a disability. Examples include guide dogs for blind passengers, seizure alert dogs, and mobility assistance dogs.
- You cannot refuse a service animal ride. Declining a rider because they have a service animal violates the ADA and Uber's own policies.
- You cannot charge extra for a service animal. The Uber Pet surcharge does not apply to service animals. The rider should not have to select Uber Pet to bring a service animal.
- You cannot ask for documentation or proof of disability. Under the ADA, you may only ask two questions: (1) Is this a service animal required because of a disability? and (2) What task has the dog been trained to perform? You cannot ask about the rider's disability, request medical records, or demand a certificate.
- Violating service animal laws can result in Uber deactivation and may expose you to civil rights complaints, fines, or lawsuits under federal and state law.
The bottom line: if a rider has a service animal, you accept the ride. No exceptions, no negotiations, no extra fees.
Emotional Support Animals (Gray Area)
Emotional support animals (ESAs) are not the same as service animals under federal law:
- ESAs are not covered by the ADA. They are not trained to perform specific tasks and do not have the same legal protections as service animals in the context of rideshare transportation.
- Uber does not require drivers to accept ESAs. If a rider says their pet is an emotional support animal but it is not a trained service animal, you are not legally obligated to transport the animal (in most jurisdictions).
- However, some state and local laws may provide additional protections for ESAs. If you drive in a state with broader animal accommodation laws, check your local regulations.
- When in doubt, accept the ride. If you are unsure whether an animal is a service animal or an ESA, the safer choice -- both legally and for your Uber account -- is to accept the ride. A discrimination complaint, even if ultimately unfounded, is a headache you do not need.
Uber Pet Requests (Your Choice)
Uber Pet rides are the simplest category:
- You only receive Uber Pet requests if you have opted in.
- You can decline any specific Uber Pet ride without penalty or impact on your acceptance rate.
- The rider pays the Pet surcharge and you earn the premium.
- If a rider shows up with a pet but did not select Uber Pet, you are not obligated to accept the animal (unless it is a service animal). You can politely ask the rider to rebook as an Uber Pet trip or cancel the ride.
Protecting Your Vehicle -- A Driver's Checklist
If you are going to opt in to Uber Pet, prepare your car first. A small upfront investment in supplies will save you time, money, and frustration.
Seat covers. Invest in waterproof, washable seat covers for your back seat. You can find good ones on Amazon for $20-50. Look for covers that are easy to install and remove -- you want to be able to pull them off quickly if your next ride is a non-pet passenger who does not want to sit on a fur-covered seat.
Rubber-backed floor mat. Place a rubber-backed mat or liner on the back seat floor. Muddy paws and minor accidents are easier to clean off rubber than carpet.
Cleaning kit in the trunk. Keep a small kit with: a lint roller, a pet hair remover brush, paper towels, an enzyme-based cleaner (for organic messes), and a small spray bottle of all-purpose cleaner. The total cost is under $20 and will pay for itself many times over.
Air freshener. Pet odor can linger, and your next rider will notice. Keep a subtle, non-overpowering car air freshener. Avoid anything too strong -- some riders are sensitive to fragrances.
Between-ride routine. Build a 2-3 minute cleanup habit after every Pet ride: lint-roll the back seat, wipe down any surfaces the pet touched, check the floor for mud or hair, and do a quick sniff test. This prevents buildup and keeps your car presentable for non-pet riders.
Set expectations with riders. When the rider gets in, politely ask them to keep the pet on the back seat. If the pet is wet or muddy, ask if they have a towel. Most pet owners are understanding and will cooperate -- they chose Uber Pet specifically because they want a smooth ride for their animal.
Gridwise tracks every trip -- including Pet rides -- so you can see exactly how they compare to your standard UberX earnings.
What to Do If a Pet Damages Your Car
Even with preparation, accidents happen. A nervous dog might vomit, a cat might scratch the seat, or a puppy might have an accident on your floor mat. Here is how to handle it.
Uber's Cleaning Fee Policy
Uber has a cleaning fee policy that covers messes caused by riders -- including pet-related incidents:
- Minor — Examples: Small amount of pet hair, mild odor | Typical Fee Range: Generally does not qualify
- Moderate — Examples: Vomit, urine on seat cover, significant mud | Typical Fee Range: $20 - $80
- Severe — Examples: Feces on seats, urine soaked into upholstery, scratches/tears | Typical Fee Range: $80 - $150
Important: Normal wear from a pet ride -- some hair on the seat, a faint smell -- does not qualify for a cleaning fee. Uber expects drivers who opt in to Uber Pet to accept that a certain amount of pet-related mess comes with the territory. Cleaning fees are reserved for significant soiling or damage.
How to Report Damage and Request a Cleaning Fee
If a pet causes real damage, follow these steps immediately:
Step 1: Take photos right away. Before you leave the drop-off location or accept another ride, take clear, well-lit photos of the damage. Get multiple angles. If possible, include a timestamp (your phone's photo app does this automatically).
Step 2: Report through the Uber Driver app. Go to Help, then Trip Issues, then select the specific trip, and choose the Cleaning Fee option.
Step 3: Upload your photos and write a clear description. Be specific: "Dog vomited on rear passenger seat and floor mat. See attached photos." Vague descriptions get denied more often.
Step 4: Wait for Uber's review. Uber will review your report and may charge the rider a cleaning fee. This typically takes 24-48 hours. The fee, if approved, is added to your earnings.
Step 5: If the fee does not cover your actual costs, get a professional cleaning receipt and submit it with an appeal. Uber sometimes approves higher reimbursement when you provide a professional invoice.
What If Uber Denies Your Cleaning Fee Request?
Denials happen, and they are frustrating. Here is how to escalate:
- Provide more detailed photos. If your initial submission was weak on evidence, submit additional time-stamped photos. Before-and-after photos are ideal if you have them.
- Get a professional cleaning receipt. Take your car to a detailer, get the mess cleaned, and submit the itemized receipt. A $75 detail receipt carries more weight than a written description alone.
- Escalate through Uber support. If your first request is denied and you have strong documentation, reply to the support thread or call Uber driver support to request a second review. Be polite but firm, and reference your photos and receipt.
- Know the limits. Uber's cleaning fee policy has a cap, and it may not cover 100% of your costs for severe damage. This is one of the inherent risks of Uber Pet driving -- the premium you earn per ride does not always offset worst-case scenarios.
Uber Pet Availability -- Where Is It Offered?
Uber Pet is currently available in 30+ US cities. Here are some of the major markets where the feature is active:
- New York City
- Los Angeles
- San Francisco
- Chicago
- Houston
- Phoenix
- Dallas
- Atlanta
- Miami
- Seattle
- Denver
- Austin
- Philadelphia
- San Diego
- Portland
How to check if Uber Pet is available in your market: Open the Uber Driver app and go to Work Hub, then Account. If "Uber Pets" appears as a toggle option, it is available in your city. If you do not see it, Uber Pet has not launched in your area yet.
Uber has been steadily expanding Uber Pet to new markets, so even if it is not available today, check back periodically. When it does become available, you will likely see a notification in the Driver app.
Tips for a Good Uber Pet Experience
Once you have opted in and prepared your vehicle, these tips will help you deliver a great experience and earn better ratings and tips:
Greet the pet warmly. A simple "Hey there, buddy" or asking the owner the pet's name goes a long way. It signals to the rider that you are comfortable with animals and sets a positive tone for the trip.
Ask where the rider wants the pet. Back seat is standard, but let the rider take the lead. If they have a carrier or crate, offer to help position it securely.
Drive smoothly. Sudden braking and sharp turns agitate animals. Maintain a steady speed, brake gradually, and take turns gently. This keeps the pet calm and reduces the chance of motion sickness.
Keep windows cracked for ventilation. A slightly open window reduces pet odor during the ride and can help calm anxious animals. Just check with the rider first -- some pets get excited by open windows and may try to stick their head out.
Have a towel available. Keep a clean towel in your back seat for wet or muddy paws. Offering it proactively shows preparation and professionalism.
Rate honestly. If the pet was well-behaved and the rider was respectful of your vehicle, that is a 5-star ride. If the rider let the pet run wild, left a mess, or was dismissive of your car, rate accordingly. Your feedback helps the system work for all drivers.
Manage allergies between rides. If you notice mild allergy symptoms after a pet ride, do your between-ride cleanup immediately. Running the AC or heat with the windows cracked for a minute can help clear airborne dander. If you find that allergies are becoming a recurring issue, it may be time to toggle Uber Pet off.
FAQ
Do I have to accept Uber Pet rides?
No. Uber Pet is entirely voluntary. You opt in through the Uber Driver app (Work Hub, then Account, then Uber Pets), and you can opt out at any time with no penalty. Even when opted in, you can decline individual Uber Pet ride requests without it affecting your account or acceptance rate.
Can I refuse a service animal?
No. Under the ADA, all Uber drivers must accept service animals regardless of Uber Pet opt-in status. Service animals are dogs (and sometimes miniature horses) trained to perform specific tasks for people with disabilities. Refusing a service animal can result in deactivation from Uber and legal consequences. You cannot charge extra for a service animal ride, and you cannot ask for documentation of the rider's disability.
How much extra do I earn per Uber Pet ride?
Riders pay an additional $3-5 for Uber Pet. After Uber's commission, drivers typically see $2-4 in extra earnings per Pet ride. The amount varies by market and is not always perfectly consistent. Tips on Pet rides tend to be slightly higher than average, which can add to the overall earnings boost.
What if I am allergic to pets?
If you have mild allergies, you may be able to manage with antihistamines, a thorough between-ride cleaning routine, and an air purifier or ventilation strategy. If your allergies are moderate to severe, Uber Pet is probably not worth the health trade-off. The $2-4 per ride premium does not justify persistent discomfort or the need for medication. You can always opt out and focus on standard UberX rides.
What happens if a pet bites me during an Uber Pet ride?
If a pet bites or injures you during a ride, end the trip immediately and seek medical attention if needed. Report the incident through the Uber Driver app under Help and Trip Issues. Uber may deactivate the rider's account and may assist with connecting you to insurance resources. You should also document the injury with photos and consider filing a report with local animal control, especially if the bite is serious. Your personal auto insurance or Uber's commercial policy may cover medical expenses depending on the circumstances.
Can a rider bring more than one pet?
Uber's general guideline is one pet per Uber Pet ride, but this is not strictly enforced in all markets. Use your judgment: two small dogs in carriers are different from two large Labradors. If a rider shows up with more animals than you are comfortable transporting, you can decline the ride. Your vehicle, your call.
Does Uber Pet cover pet carriers and crates?
Yes. Riders can bring their pet in a carrier or crate, and this actually makes the ride easier for everyone. The carrier should fit in the back seat or on the floor behind the front seat. If a rider has an oversized carrier that does not fit, you are not obligated to transport it in your trunk or on your seats in a way that is unsafe.
What if the pet is too large for my car?
If a rider's pet is too large to fit safely in your vehicle, you can decline the ride. Uber does not have breed or size restrictions for Uber Pet, but the animal must fit reasonably in the back seat without creating a safety hazard. A Great Dane in a compact sedan is not going to work, and no one should expect it to. Cancel the ride, select the appropriate reason, and move on to the next request.
Ready to see if Uber Pet is boosting your bottom line? Download Gridwise and track every ride -- Pet, UberX, Comfort, and more -- so you always know exactly where your money is coming from.

UberX vs Uber Comfort vs Uber Black: Earnings, Requirements, and Which Tier Is Worth It
If you're an Uber driver trying to figure out whether upgrading to a higher service tier is worth it, you're asking the right question -- but probably looking at the wrong numbers. Most comparisons focus on per-trip fares. The problem is that higher fares don't automatically mean higher earnings.
A driver completing three UberX trips per hour at $15 each earns $45. A driver completing one Uber Black trip per hour at $40 earns $40. And that's before factoring in the $60,000 luxury vehicle and commercial insurance the Black driver is paying for.
This guide breaks down all three tiers -- UberX, Uber Comfort, and Uber Black -- side by side. Requirements, gross earnings, demand frequency, expenses, and net profitability. No marketing spin, just the math that actually matters for your bottom line.
Quick Answer -- Which Uber Tier Pays the Most?
Here's the short version before we dig into the details:
UberX:
- Per-trip pay: Base rate
- Hourly gross: $15-25/hr
- Trips per hour: 3-4 in busy markets
- Vehicle investment: $5,000-15,000
- Monthly insurance: $150-300
- Best for: Volume and consistency
Uber Comfort:
- Per-trip pay: ~20% more than UberX
- Hourly gross: $18-30/hr
- Trips per hour: 1-2, market-dependent
- Vehicle investment: $15,000-25,000
- Monthly insurance: $150-300
- Best for: Free upside if you qualify
Uber Black:
- Per-trip pay: 2-3x more than UberX
- Hourly gross: $25-45/hr
- Trips per hour: 0.5-2, premium markets only
- Vehicle investment: $40,000-80,000+
- Monthly insurance: $300-600+
- Best for: Full-time business in top metros
The bottom line: Uber Black earns the most per trip. UberX earns the most consistently. And for the majority of drivers, running UberX plus Comfort delivers the best net earnings after expenses. The "best" tier depends entirely on your car, your market, and how much you're willing to invest.
UberX, Uber Comfort, and Uber Black -- Overview
Understanding the three main Uber tiers starts with knowing who each one is designed for on the rider side -- because that directly determines demand frequency and earnings potential on the driver side.
UberX is Uber's standard ride option and the backbone of the platform. It's the most affordable tier for riders and the most widely available, operating in over 10,000 cities globally. For drivers, UberX has the lowest barrier to entry and the highest volume of ride requests. The vast majority of Uber trips are UberX.
Uber Comfort is the mid-tier option. Riders pay roughly 20% more for a newer vehicle, extra legroom, a highly rated driver, and the ability to set preferences for temperature and conversation. For drivers, Comfort is an upgrade that requires a newer car, a 4.85+ rating, and at least 100 completed trips. It pays more per ride but with lower request frequency. For a complete breakdown, see our guide on what Uber Comfort is and how it works for drivers.
Uber Black is the premium tier. Riders get a luxury vehicle with a professionally licensed driver -- think black sedans with leather interiors. For drivers, Black requires a commercial license, commercial insurance, and a qualifying luxury vehicle. The per-trip pay is dramatically higher, but demand is concentrated in a handful of major metros and the startup costs are substantial. Our guide on how much Uber Black drivers make goes deeper on that tier specifically.
Think of it as a pyramid: UberX is the wide base with maximum volume, Comfort is the middle with moderate demand and moderate premium, and Black is the narrow top with the highest fares but the fewest requests.
Requirements Comparison -- What You Need for Each Tier
Before comparing earnings, you need to know whether you can even qualify. The requirements escalate significantly from UberX to Comfort to Black.
UberX Requirements
UberX has the most accessible requirements of any Uber tier:
- Vehicle age: 16 years old or newer (varies by city; some markets require 15 years or newer)
- Vehicle type: 4-door sedan, SUV, or minivan
- Driver's license: Valid personal driver's license
- Insurance: Personal auto insurance with a rideshare endorsement
- Background check: Standard Uber background check
- Rating minimum: No specific minimum beyond Uber's general deactivation threshold
- Trip minimum: None
If you meet Uber's basic driver requirements, you qualify for UberX. That's it.
Uber Comfort Requirements
Comfort adds three significant hurdles on top of UberX:
- Completed trips: Minimum 100 trips on the Uber platform
- Star rating: 4.85+ rolling average
- Vehicle age: 7 years old or newer (2019 model year or later for 2026)
- Rear legroom: Minimum 36 inches of rear passenger legroom
- Vehicle condition: Higher standard expected -- clean interior, no cosmetic damage, working AC
- Driver's license: Standard personal license (same as UberX)
- Insurance: Standard rideshare insurance (same as UberX)
The good news is that there's no separate application. Uber automatically evaluates your account, and if you meet all three criteria simultaneously, Comfort requests start appearing in your queue alongside UberX rides. For the full details, check our Uber Comfort guide.
Uber Black Requirements
Uber Black is a fundamentally different tier with professional-level requirements:
- Commercial license: TCP (Transportation Charter Permit), TLC license, or equivalent livery/for-hire license required in most states
- Commercial insurance: Full commercial auto insurance policy ($300-600+/month), not just a rideshare endorsement
- Vehicle type: Luxury sedan or SUV with black exterior and black leather interior
- Approved makes/models: Typically limited to vehicles like the Cadillac Escalade, Lincoln Navigator, Mercedes-Benz S-Class, BMW 7 Series, Audi A8, Chevrolet Suburban, and similar luxury models
- Vehicle age: Generally 5 years old or newer (stricter than Comfort)
- Professional appearance: Some markets require professional dress code
- Separate application: Unlike Comfort, you apply specifically for Uber Black and undergo additional vetting
Side-by-Side Requirements Table
UberX:
- Minimum trips: None
- Minimum rating: No specific minimum
- Vehicle age: Up to 16 years
- Vehicle type: Any 4-door
- Vehicle cost (typical): $5,000-15,000 used
- License type: Personal
- Insurance type: Personal + rideshare
- Application process: Standard Uber signup
Uber Comfort:
- Minimum trips: 100
- Minimum rating: 4.85+ stars
- Vehicle age: 7 years or newer
- Vehicle type: 4-door, 36"+ rear legroom
- Vehicle cost (typical): $15,000-25,000
- License type: Personal
- Insurance type: Personal + rideshare
- Application process: Automatic if you qualify
Uber Black:
- Minimum trips: Varies (separate application)
- Minimum rating: No specific minimum (vetted separately)
- Vehicle age: 5 years or newer (typical)
- Vehicle type: Luxury sedan/SUV, black exterior, leather
- Vehicle cost (typical): $40,000-80,000+
- License type: Commercial/TCP/TLC
- Insurance type: Commercial ($300-600+/mo)
- Application process: Separate Black application
The jump from UberX to Comfort is relatively small -- mainly a newer car and a strong rating. The jump from Comfort to Black is enormous -- a luxury vehicle, commercial licensing, and commercial insurance. That difference in barrier to entry is critical when calculating whether the higher pay is actually worth it.
Earnings Comparison -- How Much Each Tier Pays
Now for the numbers drivers actually care about. We'll look at this from three angles: per-trip earnings, hourly gross, and the demand factor that ties them together.
Per-Trip Earnings
Per-trip pay is the most straightforward comparison, but it's also the most misleading if you stop there.
UberX:
- Base rate per mile: ~$1.00 (varies by market)
- Base rate per minute: ~$0.20 (varies by market)
- Example: 10-mile, 20-min trip: ~$15
- Example: 5-mile, 12-min trip: ~$8
- Premium over UberX: Baseline
Uber Comfort:
- Base rate per mile: ~$1.20
- Base rate per minute: ~$0.24
- Example: 10-mile, 20-min trip: ~$18
- Example: 5-mile, 12-min trip: ~$10
- Premium over UberX: ~20%
Uber Black:
- Base rate per mile: ~$2.50-3.50
- Base rate per minute: ~$0.50-0.70
- Example: 10-mile, 20-min trip: ~$35-45
- Example: 5-mile, 12-min trip: ~$20-25
- Premium over UberX: ~200-300%
On a per-trip basis, Uber Black blows everything else away. A $15 UberX ride becomes an $18 Comfort ride or a $35-45 Black ride. The math looks obvious -- until you factor in how many of those trips you actually get.
Hourly Earnings (Gross)
Hourly earnings paint a more realistic picture because they account for time between rides, not just time during rides.
UberX (Gross/hr):
- Major metro (NYC, LA, Chicago): $20-25
- Mid-size metro (Austin, Portland, Denver): $17-22
- Smaller metro / suburban: $15-18
Uber Comfort (Gross/hr):
- Major metro (NYC, LA, Chicago): $22-30
- Mid-size metro (Austin, Portland, Denver): $18-25
- Smaller metro / suburban: $15-20
Uber Black (Gross/hr):
- Major metro (NYC, LA, Chicago): $30-45
- Mid-size metro (Austin, Portland, Denver): $20-30
- Smaller metro / suburban: Not viable
These ranges reflect active driving hours. Notice how the gap narrows significantly when you look at hourly rather than per-trip numbers -- especially outside major metros. That's because of the demand factor.
The Demand Factor -- Trips Per Hour
This is the part most comparisons skip, and it's the most important variable in the equation.
UberX:
- Avg. trips per hour (busy market): 3-4
- Avg. trips per hour (moderate market): 2-3
- Idle time between trips: Low (minutes)
- Demand consistency: Very consistent
Uber Comfort:
- Avg. trips per hour (busy market): 1-2
- Avg. trips per hour (moderate market): 0.5-1
- Idle time between trips: Moderate (5-15 min)
- Demand consistency: Market-dependent
Uber Black:
- Avg. trips per hour (busy market): 0.5-2
- Avg. trips per hour (moderate market): 0.5 or less
- Idle time between trips: High (15-30+ min)
- Demand consistency: Concentrated in premium areas/hours
Here's the math that matters:
- UberX driver in a busy market: 3 trips/hr x $15/trip = $45/hr gross
- Comfort driver in a busy market: 1.5 trips/hr x $18/trip = $27/hr gross
- Black driver in a busy market: 1 trip/hr x $40/trip = $40/hr gross
And in a moderate market:
- UberX: 2.5 trips/hr x $13/trip = $32.50/hr gross
- Comfort: 0.75 trips/hr x $16/trip = $12/hr gross
- Black: 0.5 trips/hr x $35/trip = $17.50/hr gross
The key insight: a high-volume UberX driver can out-earn both Comfort-only and Black-only drivers in most markets. This is why the smart strategy is to enable every tier you qualify for and never limit yourself to just one.
Gridwise shows you exactly how much you earn per hour across UberX, Comfort, and Black -- so you can make data-driven decisions about which tiers to prioritize.
Expenses & Net Profitability by Tier
Gross earnings only tell half the story. The tier that earns the most isn't necessarily the tier that profits the most -- because expenses scale dramatically as you move up.
Vehicle Costs
Your vehicle is the single largest expense in rideshare driving, and the required investment varies enormously by tier.
UberX:
- Typical vehicle cost: $5,000-15,000 (used)
- Monthly payment (est.): $0-250
- Annual depreciation: $1,000-2,500
Uber Comfort:
- Typical vehicle cost: $15,000-25,000 (used/CPO)
- Monthly payment (est.): $250-450
- Annual depreciation: $2,500-4,500
Uber Black:
- Typical vehicle cost: $40,000-80,000+ (new/CPO)
- Monthly payment (est.): $600-1,200+
- Annual depreciation: $6,000-15,000+
An UberX driver can start with a reliable used car purchased outright for $8,000 and have zero monthly payments. A Black driver needs a qualifying luxury vehicle that may cost $60,000+ with monthly payments exceeding $1,000. That's a $12,000+ annual difference before you complete a single trip.
Choosing the right vehicle matters at every tier. Our guide on the best car for Uber breaks down which models balance cost, fuel efficiency, and tier eligibility.
Insurance Costs
Insurance is where Black's expenses really separate from the pack.
UberX:
- Policy type: Personal + rideshare endorsement
- Monthly cost (est.): $150-300
- Annual cost (est.): $1,800-3,600
Uber Comfort:
- Policy type: Personal + rideshare endorsement
- Monthly cost (est.): $150-300
- Annual cost (est.): $1,800-3,600
Uber Black:
- Policy type: Full commercial auto insurance
- Monthly cost (est.): $300-600+
- Annual cost (est.): $3,600-7,200+
UberX and Comfort share the same insurance structure -- your personal policy plus a rideshare endorsement (or Uber's own insurance supplement during active trips). Black requires a standalone commercial insurance policy, which typically costs double or more.
Maintenance & Fuel
Higher-tier vehicles cost more to maintain, and luxury vehicles cost significantly more.
UberX:
- Fuel type: Regular unleaded
- Monthly fuel (est., full-time): $300-500
- Annual maintenance: $1,200-2,000
- Tire replacement: $400-600/set
Uber Comfort:
- Fuel type: Regular unleaded
- Monthly fuel (est., full-time): $300-500
- Annual maintenance: $1,500-2,500
- Tire replacement: $500-800/set
Uber Black:
- Fuel type: Premium (often required)
- Monthly fuel (est., full-time): $400-700
- Annual maintenance: $3,000-5,000+
- Tire replacement: $800-1,500+/set
Luxury vehicles require premium fuel, use more expensive parts, and charge higher labor rates at dealerships. A brake job on a Toyota Camry might cost $300. The same job on a Mercedes S-Class can easily exceed $1,000.
Net Earnings After Expenses
Here's the table that tells the real story. These estimates assume a full-time driver working approximately 40 hours per week in a mid-to-large metro area.
UberX:
- Gross hourly earnings: $18-22
- Monthly gross (40 hrs/wk): $3,120-3,810
- Monthly vehicle payment: $0-250
- Monthly insurance: $150-300
- Monthly fuel: $350-450
- Monthly maintenance (avg.): $100-165
- Total monthly expenses: $600-1,165
- Monthly net earnings: $1,955-2,645
- Net hourly earnings: $11.30-15.25
Uber Comfort:
- Gross hourly earnings: $20-26
- Monthly gross (40 hrs/wk): $3,460-4,500
- Monthly vehicle payment: $250-450
- Monthly insurance: $150-300
- Monthly fuel: $350-450
- Monthly maintenance (avg.): $125-210
- Total monthly expenses: $875-1,410
- Monthly net earnings: $2,050-3,090
- Net hourly earnings: $11.85-17.85
Uber Black:
- Gross hourly earnings: $28-40
- Monthly gross (40 hrs/wk): $4,850-6,930
- Monthly vehicle payment: $600-1,200
- Monthly insurance: $300-600
- Monthly fuel: $450-650
- Monthly maintenance (avg.): $250-415
- Total monthly expenses: $1,600-2,865
- Monthly net earnings: $1,985-4,065
- Net hourly earnings: $11.45-23.50
Key findings:
- UberX has the tightest, most predictable range. You won't get rich, but you won't lose your shirt either. The low barrier to entry means low risk.
- Comfort offers the best risk-adjusted return for drivers who already qualify. The expenses are only slightly higher than UberX, but the per-trip premium adds up over time.
- Black has the widest range -- it can be very profitable in the right market, but in the wrong market (or with poor demand), you're paying luxury-vehicle expenses on moderate-market earnings. The floor is dangerously close to UberX territory while requiring 3-5x the investment.
- The overlap is striking. At the lower end, all three tiers net roughly the same hourly rate ($11-12/hr). The difference is that UberX gets there with minimal investment, while Black gets there with $60,000+ in vehicle costs.
Which Markets Are Best for Each Tier?
Not all markets are created equal, and choosing the right tier is as much about where you drive as what you drive.
UberX: Strong everywhere. UberX demand exists in virtually every market where Uber operates. It's the safest bet for any city size. In suburban and mid-size markets, UberX is often the only tier with enough request volume to drive full-time.
Uber Comfort: Best in major metros with business travelers. Comfort demand is strongest in cities with a large base of professional riders willing to pay a premium for a slightly better experience. The top markets include San Francisco, New York City, Chicago, Austin, Seattle, Denver, and Washington, D.C. In smaller metros, Comfort requests may be too infrequent to make a meaningful difference in your earnings.
Uber Black: Only viable in top-10 metros. Uber Black demand is heavily concentrated in cities with a wealthy rider base, corporate accounts, airport traffic, and high-end hospitality. The strongest markets are New York City, Los Angeles, Miami, San Francisco, Washington D.C., and Chicago. If you're outside a top-10 metro, Black demand is typically too sparse to justify the investment.
The practical rule: If you're in a top-20 metro, your best combination is probably UberX plus Comfort. If you're in a top-5 metro and willing to go all-in, Black can work as a full-time business. If you're anywhere else, UberX is your bread and butter.
Can You Drive Multiple Tiers at Once?
Yes -- and you should. This is one of the most misunderstood aspects of Uber's tier system.
- UberX + Comfort: If you qualify for Comfort, both ride types appear in the same queue. You don't choose between them for each trip -- Uber's algorithm assigns you whatever the rider requested. You simply get a mix of UberX and Comfort rides, with Comfort paying more each time it comes up.
- Toggle tiers on and off. In your driver preferences, you can enable or disable specific ride types. Most drivers leave everything on, but you can turn off UberX to only accept Comfort if you want to test demand (though this usually means more idle time).
- Black drivers can accept lower-tier rides. If you're approved for Uber Black, you can also accept UberX and Comfort requests during slow periods to fill gaps between premium rides. This is how savvy Black drivers maintain their hourly earnings instead of sitting idle.
- The algorithm optimizes for you. When multiple ride types are enabled, Uber's matching system considers proximity, rider request, and availability. You don't need to game it -- just enable every tier you qualify for and let the data show you what works.
Best strategy: Enable every tier you qualify for. Period. There's no cost to having multiple tiers active, and every higher-tier request that comes through is bonus income above your UberX baseline.
Which Tier Should You Choose? (Decision Framework)
Instead of a generic recommendation, here's a framework based on your specific situation.
Choose UberX only if:
- You have an older vehicle (8+ years) that doesn't meet Comfort standards
- Your rating is below 4.85 or you have fewer than 100 completed trips
- You're in a smaller market where Comfort demand is negligible
- You're testing rideshare driving and don't want to commit to a vehicle upgrade
Add Comfort if:
- You already qualify -- 100+ trips, 4.85+ rating, and a Comfort-eligible car. Enable it today. It's free upside with zero additional effort or cost.
- You're close to qualifying and your car already meets the vehicle requirements. Focus on completing your remaining trips and maintaining your rating.
- You're buying a new car anyway. Choose a Comfort-eligible model and unlock the premium from day one. Our best car for Uber guide can help you pick the right one.
Pursue Uber Black if:
- You're in a top-10 metro with proven Black demand (NYC, LA, Miami, SF, D.C., Chicago)
- You're willing to invest $40,000-80,000+ in a qualifying luxury vehicle
- You can obtain a commercial license (TCP, TLC, or equivalent) in your state
- You're prepared to pay $300-600+/month in commercial insurance
- You treat rideshare as a full-time business, not a side gig
- You've already driven UberX/Comfort long enough to understand demand patterns in your market
The multi-app play: Whatever Uber tier you run, pair it with the equivalent Lyft tier (Lyft standard, Lyft Lux, or Lyft Black) to maximize your ride request volume. More platforms mean less idle time.
The honest take: For the vast majority of drivers, running UberX plus Comfort and maximizing trip volume is the most profitable strategy. Uber Black can be lucrative, but only in the right market with a serious financial commitment.
Stop guessing which tier earns you more. Download Gridwise to track your earnings by ride type and find out which tier is actually most profitable in your market.
How to Track Earnings by Tier
Uber's driver app gives you per-trip breakdowns, but it doesn't make it easy to compare tier-level performance over time. You can see what each individual ride paid, but you can't quickly answer questions like "Did I earn more per hour from Comfort rides or UberX rides this month?"
That's the kind of analysis that turns guessing into strategy.
- Use Gridwise to track and compare earnings across tiers. Gridwise automatically categorizes your trips and shows you per-hour, per-trip, and per-mile breakdowns by ride type. Over weeks and months, patterns emerge that are invisible in Uber's native app.
- Look for time-of-day patterns. You might find that Comfort rides are more common (and more profitable) during weekday business hours, while UberX volume dominates evenings and weekends. Adjusting your schedule accordingly can boost your effective hourly rate.
- Compare tip rates by tier. Comfort and Black riders tend to tip more frequently and more generously than UberX riders. Track this over time to see whether tips meaningfully change the profitability picture.
- Factor in multi-app data. If you're also driving Lyft, DoorDash, or other platforms, Gridwise lets you see your total earnings picture across apps -- which is essential for deciding how to allocate your driving hours.
Data-driven decisions beat guessing every time. The drivers who earn the most aren't necessarily the ones in the highest tier -- they're the ones who know exactly which hours, locations, and ride types generate the best return on their time.
Download Gridwise and start tracking which tier actually pays you the most -- the answer might surprise you.
FAQ
Is Uber Black worth it in 2026?
It depends entirely on your market and your willingness to invest. In top metros like New York City, Los Angeles, and Miami, Uber Black drivers who treat it as a full-time business can earn $30-45+ per hour gross. But after factoring in the luxury vehicle payment ($600-1,200/month), commercial insurance ($300-600/month), and higher maintenance costs, net earnings may not dramatically exceed what a high-volume UberX/Comfort driver makes. Uber Black is worth it if you're in a premium market, have access to a qualifying vehicle, and are prepared for the business overhead. For most drivers, it's not the right move.
Can I switch from UberX to Uber Comfort?
You don't switch -- you upgrade. If you meet all three Comfort requirements (100+ trips, 4.85+ rating, eligible vehicle), Uber automatically enables Comfort rides on your account. You'll continue receiving UberX requests alongside Comfort requests. There's no form to fill out and no separate application. Check your eligibility in the Uber driver app under your vehicle and account settings.
Do Uber Comfort drivers get more tips?
Generally, yes. Comfort riders tend to tip more frequently and at higher amounts than UberX riders. This makes sense -- riders paying a premium for a better experience are already signaling that they value quality, and they're more likely to reward it. Anecdotally, drivers report that Comfort tips average 15-25% of the fare compared to 10-15% for UberX. However, this varies significantly by market and by driver.
What's the difference between Uber Black and Uber Black SUV?
Uber Black uses luxury sedans (Mercedes S-Class, BMW 7 Series, Audi A8, Lincoln Continental, etc.) and accommodates up to 4 passengers. Uber Black SUV uses luxury SUVs (Cadillac Escalade, Lincoln Navigator, Mercedes GLS, Chevrolet Suburban, etc.) and accommodates up to 6 passengers. Black SUV commands higher fares than Black sedan but requires a more expensive vehicle. Both require commercial licensing and insurance.
Can I do Uber Black without a commercial license?
In most markets, no. Uber Black requires a TCP (Transportation Charter Permit), TLC license, or equivalent commercial/for-hire license depending on your state. A few markets have exceptions or alternative licensing paths, but the overwhelming majority of Uber Black markets require some form of commercial licensing. Check your local Uber Black requirements through the Uber driver app or Uber's official driver requirements page before investing in a vehicle.
Does Uber Comfort have surge pricing?
Yes. Uber Comfort is subject to the same dynamic pricing (surge) as UberX. When demand exceeds driver supply in a given area, surge multipliers apply to Comfort fares. Since Comfort's base fare is already higher than UberX, a surging Comfort ride can be significantly more profitable. However, surge events for Comfort may not always coincide with UberX surges because the rider pools are separate.
How do I check which Uber tiers I qualify for?
Open the Uber driver app and go to your account or vehicle settings. Your current eligible ride types are listed there. You can also visit Uber's eligible vehicles page and enter your vehicle details to see which tiers your car qualifies for. For Comfort specifically, you need 100+ trips and a 4.85+ rating in addition to an eligible vehicle. For Black, you'll need to complete a separate application through the Uber driver app.

Instacart Shopper Support: How to Contact Help, Resolve Issues, and Escalate
Need to reach Instacart shopper support right now?
Here is the fastest way:
- In-app support (fastest): Open the Shopper app, tap the headset icon, select your issue, and connect with an agent in under 2 minutes
- Phone: 1-888-246-7822 (general Instacart line -- shoppers should use the app instead)
- Email: help@instacart.com (for non-urgent issues)
- Support is available 24/7
This guide is written specifically for Instacart shoppers -- not customers. Below, you will find step-by-step instructions for reaching support through the Shopper app, which contact method to use for which problem, how to handle the most common shopper issues, and what to do when support does not resolve your case.
Quick Answer -- How to Contact Instacart Shopper Support
If you are an active Instacart shopper and need help, the in-app support system is your best option. It is faster than calling the general phone number, and it routes you directly to the shopper support team rather than the customer support team.
Here is a quick summary of every way to reach Instacart shopper support:
- In-app chat — Under 2 minutes | Active batch issues, pay questions, customer problems | 24/7
- In-app phone callback — 2-5 minutes | Account issues, deactivation concerns, complex problems | 24/7
- Phone (1-888-246-7822) — 5-15 minutes | When the app is not working or you cannot access your account | 24/7
- Email (help@instacart.com) — 12-48 hours | Non-urgent issues, documentation, paper trail | 24/7 submission
- Social media (@instacart on X) — Varies | Last resort when other channels fail | Business hours primarily
Important: The phone number 1-888-246-7822 is the general Instacart support line shared with customers. If you call it, you may be routed to the customer support team by default. For shopper-specific issues, always start with the Shopper app -- it connects you directly to agents trained to handle batch pay, account status, and shopping-related problems.
How to Access Support in the Instacart Shopper App
The Instacart Shopper app has a built-in support system that connects you to shopper-specific agents. The process is slightly different depending on whether you are actively shopping a batch or not.
To access support from the main screen:
- Open the Instacart Shopper app.
- Tap the headset icon in the top-right corner of the screen (on some app versions, this may appear as a question mark or Help option in the menu).
- Select the issue category that best matches your problem (pay, account, batch issue, etc.).
- Choose your preferred contact method: live chat or phone callback.
- You will be connected to a shopper support agent, typically within 1 to 2 minutes.
During an Active Batch
When you are in the middle of shopping or delivering a batch, the support flow changes to prioritize speed. Instacart knows that mid-batch problems need immediate resolution, so the app streamlines the process.
To reach support during an active batch:
- From the active batch screen, tap the headset icon or the ? icon in the upper corner.
- The app will show you issue options specific to your current batch: item problems, customer issues, store problems, delivery concerns.
- Select the issue, and the app will either guide you through a self-service resolution or connect you to a live agent immediately.
When to contact support during a batch:
- The customer's address is wrong or inaccessible
- The store is closed or does not have the order
- You cannot reach the customer for a required hand-off
- The app is showing incorrect batch information
- You feel unsafe completing the delivery
When to handle it yourself:
- An item is out of stock (use the app's replacement or refund flow)
- The customer wants a substitution (message them through the app)
- A line is long at the store (this is normal and does not require support)
The general rule: if you can resolve it through the app's built-in batch tools (replacements, customer messaging, delivery photo), do that first. Contact support when the app's self-service options do not cover your situation.
When You're Not on a Batch
When you are not actively shopping, you can still reach Instacart shopper support for account questions, earnings inquiries, and other non-urgent matters.
To reach support when idle:
- Open the Shopper app and tap the headset icon or navigate to Help from the menu.
- Browse the Help Center articles for your topic, or tap Contact Support to reach a live agent.
- You can submit a support ticket, request a phone callback, or start a live chat.
Scheduling a callback: If you do not want to wait on hold, the app lets you request a callback. Select your issue, choose Phone callback, and an agent will call you back -- typically within 5 to 15 minutes.
Submitting a ticket: For issues that do not require immediate attention, you can submit a written support ticket through the app. Include as much detail as possible -- batch numbers, dates, and amounts -- to speed up the resolution.
Instacart Shopper Support Contact Methods Compared
Not every support channel is equally effective for every problem. Here is a more detailed comparison to help you choose the right one.
- In-app chat (Under 2 min) — Best for quick questions, mid-batch issues, pay inquiries. Drawback: agents may give scripted responses; harder for complex issues.
- In-app phone callback (2-5 min) — Best for account problems, deactivation appeals, nuanced situations. Drawback: must have app access; callback times vary by demand.
- Phone (1-888-246-7822) (5-15 min) — Best when app is down or locked out of account. Drawback: may reach customer support first; longer hold times.
- Email (help@instacart.com) (12-48 hours) — Best for paper trail, documentation-heavy disputes, follow-ups. Drawback: slow; not suitable for urgent issues.
- Social media (@instacart on X) (Hours to days) — Best for escalation when other channels fail. Drawback: public; inconsistent response; not for sensitive account info.
Which Contact Method Is Fastest?
For most shopper issues, in-app chat is the fastest option. It consistently connects you to a live agent in under 2 minutes, and because you are accessing it through the Shopper app, you are automatically routed to the shopper support team rather than general customer support.
If your issue requires a phone conversation -- for example, you need to explain a complex pay dispute or appeal a deactivation -- use the in-app phone callback feature. It is faster than calling the general 1-888-246-7822 number because it skips the customer-vs-shopper routing and puts you directly in the shopper support queue.
The general phone number should be your backup for situations where you cannot use the app at all (app crash, locked account, phone issues).
Pro tip: Avoid contacting support during peak shopping hours (weekends, 10 AM to 2 PM, and 4 PM to 8 PM local time). Wait times increase when batch volume is highest and more shoppers are reaching out simultaneously.
Common Issues Shoppers Contact Support About
Knowing what to expect and what information to have ready before you contact support can cut your resolution time significantly. Here are the most common issues shoppers face and how to handle each one.
Pay Discrepancies and Missing Earnings
Pay disputes are one of the top reasons shoppers contact Instacart support. Common scenarios include:
- Batch pay not matching the amount shown when you accepted the offer
- Missing tips or tips that appeared and then disappeared
- Heavy pay adjustments not reflected in your earnings
- Peak boost or promotion pay not applied correctly
How to handle it:
- Open the Shopper app and go to Earnings.
- Select the specific batch in question.
- Review the breakdown: batch payment (Instacart pay) + tip + any boosts or promotions.
- Compare this to what you recall seeing when you accepted the batch.
- If there is a discrepancy, note the batch ID, the date and time, and the expected vs. actual amount.
- Contact support via in-app chat with this information ready.
What to know about tips: Instacart customers can modify their tip for up to 24 hours after delivery. A tip that disappears or shrinks within that window is likely a customer adjustment, not a system error. However, if your Instacart base pay (the non-tip portion) does not match what was shown at acceptance, that is a legitimate issue for support.
Track your Instacart earnings automatically with Gridwise -- so if you ever need to dispute a pay issue, you will have the receipts.
App Crashes and Technical Problems
The Instacart Shopper app is your lifeline during batches, so a crash or glitch can cost you time and money. Here is how to troubleshoot before contacting support:
- Force close the app completely. On iPhone, swipe up from the bottom and swipe the app away. On Android, open your recent apps and swipe it off the screen.
- Check for updates in the App Store or Google Play. Many crashes are caused by running an outdated version.
- Restart your phone if the force close did not help.
- Clear the app cache (Android only): Go to Settings, then Apps, then Instacart Shopper, then Storage, and tap Clear Cache.
- Reinstall the app as a last resort. Uninstall, then download it again from the store.
When to contact support vs. self-troubleshoot: If the steps above resolve the issue, you do not need to contact support. Contact support when:
- The app crashes repeatedly after reinstalling
- You lost progress on an active batch due to a crash
- Your earnings or batch history are showing incorrectly after a crash
- You received a rating penalty because the app malfunctioned during a delivery
Customer Not Available / Wrong Address
Arriving at a delivery address and finding no one home -- or discovering the address is wrong -- is frustrating, but there is a clear process:
- Attempt to contact the customer through the app. Use the in-app messaging and phone call features.
- If the customer does not respond, the app will start a timer (typically around 10 minutes). This timer documents your waiting period.
- While the timer runs, try contacting the customer again. Also contact support through the in-app headset icon to document the situation.
- When the timer expires, the app will give you instructions: leave the groceries in a safe location and take a photo, or return the items.
- You will still be paid for the batch. Instacart does not penalize shoppers for customer unavailability as long as you follow the in-app process.
For a wrong address: Do not deliver to a different address than what is shown in the app unless support explicitly confirms the change. Contact support immediately, explain the situation, and let them update the delivery address or cancel the order.
Store Issues (Out-of-Stock Items, Long Lines)
Out-of-stock items are the most common in-store issue shoppers face. The Shopper app has built-in tools for handling these:
- Replacements: When an item is unavailable, the app will suggest a replacement. Scan the replacement item, and the customer will be notified.
- Refunds: If no suitable replacement exists, you can refund the item. The customer will not be charged, and your batch pay is not affected.
- Customer messaging: If you are unsure about a replacement, message the customer through the app.
Account Deactivation or Warnings
Receiving a deactivation notice or account warning is stressful, but understanding the process helps you respond effectively.
Common reasons for deactivation or warnings:
- Low ratings (consistently below 4.7 stars)
- High cancellation rate (frequently dropping accepted batches)
- Customer fraud reports (customers claiming missing or damaged items)
- Policy violations
- Failed background check or identity verification
How to appeal:
- Check your email for the deactivation notice with the reason and instructions.
- Submit your appeal through the link in the email, or contact support at help@instacart.com.
- In your appeal, be specific: explain the circumstances and provide evidence.
- Instacart typically reviews appeals within 5 to 10 business days.
While waiting for the appeal: You will not be able to accept batches. Use this time to gather documentation. If you have been tracking your earnings with Gridwise, your independent records can serve as supplementary evidence.
How to Escalate an Instacart Support Issue
When your first support interaction does not resolve the problem, do not give up. There is an escalation path.
Step 1: Request a supervisor or specialist. During a chat or phone call, ask to be transferred to a supervisor. Be polite but direct.
Step 2: Follow up in writing. After any phone call, send an email to help@instacart.com summarizing the issue, what support told you, and what you are requesting.
Step 3: Use the Instacart Help Center website. Visit instacart.com/help and submit a formal complaint or ticket.
Step 4: Reach out on social media. Post to @instacart on X describing your issue -- keep it professional and factual.
Step 5: File a state labor board complaint. If your dispute involves unpaid wages, you can file a complaint with your state's Department of Labor.
Step 6: Connect with gig worker advocacy groups. Organizations like Gig Workers Rising provide resources for gig workers dealing with platform disputes.
Tips for Getting Faster, Better Support
- Be specific with details. Instead of my pay is wrong, say Batch #12345 on March 15 shows $12.50 but should include the $3.00 peak boost that was active in my zone at 11:30 AM.
- Screenshot everything during your batch. Take screenshots of the batch offer, any in-app issues, delivery confirmation screens, and customer messages.
- Stay calm and professional. Support agents can add notes to your account. Being rude does not speed up resolution.
- Follow up in writing after phone calls. Send a brief email to help@instacart.com confirming what was agreed.
- Contact support during off-peak hours. Weekday mornings before 10 AM and late evenings after 9 PM typically have the shortest wait times.
- Track your earnings independently. When you have your own records, pay disputes become simple.
Gridwise logs every Instacart batch and tip automatically so you can spot discrepancies before they become problems.
Instacart Shopper Support vs. Instacart Customer Support
One of the biggest sources of confusion -- and wasted time -- is contacting the wrong support team. Instacart maintains separate support operations for shoppers and customers, and they handle very different issues.
Key differences:
Shopper Support:
- Who it's for: Active Instacart shoppers
- Primary access: Shopper app (headset icon)
- Issues handled: Batch pay, account status, shopping problems, deactivation
- Phone number: In-app callback (recommended)
- Agent training: Trained on shopper-specific tools, pay structures, batch systems
Customer Support:
- Who it's for: People who order groceries through Instacart
- Primary access: Instacart customer app or website
- Issues handled: Order tracking, refunds, missing items, billing
- Phone number: 1-888-246-7822 (general line)
- Agent training: Trained on order management, refunds, customer billing
Why this matters: If you call 1-888-246-7822 and explain a batch pay issue, the customer support agent may not have the tools or training to help you. You will likely be transferred, adding unnecessary wait time.
The rule: Always start with the Shopper app for shopper issues. Only use the general phone number as a backup when you cannot access the app.
What Other Shoppers Say About Instacart Support
Common complaints from shoppers:
- Long wait times during peak hours, especially weekends
- Scripted responses that do not address the specific issue
- Pay disputes that take multiple contacts to resolve
- Inconsistent answers from different agents about the same issue
- Deactivation appeals that take weeks with little communication
What experienced shoppers say works:
- Persistence pays off. If the first agent cannot help, try again.
- Documentation is everything. Shoppers who keep screenshots and reference specific batch numbers consistently get faster resolutions.
- The in-app callback is underrated. It connects you to the right team faster than calling the general number.
- Escalation works. Asking for a supervisor or following up via email significantly increases the chance of resolution.
FAQ
What is the Instacart shopper support phone number?
The general Instacart phone number is 1-888-246-7822, but this line is shared with customers. As a shopper, your best option is to use the in-app support system: open the Shopper app, tap the headset icon, and request a phone callback.
Can I contact Instacart support when I'm not on a batch?
Yes. You can reach Instacart shopper support at any time. Open the Shopper app, tap the headset icon, and select your issue. You can also email help@instacart.com for non-urgent matters.
How long does it take to get a response from Instacart support?
In-app chat typically connects you in under 2 minutes. Phone callbacks through the app usually come within 2 to 5 minutes. The general phone line can take 5 to 15 minutes. Email responses typically take 12 to 48 hours.
What do I do if Instacart deactivates my account?
Check your email for the deactivation notice with the reason and appeal instructions. Submit your appeal through the link provided, or email help@instacart.com. Appeals are typically reviewed within 5 to 10 business days.
Can I dispute a low rating through support?
You can contact support to report a rating you believe is unfair, but Instacart does not remove ratings simply because a shopper disagrees. Ratings may be removed if there is evidence of fraud or if the low rating resulted from an issue outside your control.
Does Instacart have a physical office I can visit?
No. Instacart does not operate walk-in support offices for shoppers. All shopper support is handled remotely through the Shopper app, phone, and email.
Keep Your Instacart Earnings on Track
Gridwise tracks your Instacart earnings automatically, logs your mileage for tax deductions, and calculates your real hourly rate after expenses.
Download Gridwise for free and start tracking every Instacart batch today.
Read our complete breakdown of Instacart shopper earnings to see what shoppers actually make. Check out our guide to Instacart shopper requirements to know what you need to sign up. And see our analysis of whether Instacart is worth it in 2026.

Gig Driver Deactivation Appeal Guide: DoorDash, Uber, and Lyft (2026)
Getting deactivated from a gig platform is one of the most stressful things that can happen to you as a driver. One notification, and suddenly your income disappears. You are not alone -- thousands of drivers deal with this every month, and many of them get reactivated.
This guide walks you through exactly how to appeal a deactivation on DoorDash, Uber, and Lyft -- step by step, platform by platform. We cover why deactivations happen, how to build a strong appeal, what evidence to gather, and what to do while you wait for a decision.
Take a breath. Then let's get your account back.
Quick Answer -- Can You Appeal a Gig Platform Deactivation?
Yes. DoorDash, Uber, and Lyft all allow drivers to appeal a deactivation. Here is what you need to know right now:
- DoorDash: Appeals can now be submitted directly in the Dasher app (launched March 2026). You can also appeal via the online form. Most appeals are resolved within a few business days.
- Uber: Submit an appeal through the Uber Driver app or by responding to the deactivation email. If denied, visit a Greenlight Hub for in-person escalation.
- Lyft: Submit an appeal through the link in your deactivation email. Lyft allows only one appeal per deactivation, so make it count.
Whether your appeal succeeds depends on two things: the reason you were deactivated and the evidence you provide. Some deactivation types (fraud, serious safety incidents) are harder to overturn than others (rating drops, background check flags). But the appeal process exists for a reason -- platforms know that mistakes happen.
Keep reading for the full step-by-step process for each platform.
Common Reasons Gig Drivers Get Deactivated
Before you file your appeal, you need to understand exactly why you were deactivated. Each platform has different rules, different thresholds, and different enforcement approaches. Knowing the specific reason helps you build a stronger case.
DoorDash Deactivation Reasons
DoorDash deactivates Dashers for several categories of violations. The most common include:
- Completion rate below 80%. If you accept orders and then unassign them too frequently, your completion rate drops. DoorDash requires a minimum 80% completion rate. Learn more about how this metric works in our DoorDash completion rate guide.
- Customer rating below 4.2. Consistently low ratings from customers can trigger a deactivation review.
- Fraud or abuse. This includes things like marking deliveries as completed without actually delivering, using referral manipulation, or exploiting promotions.
- Failed background re-check. DoorDash runs periodic background checks. If a new offense appears on your record, your account may be deactivated.
- Contract violations. Repeated contract violations -- such as extremely late deliveries, confirmed missing items, or tampering with orders -- can lead to deactivation.
For a full breakdown of what DoorDash requires from drivers, see our DoorDash driver requirements guide.
Uber Deactivation Reasons
Uber deactivates drivers for the following common reasons:
- Rating below 4.6. Uber requires drivers to maintain a minimum rating, which varies slightly by city. In most markets, dropping below 4.6 puts your account at risk.
- Safety incidents. Reports from riders involving unsafe driving, intoxication, or threatening behavior are taken very seriously.
- Fraud. Artificially inflating fares, accepting trips with no intent to complete them, or manipulating GPS.
- Failed annual background check. Uber re-runs background checks annually. New violations can trigger deactivation.
- Excessive cancellations. A high cancellation rate, especially canceling after arriving at the pickup location, can lead to account review.
- Rider complaints. Multiple complaints about the same behavior pattern -- even if no single incident is severe -- can add up.
If you need help reaching Uber's support team during the appeal process, check out our full guide to Uber driver support.
Lyft Deactivation Reasons
Lyft deactivates drivers for reasons similar to Uber's, including:
- Rating below the market threshold. Lyft's minimum rating varies by city, but generally falling below 4.6 to 4.8 (depending on your market) can trigger a review.
- Safety reports. Passenger reports of unsafe driving, impairment, or inappropriate behavior.
- Background check issues. Just like DoorDash and Uber, Lyft runs periodic background checks and will deactivate drivers if new disqualifying offenses appear.
- Community guidelines violations. This is a broad category that covers everything from discrimination to vehicle condition complaints.
Deactivation vs. Temporary Suspension
There is an important distinction between deactivation and suspension, and understanding it will save you a lot of stress.
A temporary suspension means your account is on hold for a limited time. Common triggers include a background check in progress, a single rider complaint under investigation, or a documentation issue (expired license, insurance, or registration). Suspensions often resolve on their own once the issue clears. You may not need to appeal at all -- just wait and check your app regularly.
A deactivation means your account has been permanently removed from the platform. You can no longer go online, accept trips or deliveries, or earn on that platform unless your appeal is successful. Deactivations require you to take action.
If you are unsure whether you have been suspended or deactivated, check the email notification from the platform. It will specify which one it is. If you are still not sure, contact driver support directly.
How to Appeal a DoorDash Deactivation (Step by Step)
DoorDash has made significant improvements to its deactivation appeal process in 2026, including a new in-app appeal feature that launched in March. Here is exactly how to file your appeal.
Step 1: Check your email and the Dasher app for the deactivation notice. DoorDash sends a notification explaining the specific reason for your deactivation. Read it carefully. The reason cited in this notice is what your appeal needs to address directly.
Step 2: Launch the in-app appeal. As of March 2026, DoorDash now allows Dashers to submit appeals directly in the Dasher app. When you open the app after deactivation, you should see an appeal option in the notification. Tap it to start the process. If you do not see it, you can also submit your appeal through the online appeal form.
Step 3: Gather your evidence. Before writing your appeal, collect everything that supports your case. This might include delivery confirmation photos, screenshots of customer communications, GPS records, dashcam footage, or anything else that directly addresses the deactivation reason. We cover evidence gathering in detail below.
Step 4: Write your appeal clearly and factually. Address the specific reason cited in your deactivation notice. Present your evidence. Be honest -- if you made a legitimate mistake, acknowledge it and explain what you have done to prevent it from happening again. Keep your appeal concise: two to three paragraphs is ideal.
Step 5: Submit and monitor your status. After submitting, you can now track your appeal status in real time through the Dasher app. DoorDash has committed to providing clearer communication about the appeal process, including updates on where your case stands.
Timeline: Most DoorDash deactivation appeals are resolved within a few business days. Complex cases involving fraud investigations may take longer.
If you need help reaching DoorDash while your appeal is in progress, check out our DoorDash Dasher support guide for every way to contact them.
What DoorDash Deactivations Can Be Appealed?
Not all DoorDash deactivations are created equal when it comes to appeals:
- Contract violations, safety reports, and fraud allegations: Yes, these can be appealed. If you believe the allegation is incorrect or you have evidence that contradicts it, you have a strong basis for appeal.
- Low completion rate or low customer rating: It depends. If your metrics dropped below threshold due to app glitches, incorrect order assignments, or circumstances outside your control, you may have a case. If your metrics are genuinely low due to your own actions, the appeal is less likely to succeed.
- Low acceptance rate: This is not a deactivation trigger on DoorDash. Your acceptance rate does not affect your account standing, and you cannot be deactivated for declining orders.
How to Appeal an Uber Deactivation (Step by Step)
Uber's appeal process involves a combination of in-app communication and, if necessary, in-person escalation. Here is how to work through it.
Step 1: Check your email for the deactivation notice. Uber sends an email explaining why your account was deactivated. This email contains important information including the reason for deactivation and your appeal options.
Step 2: Fill out the appeal form. You can submit your appeal through the Uber Driver app (open the app, navigate to Help, and look for the appeal option) or by replying directly to the deactivation email with your written appeal and supporting evidence.
Step 3: Include all relevant evidence. Gather and attach everything that supports your case: dashcam footage, screenshots, photos, witness statements, police reports (if applicable), or anything else that addresses the specific deactivation reason.
Step 4: Submit the appeal. Make sure you have addressed every point raised in the deactivation notice before submitting. Double-check that all evidence files are properly attached.
Step 5: Wait for the initial review. Uber's appeal review typically takes two to three business days. You will receive an email with the outcome.
Step 6: If denied, visit a Greenlight Hub. This is where Uber's process differs from the other platforms. If your initial appeal is denied, you can visit a Greenlight Hub for an in-person or video discussion about your case. Greenlight Hub representatives can review your account in detail and sometimes overturn decisions that the remote team upheld. For help finding and scheduling a Greenlight Hub visit, see our Uber driver support guide.
Uber's Appeal Timeline
- Initial review: 2 to 3 business days after submission
- Greenlight Hub escalation: Same-day resolution if an appointment is available, though complex cases may require follow-up
- Final decision: Most cases are fully resolved within one to two weeks, including any escalations
How to Appeal a Lyft Deactivation (Step by Step)
Lyft's appeal process is more restrictive than DoorDash or Uber. The most important thing to understand upfront: Lyft typically allows only one appeal per deactivation. This means you need to get it right the first time.
Step 1: Check your email for the deactivation notice. Lyft sends an email explaining the deactivation reason and providing a link to the appeal form. Save this email -- you will need the appeal link.
Step 2: Submit the appeal form. Click the appeal link in your deactivation email to access the Lyft appeal form. Fill it out completely and carefully.
Step 3: Include supporting evidence. Attach any evidence that supports your case: dashcam recordings, photos, screenshots, police reports, or any documentation that directly addresses the reason for your deactivation.
Step 4: Wait for Lyft's review. Lyft will review your appeal and respond via email. Review times vary, but most drivers hear back within one to two weeks.
Lyft's One-Appeal Rule
This cannot be overstated: Lyft generally allows only one appeal per deactivation. If your appeal is denied, you typically cannot submit another one unless significant new evidence surfaces that was not available during the original appeal.
What this means for you:
- Do not rush your appeal. Take the time to gather all available evidence before submitting.
- Be thorough. Include everything that could help your case. You likely will not get a second chance.
- Be specific. Address the exact reason for deactivation with direct evidence.
- Proofread. A clear, professional, well-organized appeal demonstrates that you take the situation seriously.
If you are unsure whether your evidence is strong enough, consider waiting a day or two to gather more documentation before submitting. A slightly delayed appeal that is comprehensive is better than a rushed appeal that misses key evidence.
How to Write an Effective Deactivation Appeal
No matter which platform deactivated you, the principles of a strong appeal are the same. This section applies to DoorDash, Uber, and Lyft equally.
Be factual and calm. This is the single most important piece of advice. Your appeal is being read by a real person (or reviewed alongside AI-assisted analysis). Angry rants, threats, or emotional outbursts will not help your case. Stick to the facts.
Address the specific reason cited in the deactivation notice. Do not write a general "I'm a good driver" appeal. If you were deactivated for a low completion rate, explain why your completion rate dropped. If you were deactivated for a safety report, address that specific incident.
Present evidence that directly contradicts the allegation. If a customer claimed you never delivered their food but you have a delivery confirmation photo, include it. If you were accused of unsafe driving but have dashcam footage showing otherwise, attach it.
Acknowledge any legitimate mistakes but explain context. If you did make a mistake, owning it and explaining the circumstances is more effective than denying everything. Platforms want to see that you understand what went wrong and have taken steps to fix it.
State what you have done to prevent the issue from recurring. This shows the platform that reactivating you is a low-risk decision. Mention specific actions: purchased a dashcam, reviewed community guidelines, adjusted your approach to challenging deliveries.
Keep it concise. Two to three paragraphs is the sweet spot. Appeal reviewers handle a high volume of cases. A focused, well-organized appeal gets more attention than a five-page letter.
What Evidence to Gather Before Appealing
Start collecting evidence immediately after receiving your deactivation notice. The sooner you gather it, the better -- some data may become harder to access over time.
- Dashcam footage. If you use a dashcam (and you absolutely should -- more on that in the prevention section), pull the footage from the date and time of the incident cited in your deactivation notice.
- Delivery confirmation photos. Screenshots showing you completed the delivery, including any photos you took at the drop-off location.
- GPS data. Your location history can prove you were where you said you were. Both Google Maps and Apple Maps store timeline data.
- Customer communication screenshots. Any in-app messages between you and the customer related to the incident.
- Police reports. If your deactivation stems from an incident where law enforcement was involved, a police report adds significant credibility to your appeal.
- Completion rate and rating history. Screenshots of your metrics over time, showing that a low metric was an anomaly rather than a pattern.
- Character references. While less common, written statements from regular customers or other professional references can support your case, especially in safety-related deactivations.
Legal Resources for Deactivated Drivers
If your appeal is denied and you believe the deactivation was unjust, there are organizations and legal options available to you.
Independent Drivers Guild (IDG)
The Independent Drivers Guild provides free deactivation assistance and representation for gig drivers in New York and New Jersey. If you drive in those states, the IDG can:
- Review your deactivation case at no cost
- Help you draft or strengthen your appeal
- Advocate on your behalf directly with the platform
The IDG has successfully helped many drivers get reactivated, particularly in cases involving misidentification, false rider reports, or background check errors.
Seattle Deactivation Appeals Panel
Seattle has established the first municipal deactivation appeals panel in the United States. This panel provides rideshare drivers in Seattle with a government-administered process to challenge deactivations. If you drive in Seattle, this is an additional avenue beyond the platform's own appeal process.
The Seattle ordinance requires rideshare companies to provide drivers with written notice of deactivation, a reason for the deactivation, and information about the appeals panel. This law applies specifically to rideshare (Uber and Lyft), not delivery platforms.
When to Consult a Lawyer
Most deactivation appeals do not require a lawyer. But there are situations where legal representation may be appropriate:
- Discrimination. If you believe you were deactivated based on your race, religion, gender, national origin, or other protected characteristic.
- FCRA violations in background checks. The Fair Credit Reporting Act gives you specific rights regarding background checks. If you were deactivated due to inaccurate information on your background check, you may have a legal claim against the background check company.
- Breach of contract. If you can demonstrate that the platform violated its own deactivation policy or the terms of your independent contractor agreement.
Organizations like ConsumerAttorneys.com handle gig worker deactivation cases and can provide consultations. Many employment and consumer rights attorneys offer free initial consultations, so the first step of exploring legal options costs you nothing.
Important: This guide is not legal advice. If you believe your rights have been violated, consult with a qualified attorney in your jurisdiction.
How to Prevent Deactivation in the First Place
The best deactivation appeal is the one you never have to file. Here are practical steps to protect your account across all platforms.
Maintain high ratings. Communicate with customers when deliveries are running late. Be polite and professional on every trip. Deliver promptly and follow all delivery instructions. Small things -- like a quick text when you arrive -- go a long way toward keeping your ratings strong.
Keep your completion rate high. On DoorDash, your completion rate needs to stay above 80%. Avoid accepting orders you are unlikely to complete. If you need to unassign, do it strategically and infrequently.
Use a dashcam. A dashcam is the single best investment you can make to protect yourself against false claims. For rideshare drivers, a dual-facing dashcam (recording both the road and the interior) provides evidence against false safety and behavior reports. For delivery drivers, even a basic front-facing dashcam helps document your trips. If a rider or customer files a false report, your dashcam footage can be the difference between a successful appeal and a permanent deactivation.
Do not game the system. Fake GPS locations, delivery fraud, multi-apping during active orders (accepting a trip on one platform while actively completing a trip on another), and referral manipulation will eventually get caught. These behaviors result in deactivations that are extremely difficult to appeal.
Keep your documents current. Set calendar reminders for when your driver's license, vehicle registration, and insurance policy expire. Upload renewed documents to each platform well before the expiration date. Letting documents lapse is one of the most preventable causes of account issues.
Monitor your account metrics weekly. Check your ratings, completion rate, cancellation rate, and any warnings or notifications from the platform at least once a week. Catching a downward trend early gives you time to correct it before it reaches deactivation territory.
Track your ratings, completion rate, and earnings trends with Gridwise -- so you can spot deactivation risks before they become a problem.
What to Do While Your Appeal Is Pending
Waiting for an appeal decision is stressful, but there are productive steps you can take during this time.
Sign up for other gig platforms. If you were deactivated from DoorDash, apply to Uber Eats, Lyft, Grubhub, Instacart, or Amazon Flex. If you lost access to Uber or Lyft, explore delivery apps. Diversifying your income sources is smart practice even when all your accounts are active -- it is essential when one goes down. Check our guides to Uber driver requirements and DoorDash driver requirements to see what you need to get started on another platform.
Document everything related to your appeal. Save copies of your appeal submission, any responses from the platform, screenshots of your appeal status, and notes on every interaction with support. If your appeal is denied and you need to escalate (especially with Uber's Greenlight Hub option), having a complete record strengthens your case.
Do not create a new account. This is critical. Every major gig platform explicitly prohibits creating a second account after deactivation. If you create a new account using different information, you will be caught -- and the new account will be permanently banned with zero chance of appeal. It is not worth the risk.
Check your appeal status regularly but do not spam support. Check in once every day or two. Sending dozens of messages to support will not speed up the process and may work against you.
FAQ
Can I create a new account after deactivation?
No. DoorDash, Uber, and Lyft all prohibit creating new accounts after deactivation. If you are caught, the new account will be permanently banned and your chances of ever being reactivated on the original account drop to zero. The only path back is through the official appeal process.
How long does a deactivation appeal take?
It depends on the platform. DoorDash appeals are typically resolved within a few business days. Uber's initial review takes two to three business days, with Greenlight Hub escalation adding additional time. Lyft's review generally takes one to two weeks. Complex cases involving fraud or safety investigations may take longer on any platform.
Can I get deactivated for low acceptance rate on DoorDash?
No. DoorDash does not deactivate Dashers for having a low acceptance rate. You are free to decline any order without it affecting your account status. The metrics that matter for deactivation are your completion rate (minimum 80%) and your customer rating (minimum 4.2).
Will I get back-pay for the time I was deactivated?
Generally, no. Gig platforms classify drivers as independent contractors, and the deactivation appeal process does not include compensation for lost earnings during the review period. In rare cases involving provable platform errors or legal settlements, some form of compensation may be available, but this is the exception rather than the rule.
Can I appeal more than once?
On DoorDash and Uber, you may be able to submit additional information or escalate your case (Uber's Greenlight Hub is specifically designed for this). On Lyft, you typically get only one appeal per deactivation. Across all platforms, if you discover significant new evidence after your initial appeal, you can try to submit it -- but there is no guarantee it will be reviewed.
Is deactivation the same as being fired?
Legally, no. As an independent contractor, you are not an employee of DoorDash, Uber, or Lyft. Deactivation means the platform has terminated your access to their app and marketplace. While the practical effect is similar to losing a job -- you lose access to income -- the legal distinction matters for things like unemployment benefits (which are generally not available to deactivated gig workers, though some states have begun offering limited benefits).
Should I hire a lawyer for my appeal?
For most deactivation appeals, a lawyer is not necessary. The platform appeal processes are designed to be handled by drivers themselves. However, if you believe your deactivation involves discrimination, FCRA violations in a background check, or breach of contract, consulting with an attorney is worth considering. Many offer free initial consultations. See the legal resources section above for organizations that specifically help gig drivers.

Spark Driver Customer Service: Phone Number, Chat, and How to Get Help Fast
Note: This guide is published by Gridwise, an independent app for gig drivers and gig workers. Gridwise is not Spark, Walmart Spark, or the Spark Driver platform, and is not affiliated with, endorsed by, or sponsored by Spark or Walmart. Any references to Spark are for informational purposes only.
You need to reach Spark Driver customer service. Maybe a payment is wrong, your account is locked, or you are stuck mid-delivery with a problem that needs solving right now. Here is the number you are looking for.
Spark Driver customer service phone number: 1-855-743-0457
That line is available 7 days a week, from 5 AM to 11:59 PM CT. If your issue is related to sign-up, onboarding, or your background check, you need a different number: call Delivery Drivers, Inc. (DDI) at 1-800-933-4463 instead.
Now that you have the phone numbers, keep reading. Below is every way to contact Spark Driver support, ranked by speed, matched to specific issue types, and backed by tips that will save you time and frustration.
All Ways to Contact Spark Driver Support
Quick reminder: Gridwise is not Spark or Walmart Spark — we're an independent app that helps gig drivers track earnings, mileage, and opportunities across all the apps they drive for. The info below is shared to help Spark drivers reach Spark's official support team.
Spark offers multiple ways to get help. Each channel has different response times and works better for certain types of problems. Here is a complete breakdown.
Phone Support (1-855-743-0457)
Calling 1-855-743-0457 is the fastest way to reach a live person on the Spark Driver support team.
Hours: 5 AM to 11:59 PM CT, 7 days a week.
Typical wait time: 5 to 15 minutes. Calling early in the morning on weekdays tends to get you through faster.
Best for:
Phone agents can access your delivery history, review payment records, and escalate issues while you are on the line. If your problem is time-sensitive, this is the channel to use.
In-App Chat
The Spark Driver app includes a built-in support chat feature.
How to access it:
Availability: The support bot is available 24/7. Live agents are available during standard business hours, though exact hours can vary.
Typical response time: Immediate for the bot. 5 to 20 minutes for a live agent during business hours.
Best for:
The in-app chat is especially useful when you are on the road. You can start a conversation, handle your delivery, and check back for a response without losing your place in the queue.
Email (sparksupport@custhelp.com)
For non-urgent issues, you can email Spark Driver support at sparksupport@custhelp.com.
Typical response time: 24 to 72 hours.
Best for:
When emailing, include your full name, the email address associated with your Spark Driver account, your driver ID, and any relevant order numbers or screenshots. The more detail you provide upfront, the less back-and-forth you will deal with.
Social Media
Spark Driver maintains an official presence on Twitter/X at @SparkDriverApp.
Typical response time: A few hours to a full day, depending on volume.
Best for:
Social media is not the first channel you should try, but it can be surprisingly effective when other channels have failed. Public posts tend to get faster responses than private messages because companies prioritize visible complaints.
Spark Driver FAQ / Help Center
Spark maintains an official FAQ and help center at sparkdriverapp.com/en_us/faqs.html.
Availability: 24/7 (self-service).
Best for:
The FAQ covers common topics like payment schedules, order types, and account settings. For straightforward questions, it is often the fastest path to an answer because there is no wait time at all.
Spark Driver vs. Delivery Drivers Inc. (DDI) -- Who to Contact
This is one of the most common sources of confusion for Spark drivers, and getting it wrong will waste your time.
Spark Driver and Delivery Drivers, Inc. (DDI) are two separate organizations. Spark is the Walmart-owned delivery platform. DDI is the third-party company that handles driver onboarding, background checks, and contractor agreements. When you signed up to drive for Spark, you actually went through DDI's enrollment process.
Here is how to know which one to contact:
Contact Spark Driver support (1-855-743-0457) for:
Contact DDI (1-800-933-4463) for:
The common mistake: Drivers call Spark support about a background check delay, and Spark tells them they cannot help. Or they call DDI about a missing payment, and DDI redirects them to Spark. Knowing which organization handles which issue will save you a phone call and a significant amount of hold time.
If you are unsure, here is a simple rule: if you have not completed your first delivery yet, contact DDI. If you are already delivering, contact Spark.
Which Contact Method Is Fastest? (Ranked)
Not all support channels are created equal. Here is how they stack up in terms of speed and effectiveness:
Before you contact support through any channel, have these ready:
Providing this information upfront can cut your resolution time in half. Vague messages like "my pay is wrong" will get a vague response. Specific messages like "Order #12345 on March 20 shows $8.50 but should include the $3 tip that the customer confirmed" get resolved fast.
Common Spark Driver Issues and How to Resolve Them
These are the five issues that Spark drivers contact support about most frequently. Here is what to do for each one.
Payment Not Received or Wrong Amount
You completed a delivery and the payment is missing, short, or does not include a tip you were promised.
Steps to resolve:
Having an independent record of your deliveries makes payment disputes much easier to win.
Track your Spark Driver earnings automatically with Gridwise -- see your pay per hour, per mile, and compare it to other gig platforms.
Account Deactivated or Suspended
Your account has been deactivated and you cannot log in or receive orders.
Steps to resolve:
Deactivation appeals can take time. Be persistent but professional. For a detailed walkthrough of the appeals process, see our gig driver deactivation appeal guide.
App Not Showing Orders
You are online and ready to deliver but the app is not sending you any offers.
Steps to resolve:
Order availability depends on your zone, time of day, and driver metrics. If you are new to Spark, there may be a ramp-up period before you start receiving consistent offers. Check whether Spark is worth it in your area by comparing typical earnings data.
Order Issues During Delivery
You are in the middle of a delivery and something has gone wrong -- wrong address, missing items, or the customer is not available.
Steps to resolve:
The key with mid-delivery issues is to document everything in real time. Take photos, note timestamps, and use the in-app tools. This protects you if there is a dispute later.
Background Check Delays
You applied to drive for Spark and your background check is taking longer than expected.
Steps to resolve:
Having payment issues? Gridwise logs your deliveries independently so you always have a record to reference when contacting support.
Tips for Getting Faster Help from Spark Support
After talking to hundreds of gig drivers about their support experiences, these are the strategies that consistently lead to faster resolutions.
Call during off-peak hours. Early morning weekday calls (between 5 AM and 8 AM CT) typically have the shortest wait times. Avoid calling during the lunch rush or on weekends when both delivery volume and support call volume spike.
Have your information ready before you call. Your driver ID, the specific order number, dates, times, and screenshots. Support agents can help you faster when they do not have to ask for basic details.
Be specific about the problem. "My pay is wrong" gives the agent nothing to work with. "Order #12345 delivered on March 20 at 2:15 PM shows $8.50 but the offer was $12 with a $3 tip that has not appeared after 48 hours" gives them everything they need.
Use in-app chat for mid-delivery problems. When you are on the road and cannot make a phone call, the in-app chat is faster and does not require you to pull over.
Escalate through social media when other channels fail. If you have called, emailed, and chatted without resolution, posting publicly on X (@SparkDriverApp) with a polite but specific description of the unresolved issue can accelerate the process.
Document everything. Every time you contact support, write down the date, time, the name of the agent (if given), and what they told you. Take screenshots of chat conversations. This record is invaluable if you need to escalate or if the same issue comes back.
Track your Spark Driver earnings automatically with Gridwise -- see your real pay per hour, per mile, and across every gig platform you drive for.
Spark Driver Support Hours and Availability
Here is a quick reference for when each support channel is available:
If you need help outside of Spark's phone support hours (before 5 AM or after 11:59 PM CT), the in-app support bot and the FAQ/Help Center are your only immediate options. For true emergencies during those hours, document the issue thoroughly and call first thing in the morning.
FAQ
What is the Spark Driver customer service phone number?
The Spark Driver customer service phone number is 1-855-743-0457. It is available 7 days a week, from 5 AM to 11:59 PM CT. For sign-up and onboarding issues, call Delivery Drivers, Inc. (DDI) at 1-800-933-4463 instead.
Is Spark Driver support available 24/7?
Phone support is not available 24/7. The Spark Driver phone line (1-855-743-0457) operates from 5 AM to 11:59 PM CT, 7 days a week. The in-app support bot is available 24/7, but live agents are only available during business hours.
How do I talk to a real person at Spark Driver?
The fastest way to talk to a real person is to call 1-855-743-0457 during operating hours (5 AM to 11:59 PM CT). You can also reach a live agent through the in-app chat by tapping Help and then CHAT NOW during business hours. The support bot may handle your initial interaction before connecting you with a person.
What is Delivery Drivers, Inc. (DDI)?
DDI is the third-party company that manages onboarding, background checks, and contractor agreements for Spark drivers. If your issue is related to signing up, your background check, tax documents, or your initial application, you need to contact DDI at 1-800-933-4463 rather than Spark Driver support.
How do I check my Spark Driver account status?
Open the Spark Driver app and check your profile and notifications for any alerts or messages about your account status. If you cannot log in, contact Spark support at 1-855-743-0457 for performance-related issues or DDI at 1-800-933-4463 for onboarding-related issues.
How do I report a problem with an order?
During an active delivery, tap Help on the delivery screen and use CHAT NOW for real-time assistance. After a delivery is complete, go to your delivery history in the Spark Driver app, tap the specific order, and select the option to report an issue. For payment discrepancies, call 1-855-743-0457 with the order number and details.
Can I reapply for Spark Driver after deactivation?
It depends on the reason for deactivation. If your deactivation was related to onboarding (background check, document issues), contact DDI at 1-800-933-4463 to ask about reapplication. If it was performance-based, contact Spark support at 1-855-743-0457 to understand the appeals process. Some deactivations are permanent, while others allow reapplication after a waiting period. See our deactivation appeal guide for a detailed walkthrough.
Track your Spark Driver earnings automatically with Gridwise -- see your real pay per hour, per mile, and across every gig platform you drive for.
Gridwise is an independent app for gig drivers and gig workers. Gridwise is not Spark, Walmart Spark, or the Spark Driver platform, and is not affiliated with, endorsed by, or sponsored by Spark or Walmart. Any references to Spark are for informational purposes only. All trademarks and brand names belong to their respective owners.
Work smarter. Earn more.
Whether you drive, deliver, or pick up shifts — Gridwise helps you track earnings, mileage, and performance so you stay in control of your work. Download the app and take charge today.
